Hello, dears! I’m going to crochet more of these crochet doilies because I urgently need them. I followed the free pattern you can find below and they are done in 15 minutes!
¡Hola a todas! Haré más de estos tapetes de ganchillo porque los necesito, siguiendo el patrón que os pongo a continuación. ¡Y se hacen en 15 minutos!

Mi marido y yo solemos preparar confituras y chutneys caseros. El proceso es lento y laborioso pero disfrutamos haciéndolo. A veces nuestra hija se une a nosotros y entonces termina siendo una actividad familiar divertida y realmente gratificante para todos.
My husband and I usually cook homemade jams and chutneys. It’s always a slow and laborious process, I know it, but we enjoy doing it, and when our daughter joins us it becomes a really cheerful and rewarding family activity.

Terminamos acumulando una cantidad considerable de tarros de cristal con confituras y chutneys de diferentes sabores en nuestra despensa y una parte importante de ellos terminan también en las despensas de nuestros amigos :o)
There are a lot of mason jars with jams and chutneys of different flavors in our pantry and a considerable part of them also end up in the pantries of our friends :o)

Y éste es el caso. Necesitaba un tapete pequeño, coqueto y rápido de hacer para cubrir la tapa de los envases que queremos regalar.
And this is the case: I need a small doily, charming and quick to crochet, to cover the tops of the mason jars we wish to give away.

Voy a hacer el mismo motivo de ganchillo, cambiando únicamente el color en la segunda vuelta, dependiendo del color del ingrediente principal que va en cada tarro de cristal.
I’m going to crochet the same doily motif to all the tops, only changing the color of the second round, depending on the color of the main ingredient that goes into each mason jar.

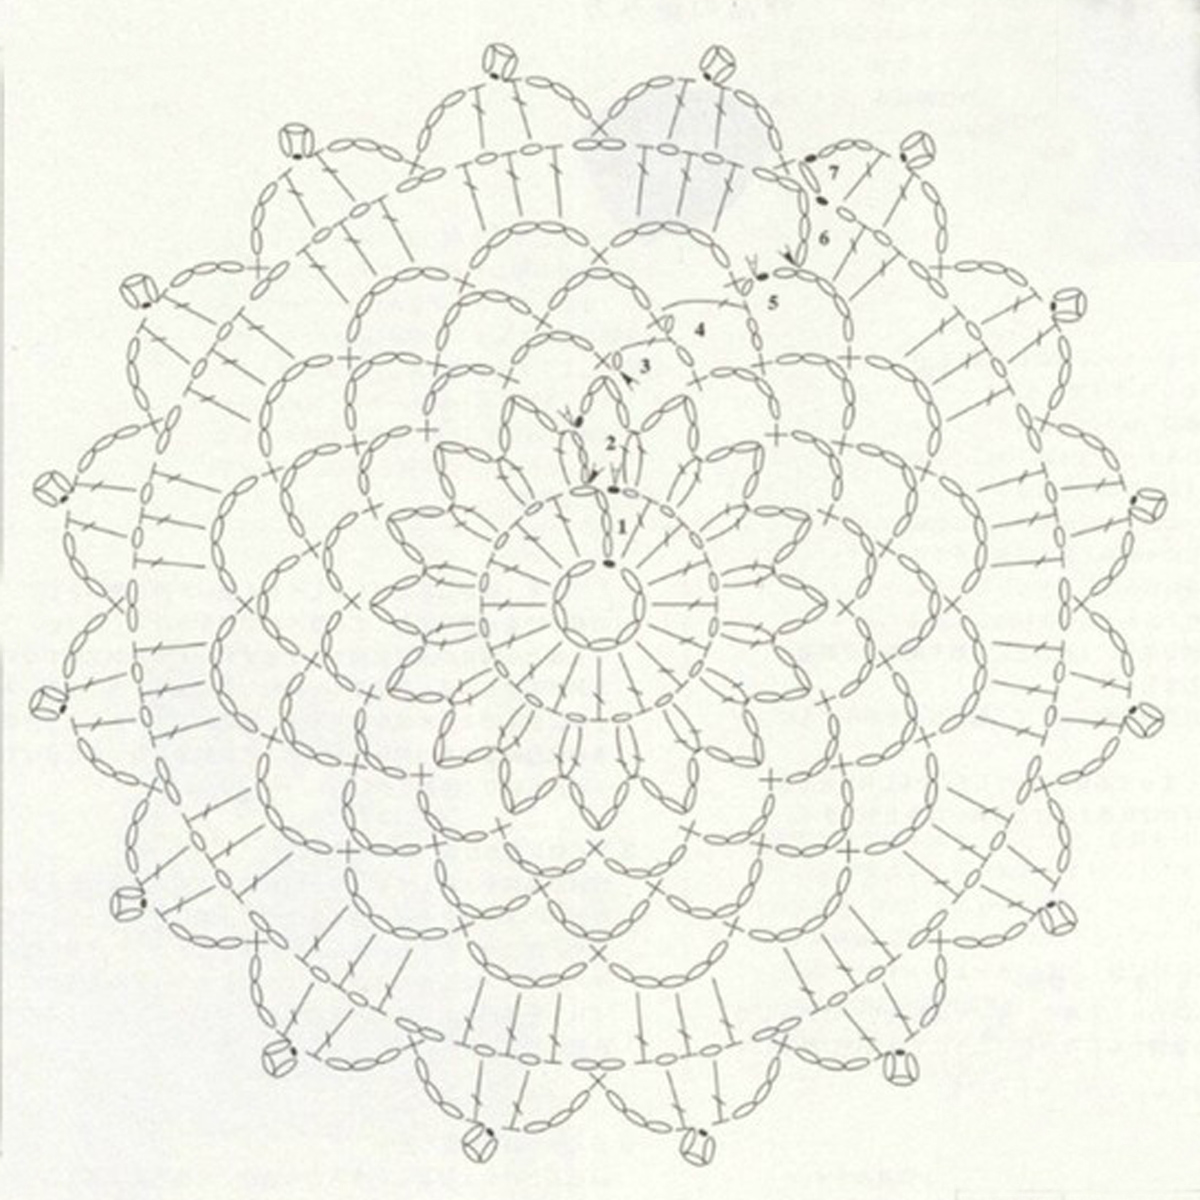
Elegí el patrón que encontré AQUÍ que veis a continuación. Pero, como siempre, hice varias modificaciones para adaptarlo a mis necesidades que también os explico.
I’ve chosen a pattern I found for free HERE and which you can also see below. But, as always, I’ve made some modifications to suit it to my needs that it’s also explained.
 |
| Source |
Eliminé las dos últimas vueltas del gráfico y añadí las siguientes tres vueltas en hilo de color verde.
Vuelta 1: Coger hebra pasando la aguja por debajo de cualquier arco de cads de la vta anterior, hacer 1 cad + 1 pb; hacer 5 cads + 1 pb en el mismo arco de cads. *Hacer 5 cads; en el siguiente arco de cads, hacer: 1 pb + 5 cads + 1 pb*; repetir ** hasta el final de la vta. Hacer 5 cads y cerrar la vta haciendo 1 pe en el primer pb de la vta.
Vuelta 2: Hacer 1 pe para situarnos dentro del primer arco de cads de la vta anterior. Hacer 2 cads (cuentan como el primer pa del primer 3-pa-tog de la vta), completar este primer 3-pa-tog. Hacer 3 cads, hacer 1 pb en el siguiente arco de cads y hacer 3 cads. *Hacer un 3-pa-tog en el siguiente arco de cads; hacer 3 cads + 1 pb en el siguiente arco de cads y hacer 3 cads*; rep ** hasta el final de la vta. Unir al primer 3-pa-tog de esta vta con 1 pe.
Vuelta 3: Hacer 1 cads + 1 pb + 3 cads + 1 pb en el primer 3-pa-tog de la vta anterior; hacer 5 cads. *Hacer 1 pb + 3 cads + 1 pb en el siguiente 3-pa-tog; hacer 5 cads*; rep ** hasta el final de la vta. Unir al primer punto de la vta con 1 pe. Cortar el hilo y rematar.

I’ve removed the last two rounds of the graphic and added the following three ones in green.
Round 1: Insert the hook under any arc of chains to take a loop, ch 1 and make 1 sc; ch 5 + make 1 sc in the same arc of chs. *Ch 5; in the next arc of chs, make: 1 sc + ch 5 + 1 sc*; repeat ** until the end of the rnd. Ch 5 and make 1 sl.st in the first sc of the rnd to close it.
Round 2: Make 1 sl.st to begin this rnd in the first arc of chs of previous rnd. Ch 2 (counted as first dc in the first 3-dc-tog), end this first 3-dc-tog. Ch 3, make 1 sc in the next arc of chs and ch 3. *Make one 3-dc-tog in the next arc of chs; ch 3 + 1 sc in the next arc of chs and ch 3*; repeat ** until the end of the rnd. Join to the first st of the rnd with 1 sl.st.
Round 3: Ch 1 + 1 sc + ch 3 + 1 sc in the first 3-dc-tog of previous rnd; ch 5. *Make 1 sc + ch 3 + 1 sc in the next 3-dc-tog; ch 5*; repeat ** until the end of the rnd. Join to the first stitch of this rnd with 1 sl.st. Fasten off.

… y ahora ¡manos a la obra! porque tengo que hacer bastantes tapetitos. Espero que os hayáis disfrutado de este post y también os sean útiles el patrón y las explicaciones.
… and hands to work now! because I need crochet a lot of these doilies. I hope you’ve found this pattern useful for you and have also enjoyed this post.
h h H h h h h h h hH h h h h h h h
This is the last and extraordinarily creative headdress created by the “Hierbalimón” designer. Chely García-Talavera surprises us again by integrating diverse materials and techniques in this exquisite headdress that includes a crochet item I’d made for her some time ago. She has certainly achieved to make one of the most innovative and chic headdress I’ve ever seen. I recommend you do not miss her exquisite creations she always publishes HERE.
 |
| Source |