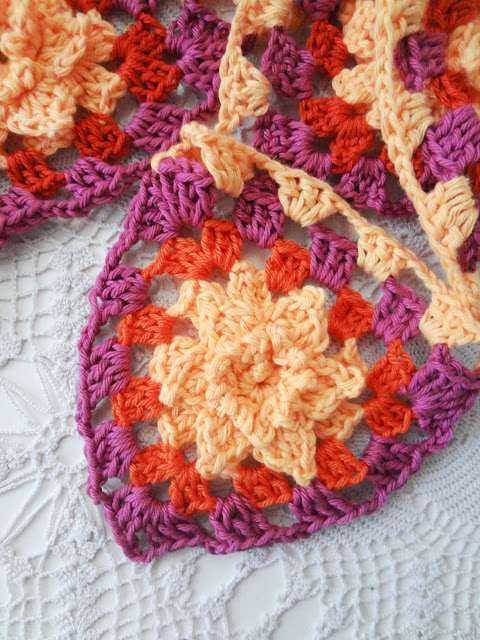
This week will be revolving around granny triangles, and they too can be quite interesting. The most popular projects made with granny triangles are certainly buntings, so here is a pattern for a lovely, colorful one. I believe the flower at the center adds up volumes to its beauty and makes a great difference in comparison with traditional granny triangles.
Yarn and hook: less than 30 gr for all 3 colors. Sport yarn of your choice and a 3 mm hook (UK 11/ US D). Left over yarn is perfect for this project. Mind that you can use whatever yarn size/weight (and relevant hook for that weight) you have at hand; that will only influence the size of your granny triangle – hence smaller weights of yarn will yield smaller grannies, heavier weights will produce big/large grannies.
Other: Tapestry needle for weaving ends.
Stitches in American terminology: chain (ch), chain space (ch-sp), stitch (st.), slip stitch (sl st), single crochet (sc), half double crochet (hdc), double crochet (dc), 3-chain picot.
Triangle: 13 cm across at the widest point and x 13 cm down center/5.11”
Flower Pattern foundation and round 1: with color 1, ch6 and join to make a ring. Ch3 and sc1 in ring. Repeat this pattern 5 times. There are 6 ch-spaces in ring.
Round 2: sl st in 1stch-sp, ch3 and make a picot. (How to make a picot: ch3 and sl st in 1st stitch of that chain). Ch3 and make another picot in same ch-sp. Repeat this pattern (2 picots in a ch-sp) for all ch-spaces. There will be 12 picots in this round. Sl st into 1st ch-sp to end round.
Round 3: Ch2 and sl st this chain behind the first picot-filled ch-sp (between the first and the second ch-spaces). Ch2 and sl st (from the behind) between the next two ch-spaces. Repeat this chaining pattern around. There are 6 ch-spaces in this round. Sl st into 1st ch-sp.
Round 4: In ch-sp, ch1 (counts as the first sc), hdc1, dc1, 3-ch picot, dc1, hdc1, sc1. Sl st into next ch-sp and repeat this pattern for all ch-spaces. There are 6 petals made in this round.
Round 5: Ch3 and sl st this chain behind the first picot-filled ch-sp (between the first and the second ch-spaces). Ch3 and sl st(from the behind) between the next two ch-spaces. Repeat this chaining pattern around. There are 6 ch-spaces in this round. Sl st into 1stch-sp.
Round 6: (in this round we are going to start working the granny stripe pattern) Ch3 (counts as the first dc), dc2, ch3, dc3 (this is the corner pattern). Next, ch3 and dc3 in next ch-sp. Ch3 and in the next ch-sp work the corner pattern (dc3, ch3,dc3). From here, repeat this pattern once, ch3, dc3 in last ch-sp, ch3 and sl st with the 1st st to end round. After this round, the triangle is made.
Round 7: With triangle’s both corners placed up, insert color 2 in chain space of the upper right corner and ch3 (counts as the 1st dc), dc2, ch3 and dc3. The corner pattern is the same as before. Next, ch3, dc3 in next ch-sp, ch3 and dc3 in next ch-sp, ch3 and work the corner pattern (dc3, ch3,dc3). Repeat this pattern twice. After you make the last chain 3, sl st it with the 1st st (corner) to end round.
Round 8: With triangle’s both corners placed up, insert color 3 in chain space of the upper right corner and ch3 (counts as the 1st dc), dc2, ch3 and dc3. The corner pattern is the same as before. Next, ch3, dc3 in next ch-sp, and repeat this two times, ch3 and work the corner pattern (dc3, ch3,dc3). Repeat the whole pattern twice. After you make the last chain 3, sl st it with the 1st st (corner) to end round.
Make as many triangles you want for your bunting / other project.
For the bunting in this tutorial I made 5 triangles. Here’s how to join them.
Bunting edge pattern: In color 1, ch7 (you can chain more if you want a bigger loop) and join to make a ring. If you want a more polished look for the loop, inside it, single crochet as many stitches as you made it with. Take a triangle and with the triangle’s face up, dc3 in upper right corner, ch3 and dc3 in next ch-sp. Repeat this pattern: ch3, dc3 in next ch-sp until you come to the other corner. In that corner dc2 and then take another triangle and dc2 in that triangle’s upper right corner. Continue working this joining / edging pattern until you have all triangles joined together. Dc3 in the last upper left corner of the last triangle and ch7 (or whatever stitch number you made for your loop) to make the loop. After this, work the tails. Block the triangles for a more polished look and the bunting is ready to be hanged!