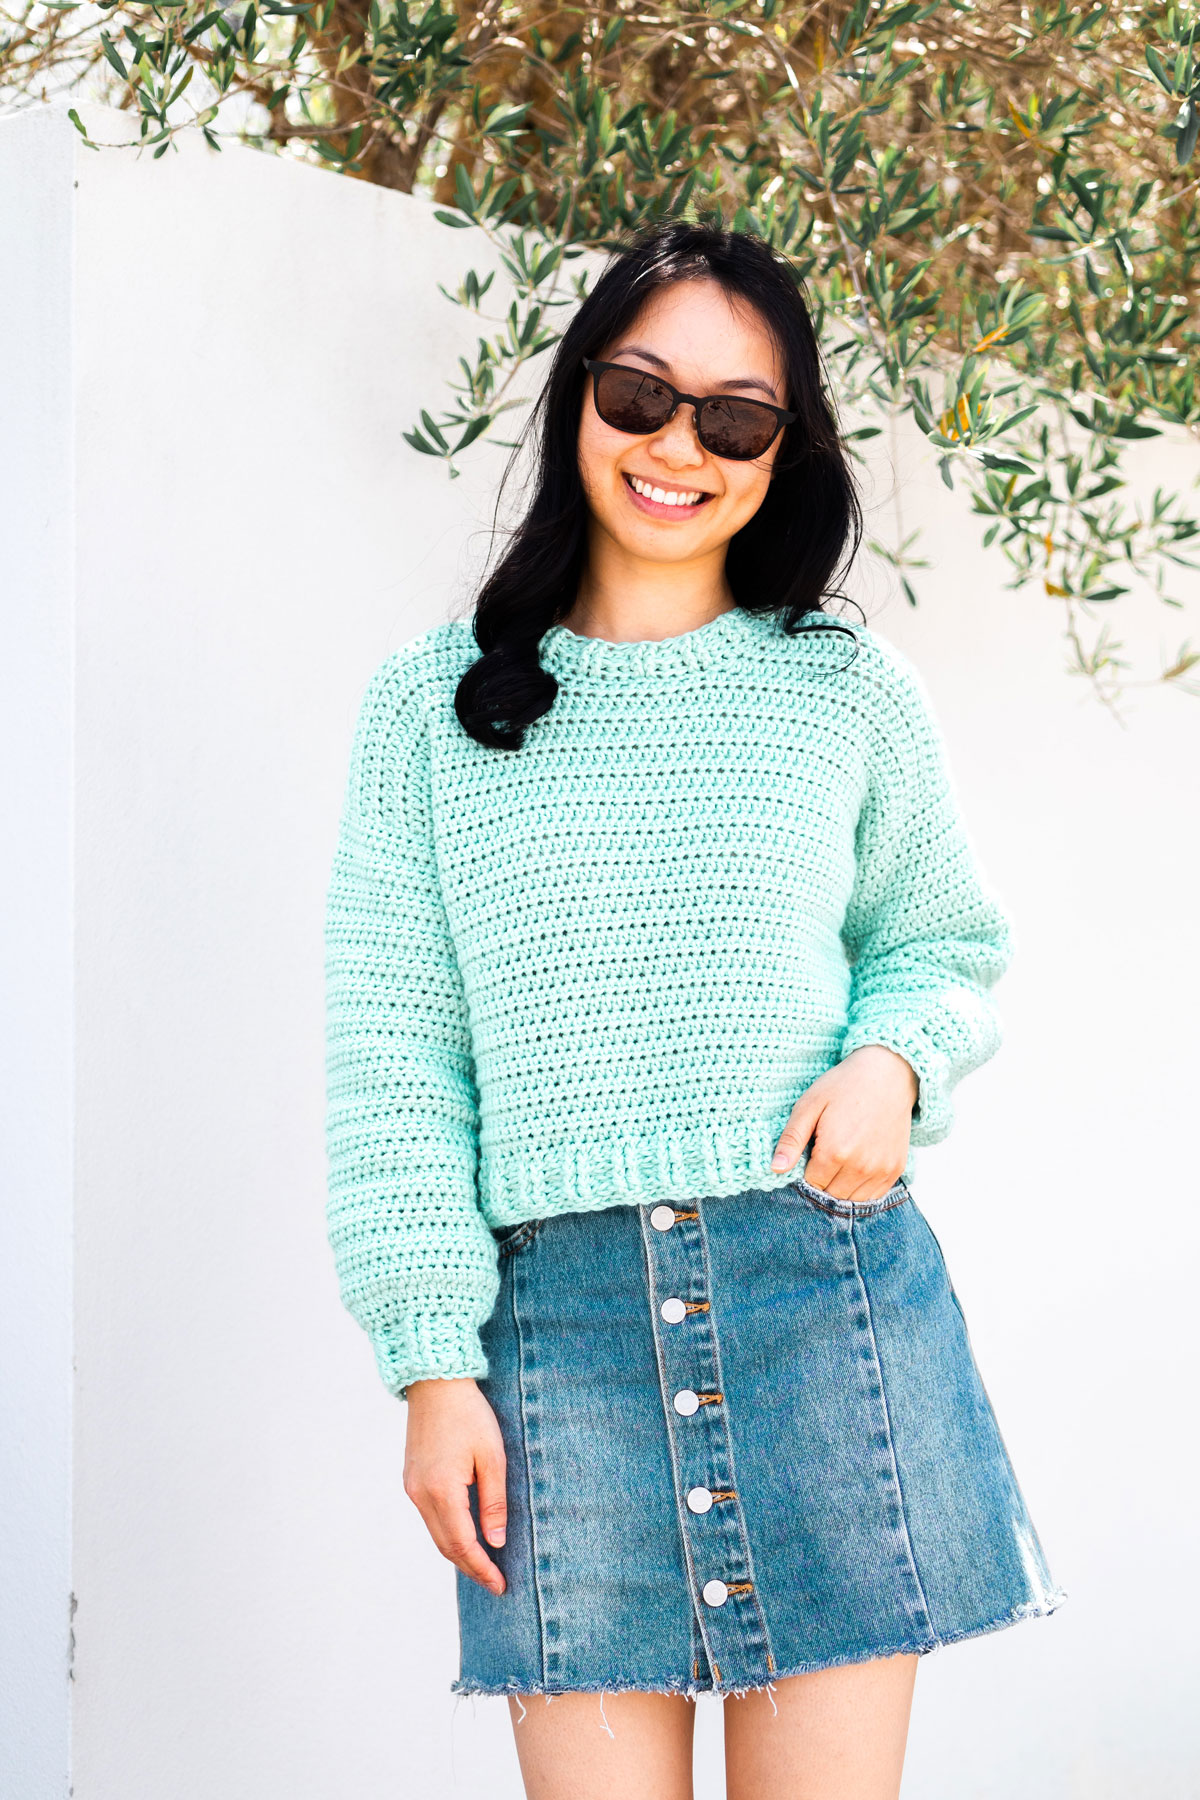
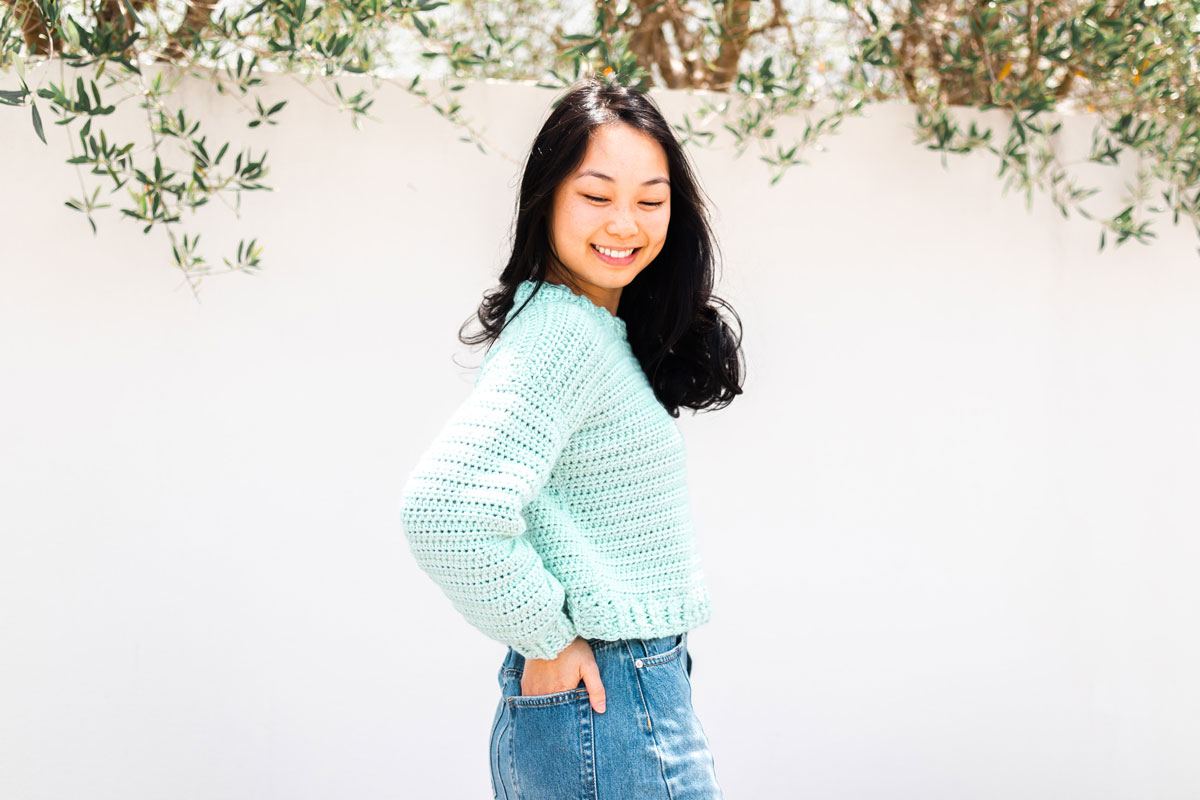
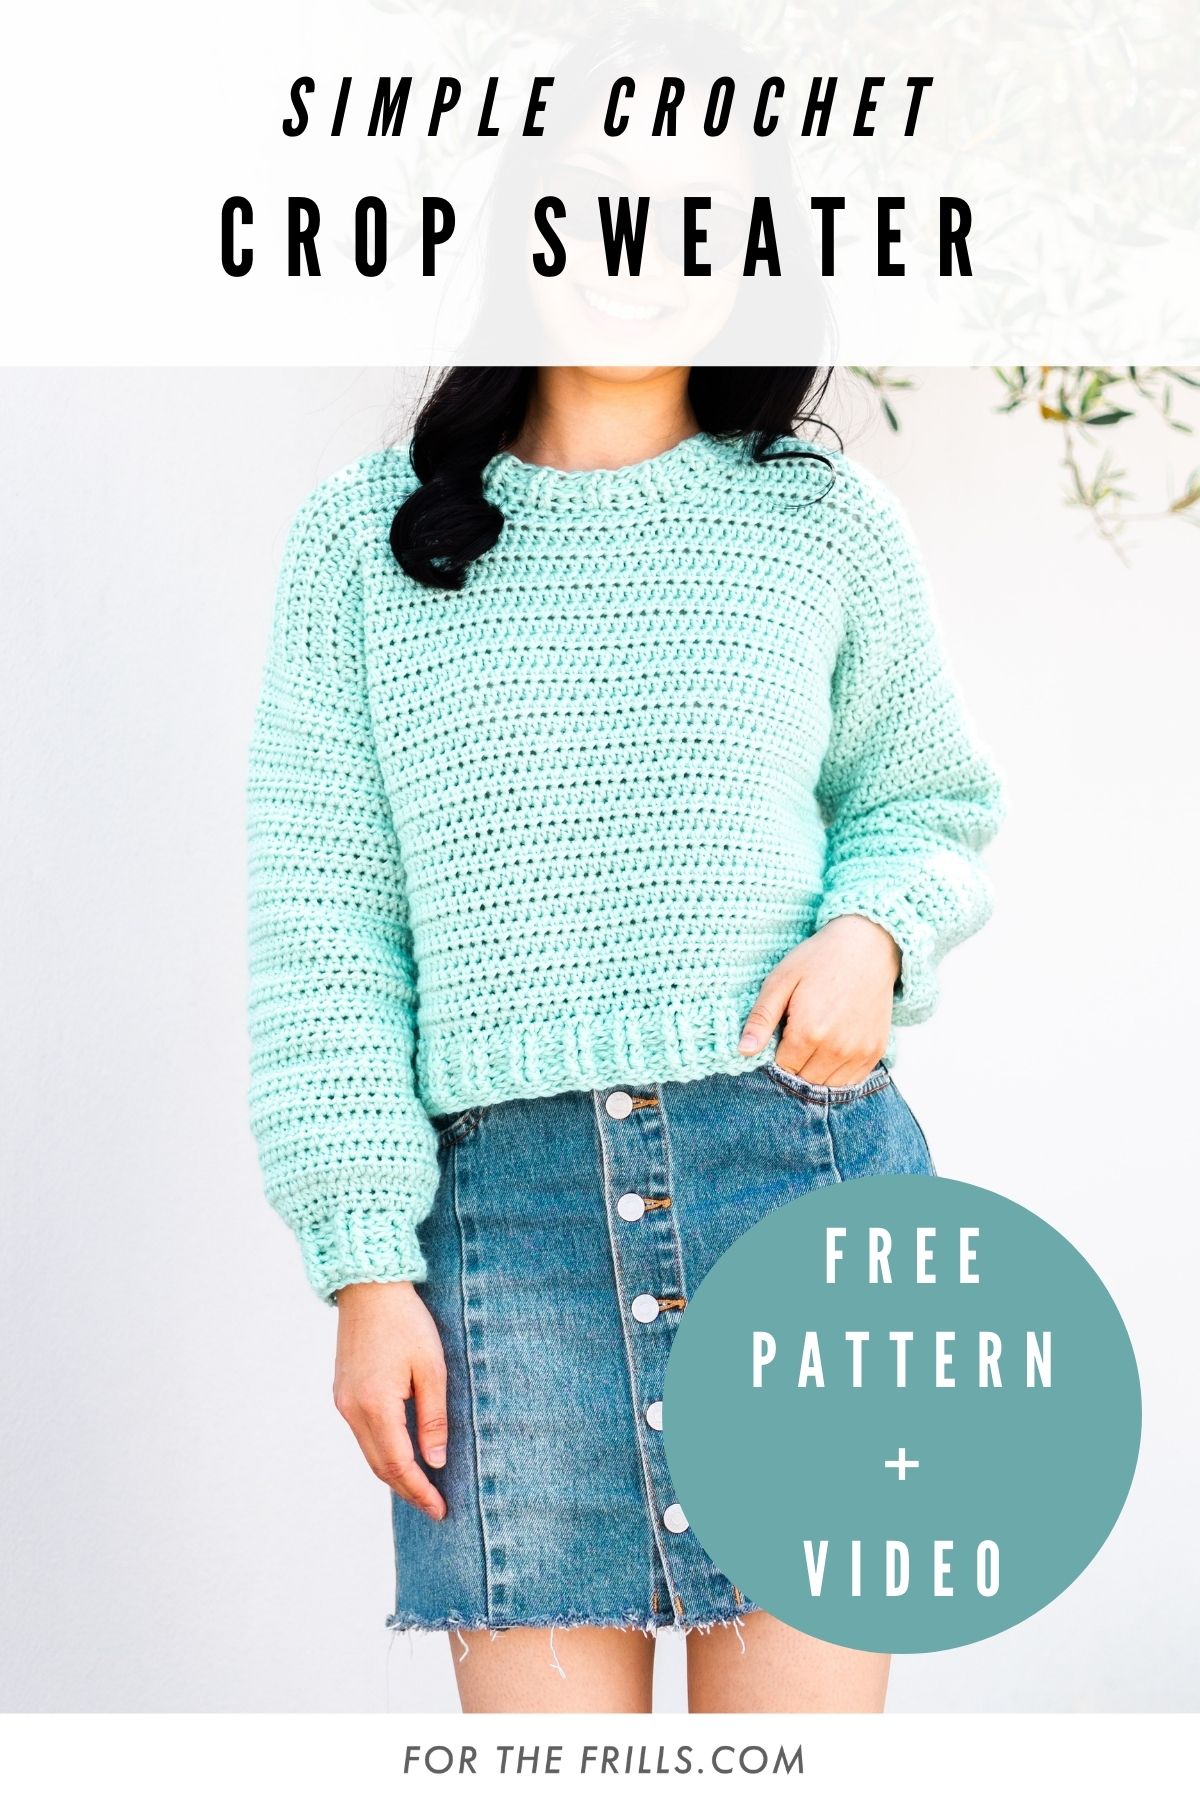
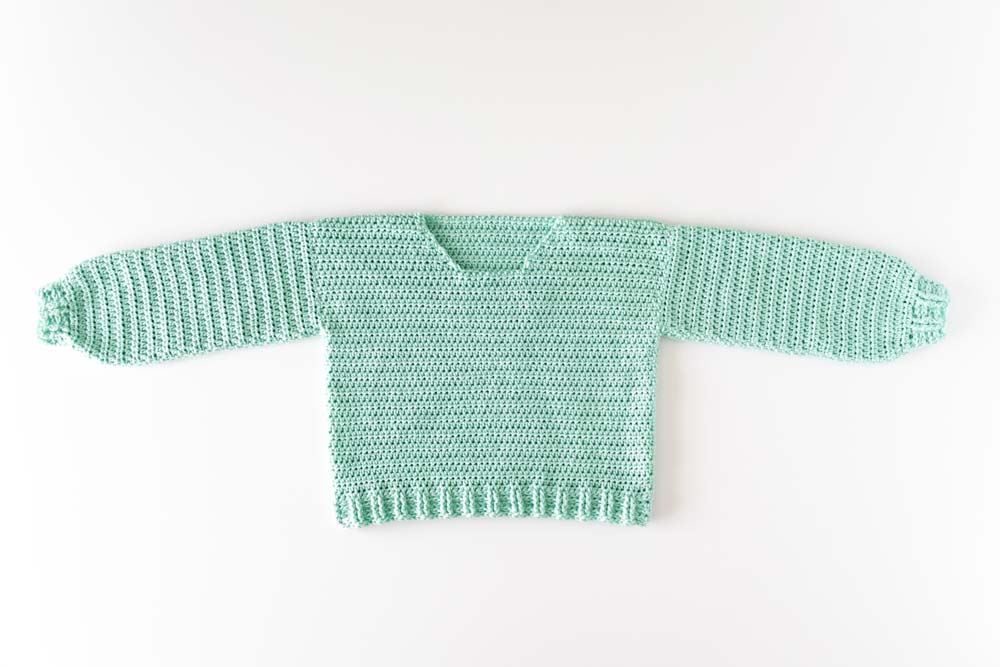
Looking to crochet your first crochet garment? Learn how to crochet a sweater with the Someday Sweater pattern. This simple crochet pullover features a comfy, boxy fit, slight balloon sleeves and an adjustable length!
This free crochet sweater pattern is accompanied by a video tutorial.
This post may contain affiliate links, view our disclosure policy for details.
Thank you to WeCrochet for providing the yarn for this free crochet tank top pattern! As always all thoughts and opinions are 100% my own ?
Have you ever thought that one day you’d like to crochet a sweater? Or maybe crocheting a garment seemed a bit daunting? Well, if you’re looking for your first crochet garment project the Someday Sweater is a great beginner-friendly sweater pattern!
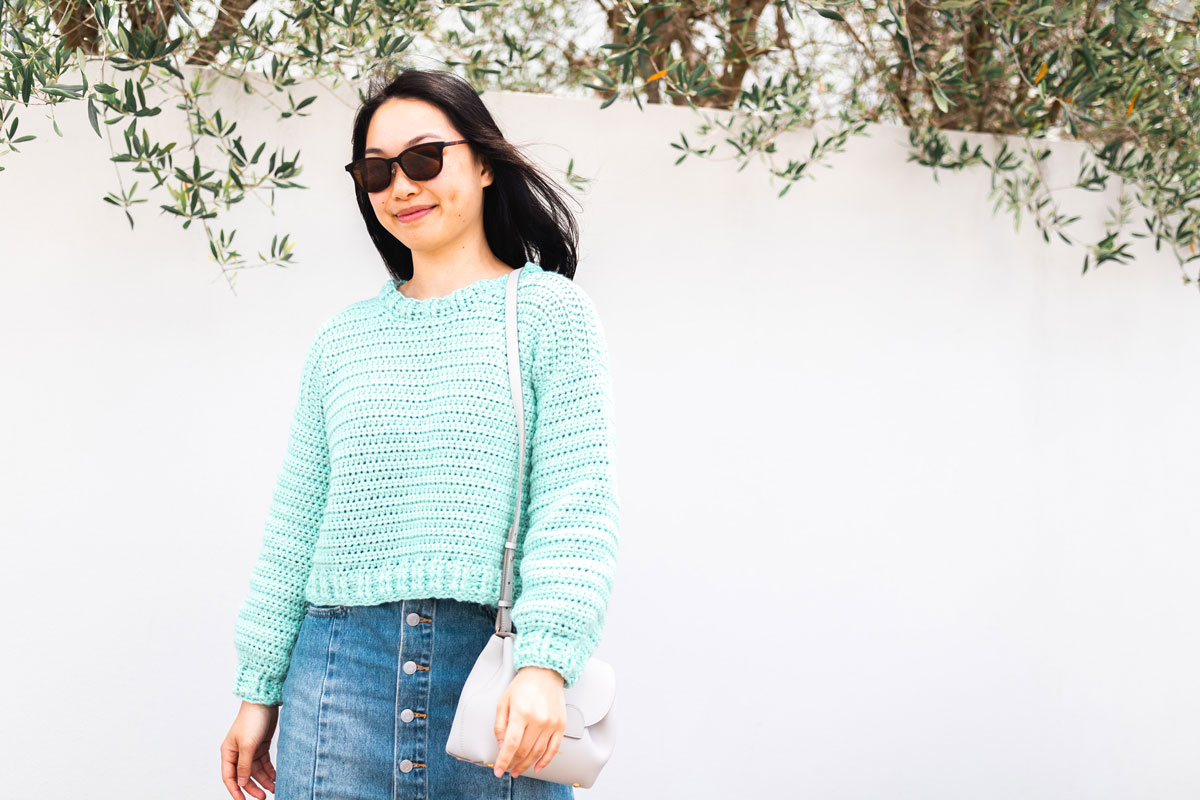
Made with bulky weight yarn, the Someday Sweater works up relatively quickly but is a lot more wearable than super bulky crochet projects. Perfect for fall, winter and even spring, you can wear this modern crop crochet jumper with anything! Pair it with jeans, a skirt or over a dress, the Someday Sweater will be your go to hand made sweater!
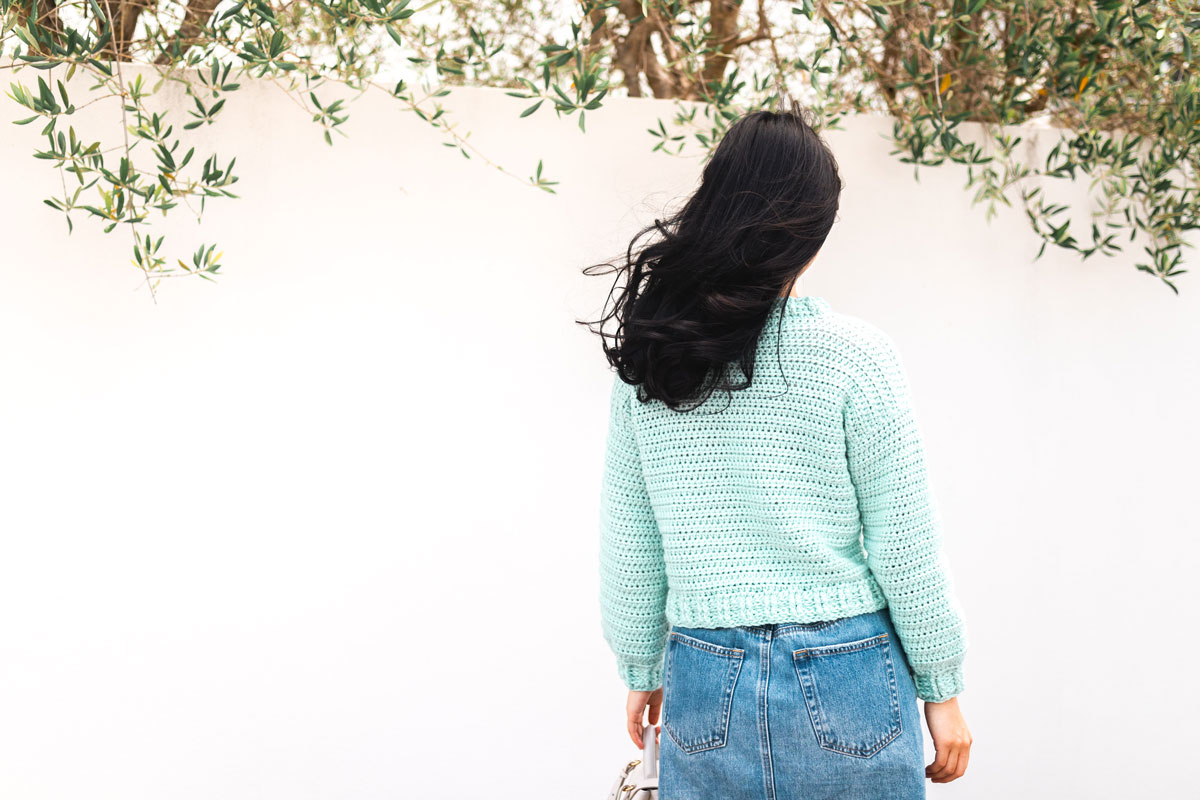
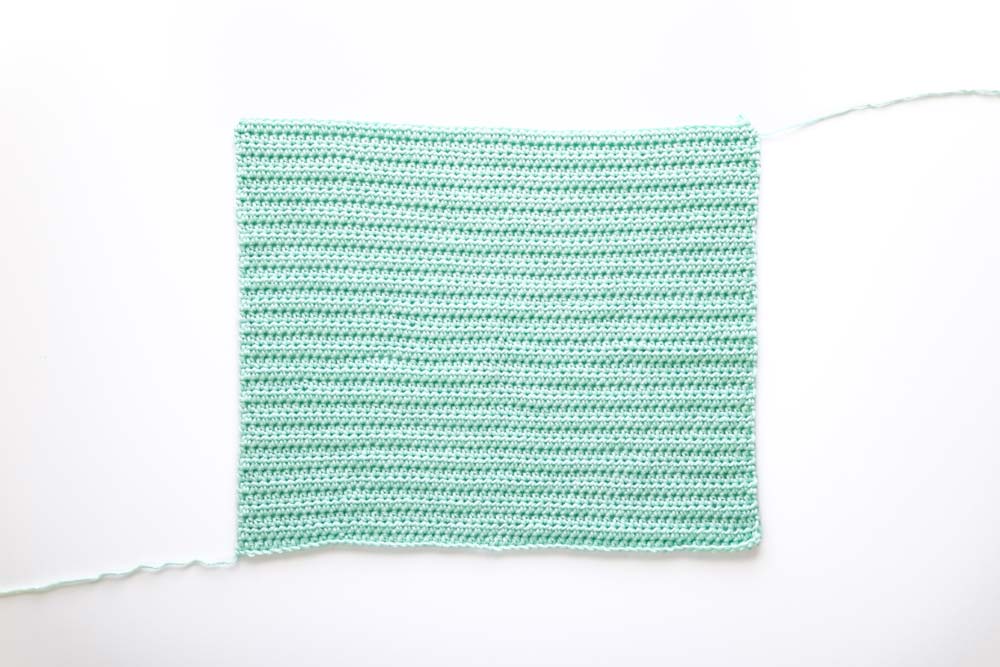
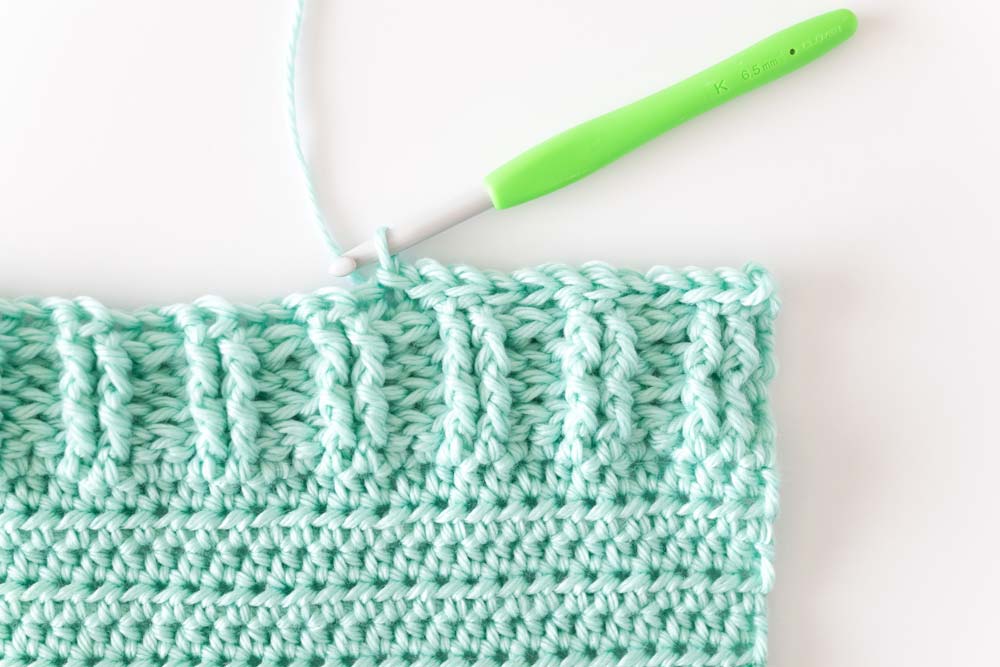
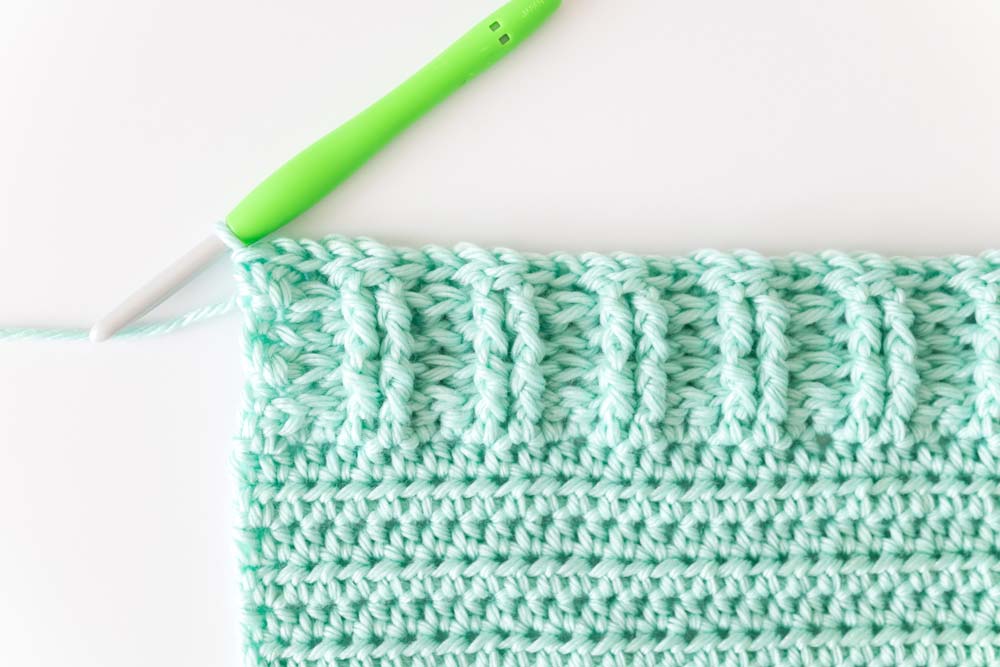
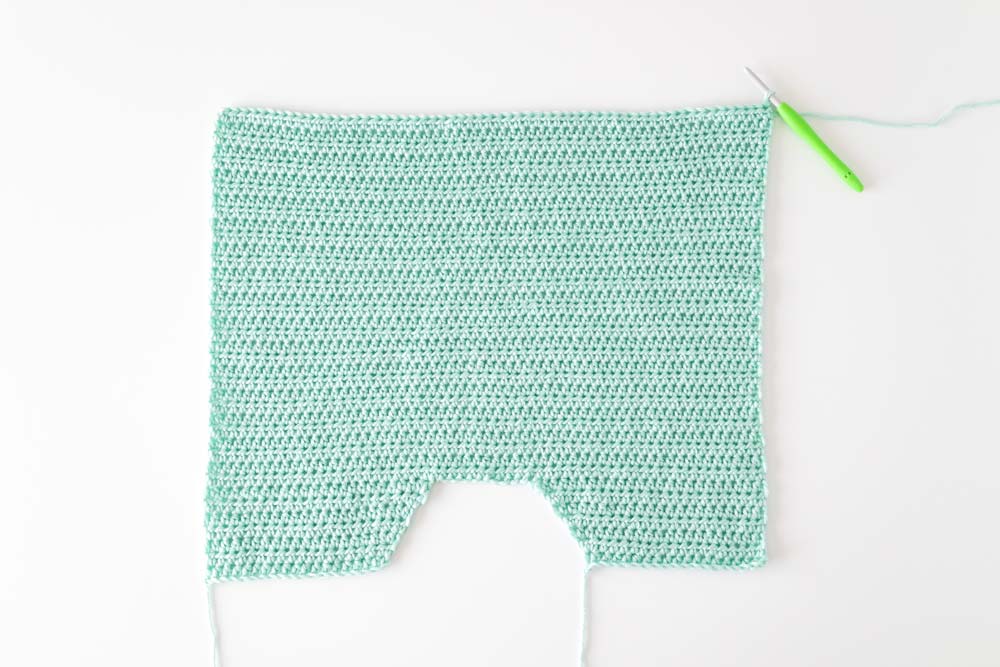
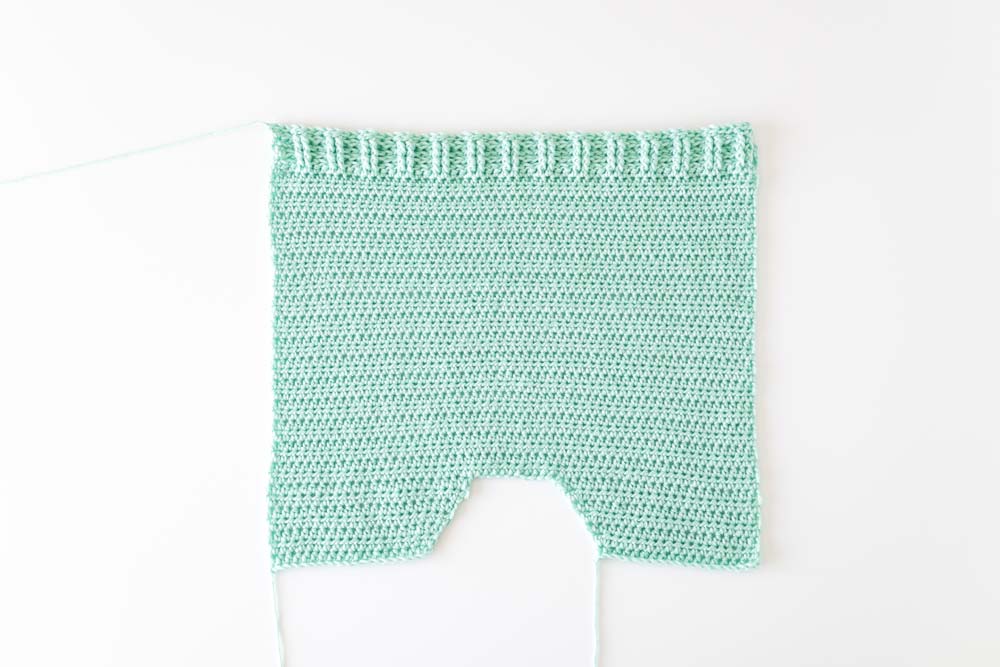
The Someday Sweater is crocheted in 4 panels using basic stitches. The vast majority of this sweater is worked in half double crochet with front and back post half double crochets used for the ribbing and finished off with slip stitches for a nice clean edge.
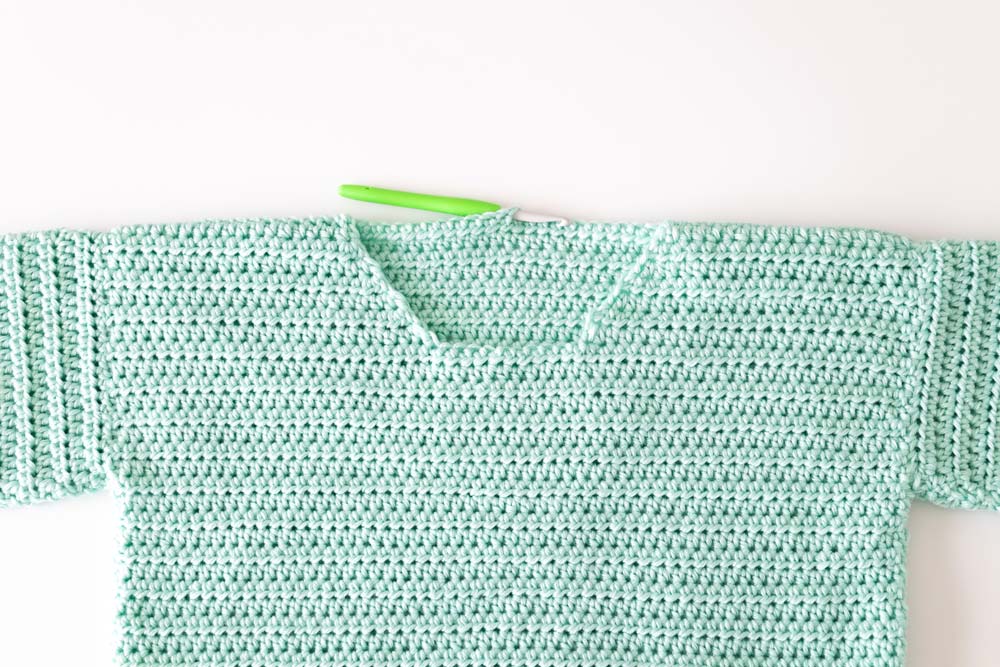
Single crochets are crocheted around the neckline and then you can add on an optional ribbed collar. All of the crochet stitches are demonstrated in the step by step video tutorial!
This simple crochet pullover consists of a back panel, front panel and 2 sleeves. The back panel is crocheted from the shoulders down so you can crochet this sweater to any length you like!
Whether you want a cropped sweater, hip length jumper or long pullover to wear with leggings, just by adding more rows to make your sweater longer or removing rows to make your sweater shorter! It’s also just a rectangle so there is absolutely no shaping in the piece.
The front panel is also crocheted from the shoulders down but we’ll start with crocheting the left shoulder as a separate piece, crochet the right shoulder and then connect them together. I love this method as it creates a smooth, looking neckline without any of the puckering or unevenness of decreasing stitches!
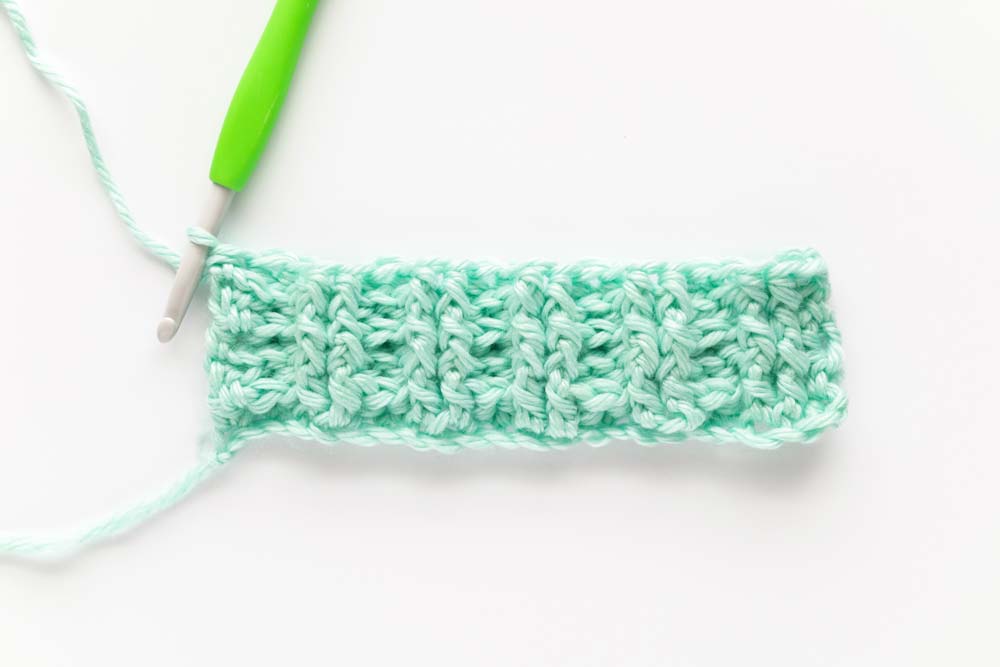
The sleeves are crocheted from the cuffs up and then there are 2 rows of increases to help create the balloon shape of the sleeves. After that it’s just straight rows of half double crochets.
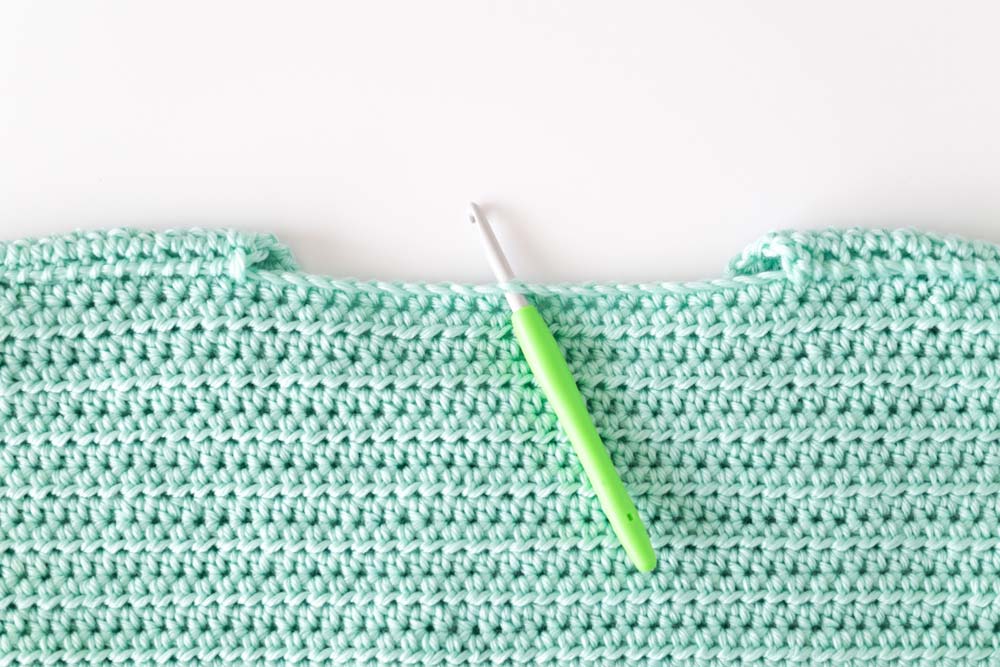
All the pieces are sewn together and then the collar is crocheted directly onto the neck opening. Single crochets are crocheted along the neckline and then a few rounds of front and back post half double crochets form the ribbed collar (as pictured). The ribbed collar is completely optional, so you can finish off your sweater with just the single crochets.
Looking for more free crochet patterns?
1. Weekend Snuggle Sweater / 2. In The Clouds Cardigan / 3. Briar Pocket Cardigan

Design Inspiration
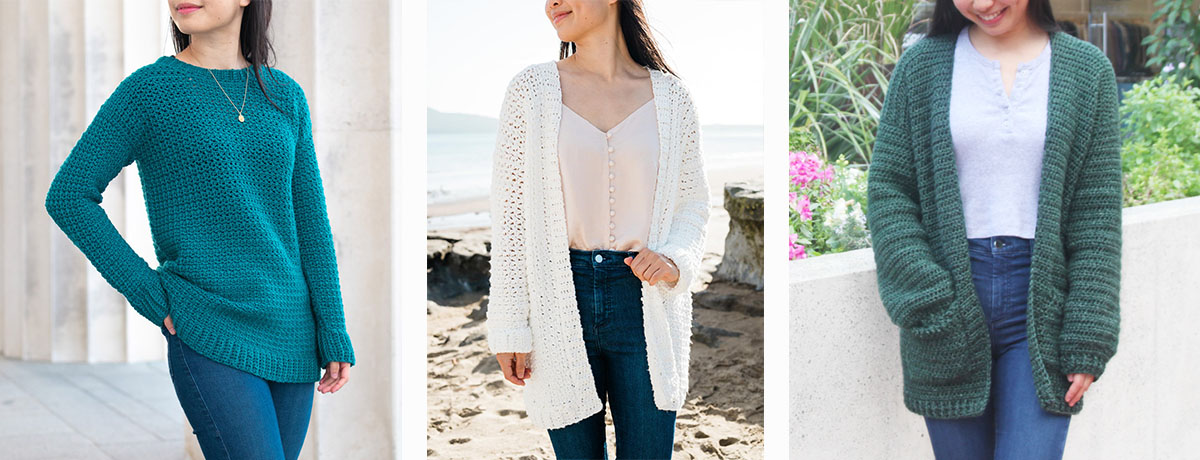
One of the most common questions I get asked is ‘I’ve never crocheted a garment before, which crochet project should I pick?’ Often, I recommend the Briar Pocket Cardigan which is great if you want a cardigan but so many of you have asked for a sweater version! The Someday Sweater isn’t *quite* an exact sweater version but it has the same boxy fit, simple construction and beginner friendly stitches!
I really wanted this project to be made in bulky yarn as it works up a lot quicker than thin yarns (If you’re looking for a thinner crochet pullover, check out the Weekend Snuggle Sweater!) but its more wearable and layer-able than super chunky sweaters!
The Brooklyn Sweater is also a reader favourite, as it really works up super quickly, but it’s made with super bulky yarn so it can only be worn in the winter. So, the Someday Sweater was created as a hybrid version between the two patterns!
Yarn
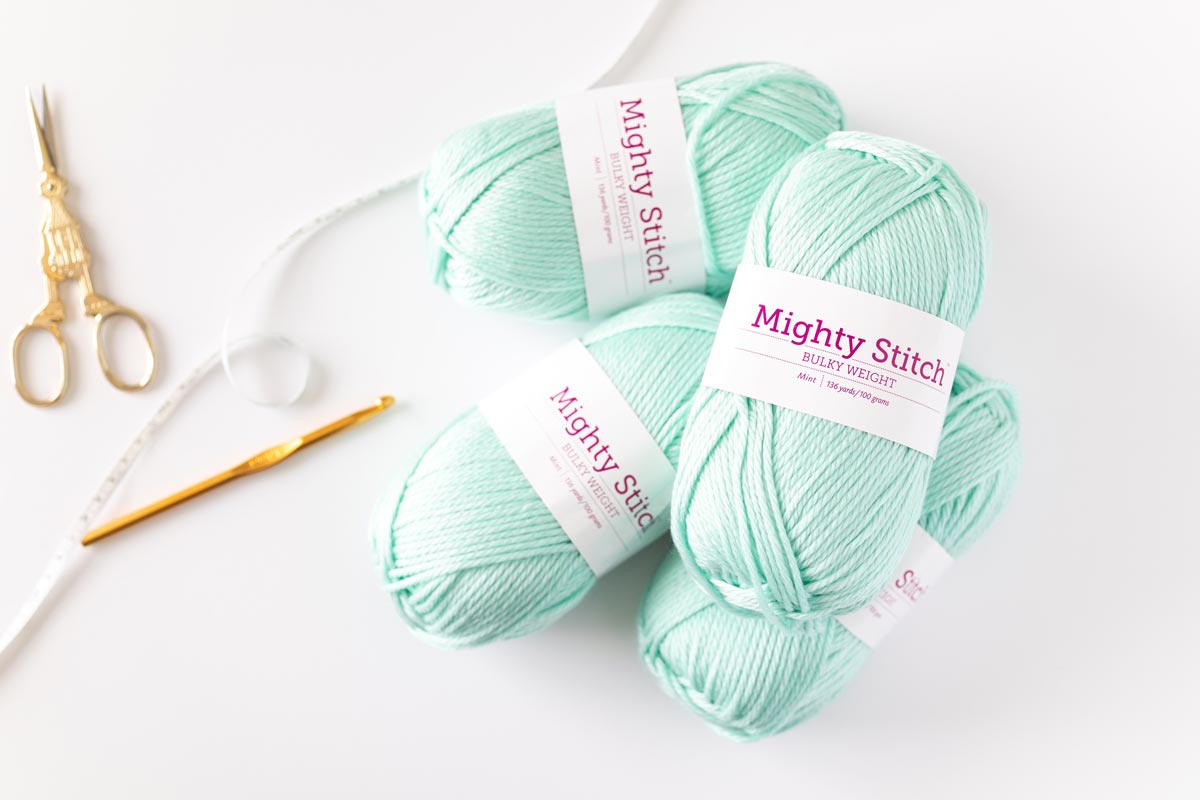
This cropped crochet sweater project uses WeCrochet’s Mighty Stitch Bulky yarn in the shade mint. Mighty Stitch is made up of an 80% acrylic with 20% wool blend, with 24 different shades and comes in lots of different versions – there’s a Mighty Stitch Worsted and Mighty Stitch Super Bulky too!
Acrylic wool blends are one of the best types of yarns out there – you get the warmth from wool but at a lower price with the durability and machine-washing properties of acrylic yarns. From the fibre blend this yarn also has a slight sheen to it but most importantly Mighty Stitch has great drape!
The drape of your yarn determines how your sweater will fit on your body! If the yarn you’re using is stiff, your sweater will just hang straight down. This isn’t necessarily a bad thing for things like crochet coats (See the Stonewash Pocket Coatigan) or home ware (See Boho Crochet Coasters).
However, if you want a cosy sweater that you’ll wear time and time again, comfort is key! Yarns that have a looser twist tend be good choices and as always crochet a swatch to see if you like the way the yarn feels! If the yarn isn’t quite right you can always save it for another project ?
Pin me for later!
Video Tutorial
Add the Someday Sweater to your Ravelry queue!
Someday Sweater – Ad-free, printable version here!
NOTES:
*Sample is a size small shown on a 5’3” model with a 32” bust.
*The sizing guide follows size XS(S, M, L, XL)(2XL, 3XL, 4XL, 5XL). E.g. “Ch 55(59, 63, 71, 75)(83, 87, 95, 99) means Ch 55 for XS, Ch 59 for Small, Ch 63 for Medium, Ch 71 for Large, Ch 75 for XL, Ch 83 for 2XL, Ch 87 for 3XL, Ch 95 for 4XL and Ch 99 for 5XL.” If there is only one number, it applies to all sizes.
*”HDC 10” means HDC into the next 10 stitches.
*”2HDC” means place 2 HDC into the same stitch.
*The turning chain ch 1 does NOT count as a stitch.
*Total stitches are indicated between < >.
*This pattern uses US crochet terms.
*The back and front panels are crocheted from the shoulders down so you can adjust the length (alteration instructions provided). The sleeves are crocheted from the cuffs up.
*The body panels are sewn together and then the sleeves are sewn onto the body. The collar is crocheted directly onto the neck opening.
*All pieces are sewn together with the RS on the inside and the WS facing outwards.
LEVEL: Beginner+/Easy
Materials
Yarn – WeCrochet Mighty Stitch Bulky – Chunky/Bulky (5), 124m/100g, 136yds/3.5oz, 80% Acrylic + 20% Superwash Wool, Mint
6(7, 8, 8, 9)(10, 11, 11, 12) skeins
Stitches & Abbreviations
Ch = Chain
Sl st = Slip Stitch
SC = Single Crochet
HDC = Half Double Crochet
FpHDC = Front Post Half Double Crochet
BpHDC = Back Post Half Double Crochet
St(s) = Stitch(es)
Rep = Repeat
RS = Right Side
WS = Wrong Side
Measurements cm:
To fit Bust: 76(86, 96, 106, 117)(127, 137, 147, 158)
Back Width: 45(48, 52, 58, 62)(68, 72, 78, 82)
Length: 41(43, 45, 45, 47)(47, 49, 49, 51)
Armhole: 16(17, 18, 19, 20)(21, 23, 23, 25)
Sleeve length: 38(38, 39, 39, 41)(41, 43, 43, 44)
Measurements inches:
To fit Bust: 30(34, 38, 42, 46)(50, 54, 58, 62)
Back Width: 17.5(19, 20.5, 23, 24.5)(27, 28.5, 30.5, 32.5)
Length: 16(17, 17.5, 17.5, 18.5)(18.5, 19.5, 19.5, 20)
Armhole: 6(6.5, 7, 7.5, 8)(8.5, 9, 9, 10)
Sleeve length: 15(15, 15.5, 15.5, 16)(16, 16.5, 16.5, 17)
GAUGE: 10cm/4” square = 12 stitches wide x 10 rows tall in half double crochet
Someday Sweater Crochet Pattern
Back Panel
FOUNDATION CHAIN: Ch 55(59, 63, 71, 75)(83, 87, 95, 99).
ROW 1 (RS): HDC into 2nd ch from the hook, HDC across, turn.
<54(58, 62, 70, 74)(82, 86, 94, 98)>
ROW 2: Ch 1, HDC across, turn.
<54(58, 62, 70, 74)(82, 86, 94, 98)>
Repeat ROW 2 until ROW 36(38, 40, 40, 42)(42, 44, 44, 46).
*ALTERATION NOTE: You can make your sweater longer/shorter by adding/removing rows. Please keep in mind that the ribbing adds 4cm/1.5” to the body length.
Do not fasten off! Proceed directly to ‘BODY RIBBING’ instructions.
Body Ribbing
ROW 1: Ch 1, HDC in 1st st, *FpHDC 2, BpHDC 2; rep from * until last st, HDC in last st, turn.
<54(58, 62, 70, 74)(82, 86, 94, 98)>
Repeat ROW 1 until ROW 4.
Total Rows: <40(42, 44, 44, 46)(46, 48, 48, 50)>
FINAL ROW: Ch 1, sl st across.
<54(58, 62, 70, 74)(82, 86, 94, 98)>
Fasten off.

Front Panel
Left Shoulder
FOUNDATION CHAIN: Ch 17(19, 21, 25, 27)(30, 32, 36, 38).
ROW 1 (RS): HDC into 2nd ch from the hook, HDC across, turn.
<16(18, 20, 24, 26)(29, 31, 35, 37)>
ROW 2: Ch 1, HDC in each st until last st, 2HDC in last st, turn.
<17(19, 21, 25, 27)(30, 32, 36, 38)>
ROW 3: Ch 1, 2HDC in 1st st, HDC across, turn.
<18(20, 22, 26, 28)(31, 33, 37, 39)>
ROW 4: Ch 1, HDC in each st until last st, 2HDC in last st, turn.
<19(21, 23, 27, 29)(32, 34, 38, 40)>
ROW 5: Ch 1, 2HDC in 1st st, HDC across, turn.
<20(22, 24, 28, 30)(33, 35, 39, 41)>
ROW 6: Ch 1, HDC in each st until last st, 2HDC in last st, turn.
<21(23, 25, 29, 31)(34, 36, 40, 42)>
Fasten off.
Right Shoulder
FOUNDATION CHAIN: Ch 17(19, 21, 25, 27)(30, 32, 36, 38).
ROW 1(RS): HDC into 2nd ch from the hook, HDC across, turn.
<16(18, 20, 24, 26)(29, 31, 35, 37)>
ROW 2: Ch 1, 2HDC in 1st st, HDC across, turn.
<17(19, 21, 25, 27)(30, 32, 36, 38)>
ROW 3: Ch 1, HDC in each st until last st, 2HDC in last st, turn.
<18(20, 22, 26, 28)(31, 33, 37, 39)>
ROW 4: Ch 1, 2HDC in 1st st, HDC across, turn.
<19(21, 23, 27, 29)(32, 34, 38, 40)>
ROW 5: Ch 1, HDC in each st until last st, 2HDC in last st, turn.
<20(22, 24, 28, 30)(33, 35, 39, 41)>
ROW 6: Ch 1, 2HDC in 1st st, HDC across, turn.
<21(23, 25, 29, 31)(34, 36, 40, 42)>
ROW 7 (JOINING ROW): Ch 1, HDC in each st until last st, 2 HDC in last st, ch 10(10, 10, 10, 10)(12, 12, 12, 12)
<22(24, 26, 30, 32)(35, 37, 41, 43)sts + 10(10, 10, 10, 10)(12, 12, 12, 12)chs>
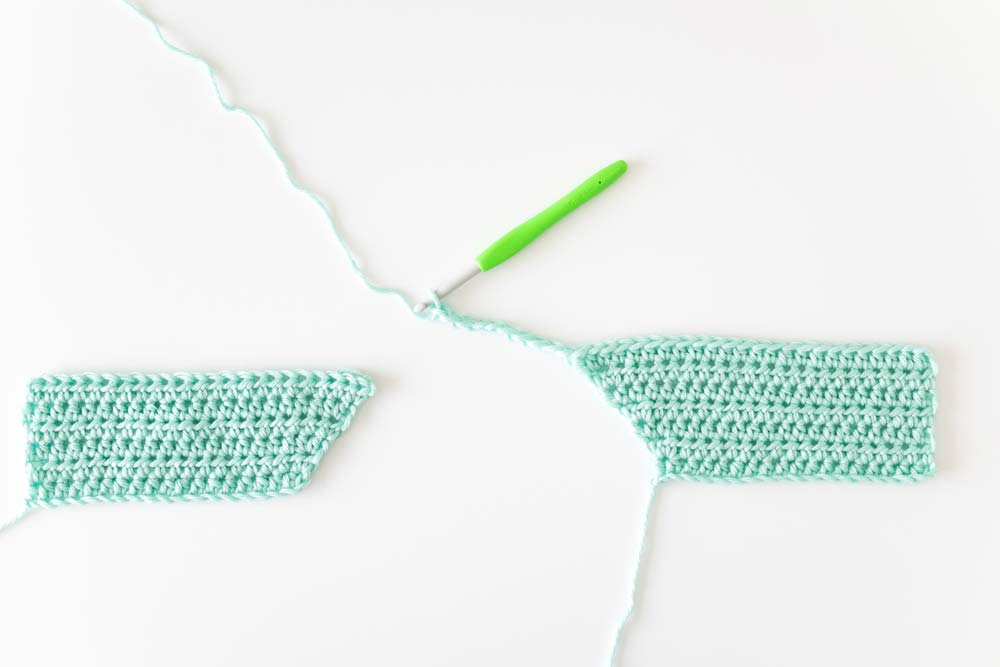
Do not fasten off! We’ll now join the ‘LEFT SHOULDER’ to the ‘RIGHT SHOULDER’.
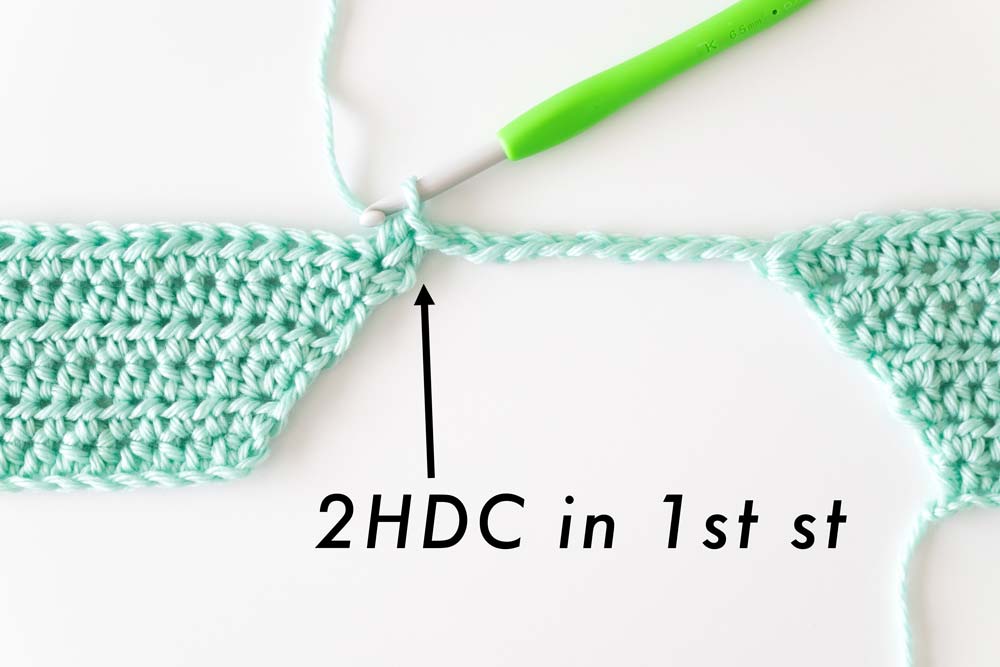
Place the ‘LEFT SHOULDER’ piece (with the right side facing up) to the left of the ‘RIGHT SHOULDER’ piece.
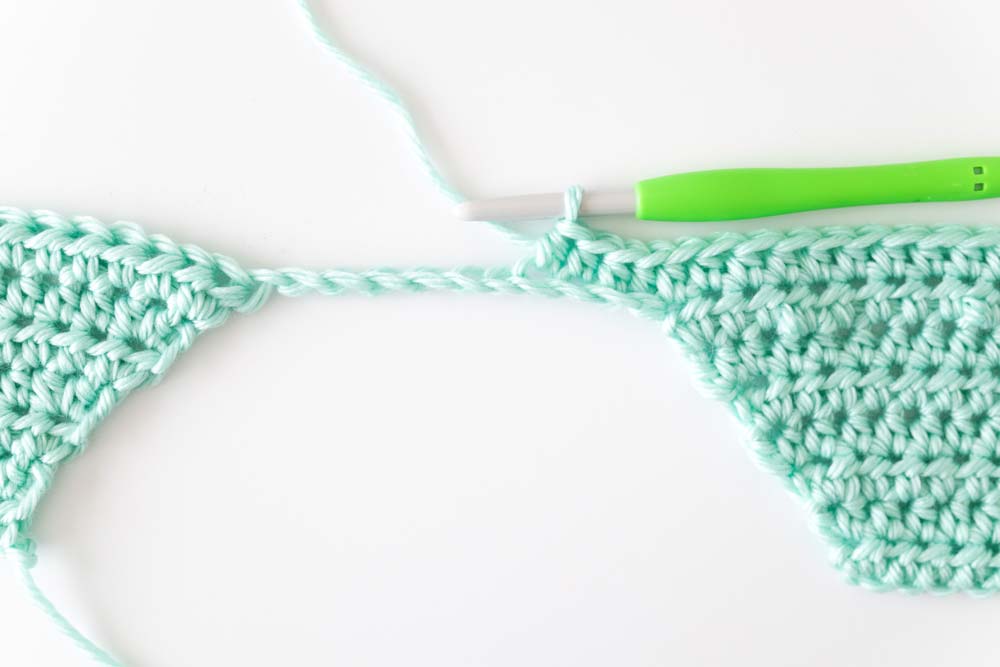
Place 2HDC in the 1st st of the ‘LEFT SHOULDER’, HDC across, turn.
<44(48, 52, 60, 64)(70, 74, 82, 86) + 10(10, 10, 10, 10)(12, 12, 12, 12)chs>

ROW 8: Ch 1, HDC across, turn.
<54(58, 62, 70, 74)(82, 86, 94, 98)>
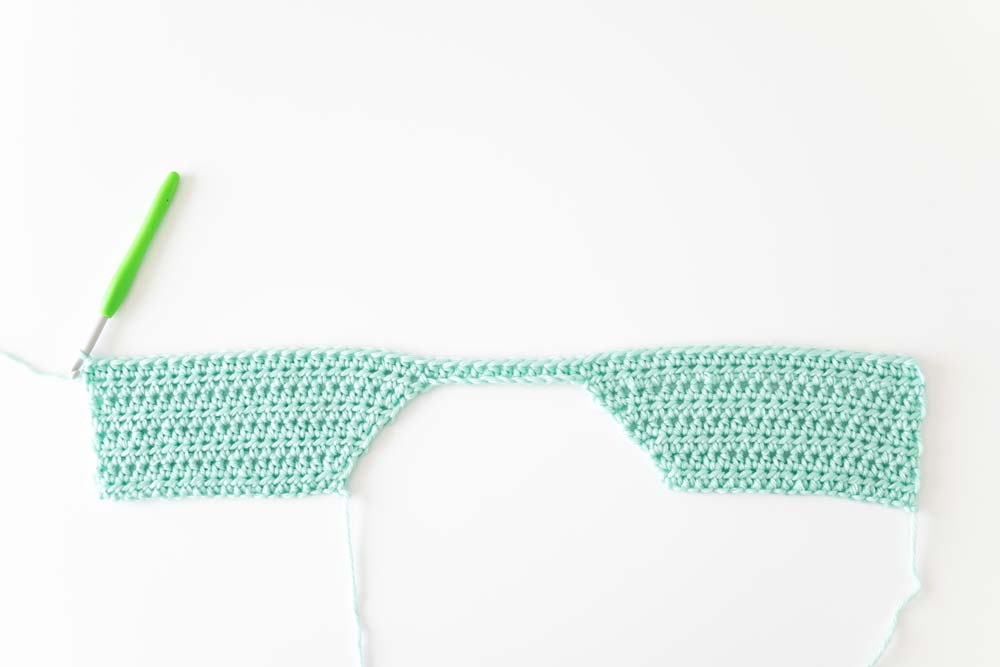
Repeat ROW 8 until ROW 36(38, 40, 40, 42)(42, 44, 44, 46).
*ALTERATION NOTE: If you altered the number of rows of your back panel, make sure you crochet the same number of rows in your front panel.
Do not fasten off! Repeat the ‘BODY RIBBING’ instructions.
Sleeves
(make 2)
FOUNDATION CHAIN: Ch 21(23, 23, 25, 25)(27, 29, 31, 31).
ROW 1 (RS): HDC into 2nd ch from the hook, HDC across, turn.
<20(22, 22, 24, 24)(26, 28, 30, 30)>
Sizes S, M, 2XL, 4XL, 5XL
ROWS 2-5: Ch 1, HDC in 1st st, *FpHDC 2, BpHDC 2; rep from * until last st, HDC in last st, turn.
<20(22, 22, 24, 24)(26, 28, 30, 30)>
Sizes XS, L, XL, 3XL
ROW 2: Ch 1, HDC in 1st st, FpHDC 2, *BpHDC 2, FpHCD 2; rep from * until last st, HDC in last st, turn.
<20(22, 22, 24, 24)(26, 28, 30, 30)>
ROW 3: Ch 1, HDC in 1st st, BpHDC 2, *FpHDC 2, BpHDC 2; rep from * until last st, HDC in last st, turn.
ROW 4: As Row 2.
ROW 5: As Row 3.
<20(22, 22, 24, 24)(26, 28, 30, 30)>
All Sizes
ROW 6: Ch 1, *HDC, 2HDC; rep from * until end, turn.
<30(33, 33, 36, 36)(39, 42, 45, 45)>
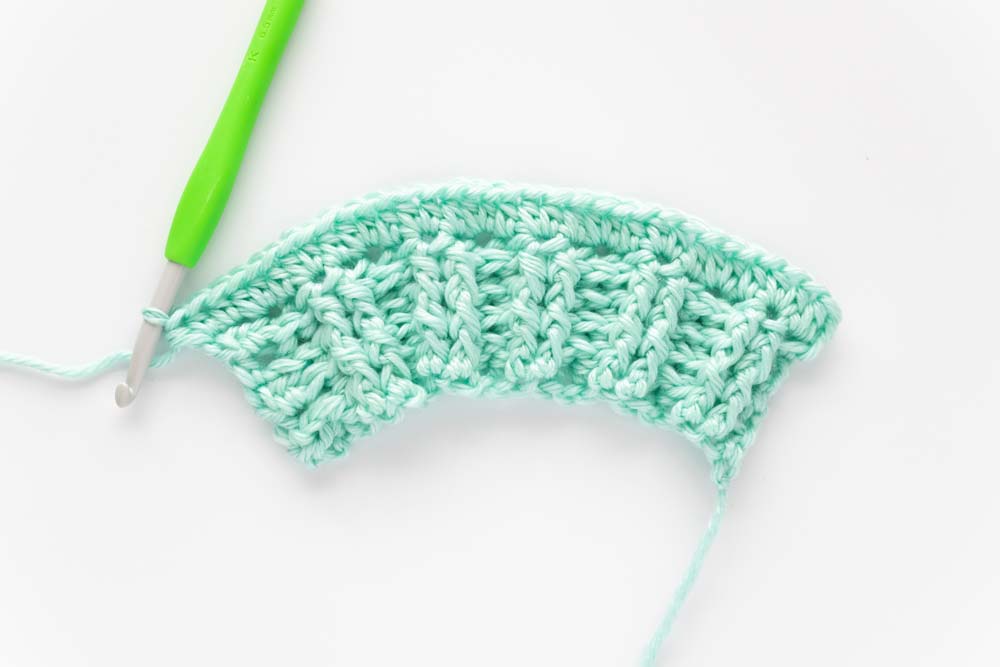
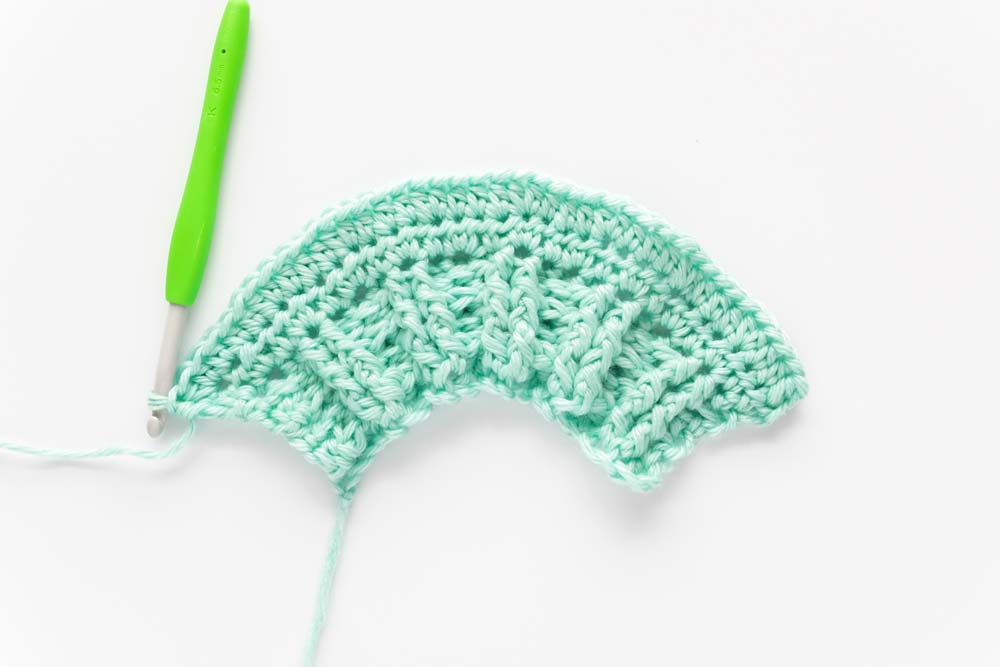
ROW 7: Ch 1, *HDC 3(3, 2, 3, 2)(2, 2, 3, 2), 2HDC; rep from * across, turn.
<37(41, 44, 45, 48)(52, 56, 56, 60)>
ROW 8: Ch 1, HDC across, turn.
*Your sleeve will have a rainbow/arc shape. As you crochet more rows the edges will start to straighten out. Photo below was taken at the end of ROW 15.
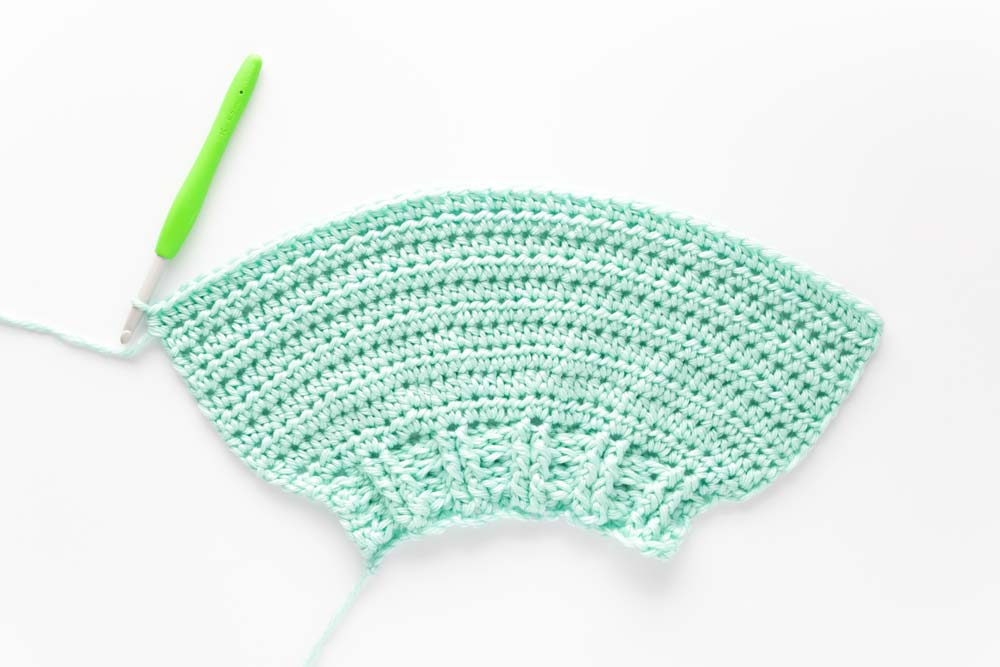
Repeat ROW 8 until your sleeve measures 38(38, 39, 39, 41)(41, 43, 43, 44)cm / 15(15, 15.5, 15.5, 16)(16, 16.5, 16.5, 17)” approx. ROW 38(38, 39, 39, 41)(41, 43, 43, 44).
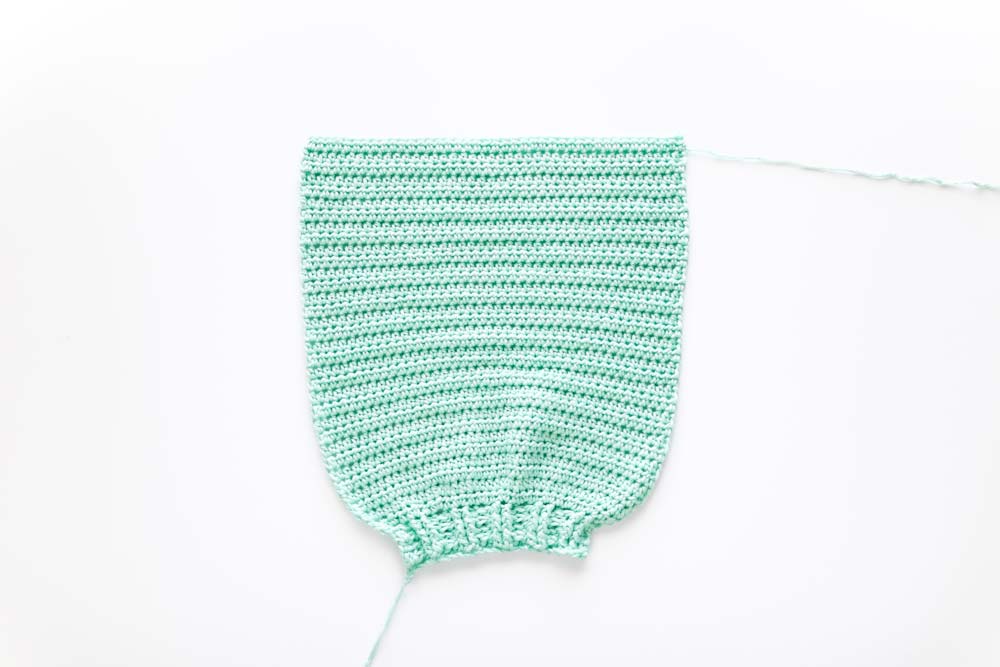
Fasten off.
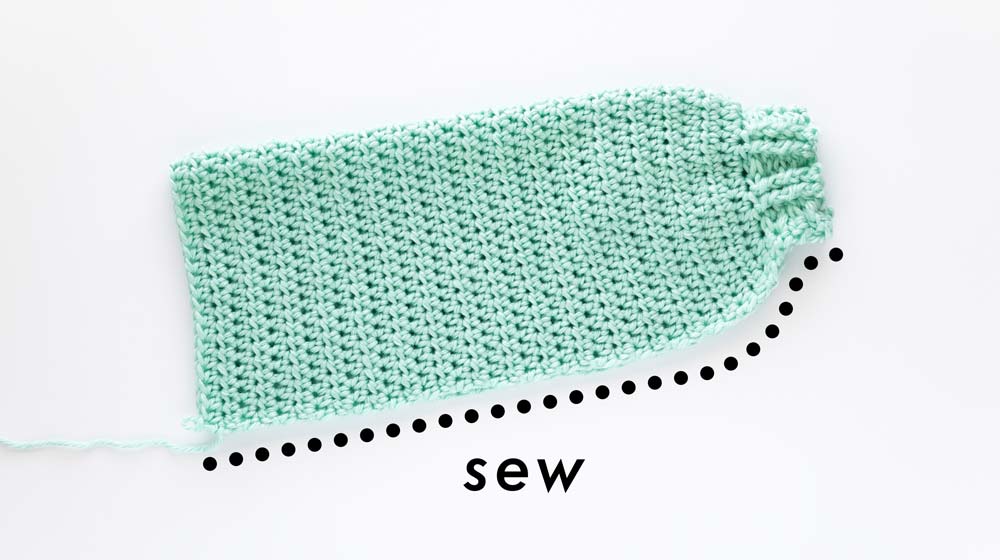
Fold sleeve in half lengthways. Whip stitch the edges of the sleeve together.
Assembly
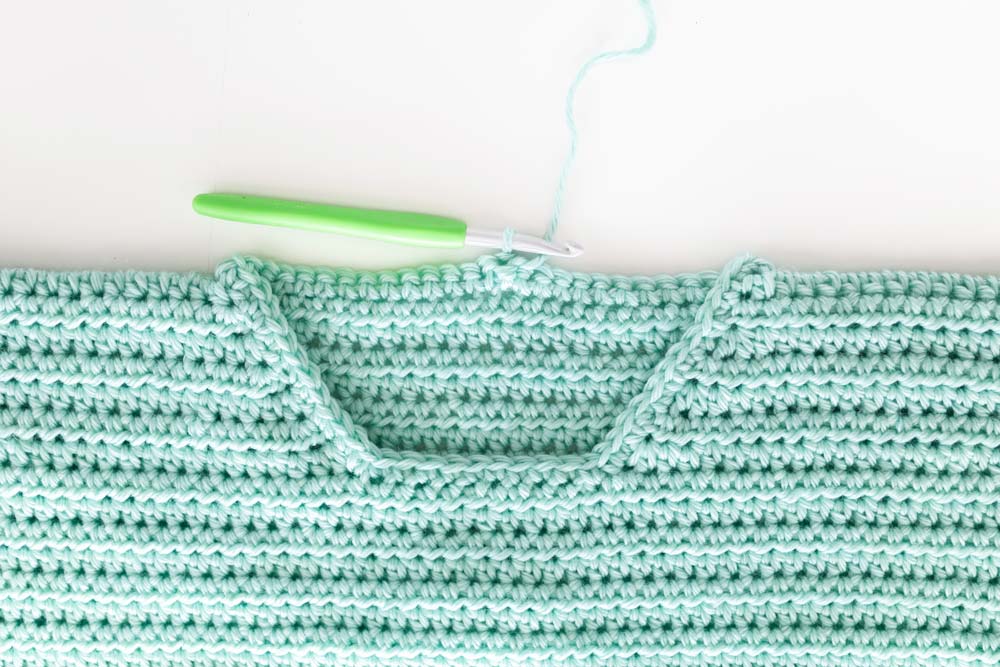
Lay the front panel on top of the back panel.
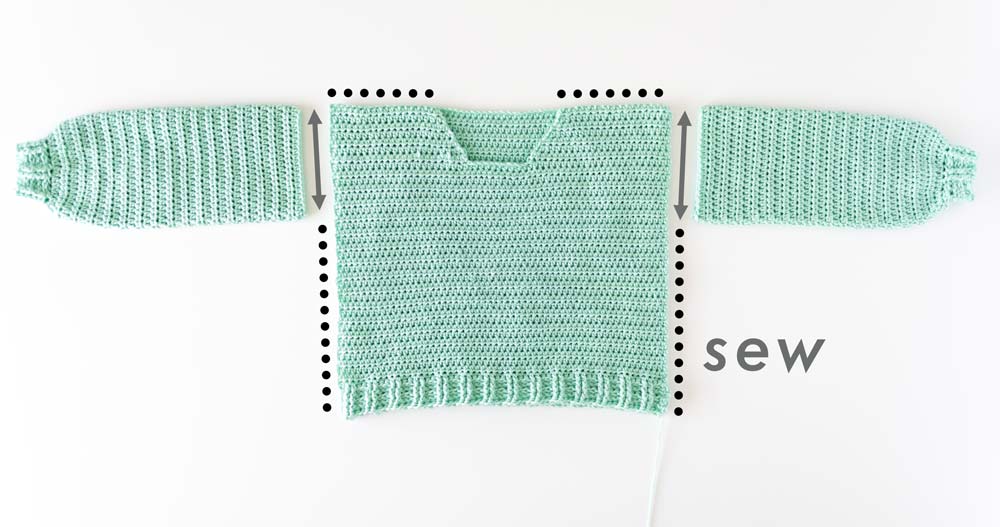
Whip stitch the shoulder seams together.
Whip stitch up the sides of body panels, leaving a gap for the sleeves.
Whip stitch the top of sleeves to the arm holes.
Turn sweater inside out so that the right side is facing you.
Collar
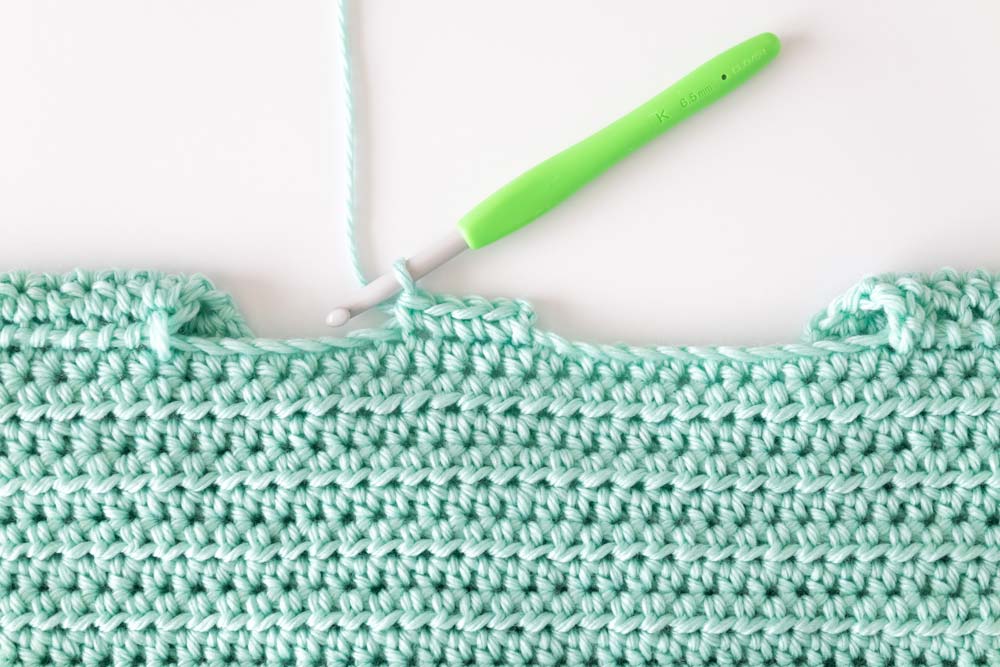
Insert crochet hook along back of the neck opening.
Secure your yarn and pull up a loop.
ROUND 1: Ch 1, SC evenly along the edge of the neck opening, sl st in the 1st st, turn.
*The exact number of stitches doesn’t matter, just make sure to end on an even number of stitches. Focus on spacing out your stitches evenly – if your neckline is ruffling you have too many stitches and if your neckline is puckering you have too few stitches.
ROUNDS 2 – 4: Ch 1, *alternate between FpHDC 2, BpHDC 2; rep from * around, sl st in 1st st, turn.
*Remember FpHDCs always are crocheted on top of BpHDCs and BpHDCs are always crocheted on top of FpHDCs. If you end the row with a FpHDC, start the next row by ch 1, and then alternating between BpHDC 2, FpHDC 2.
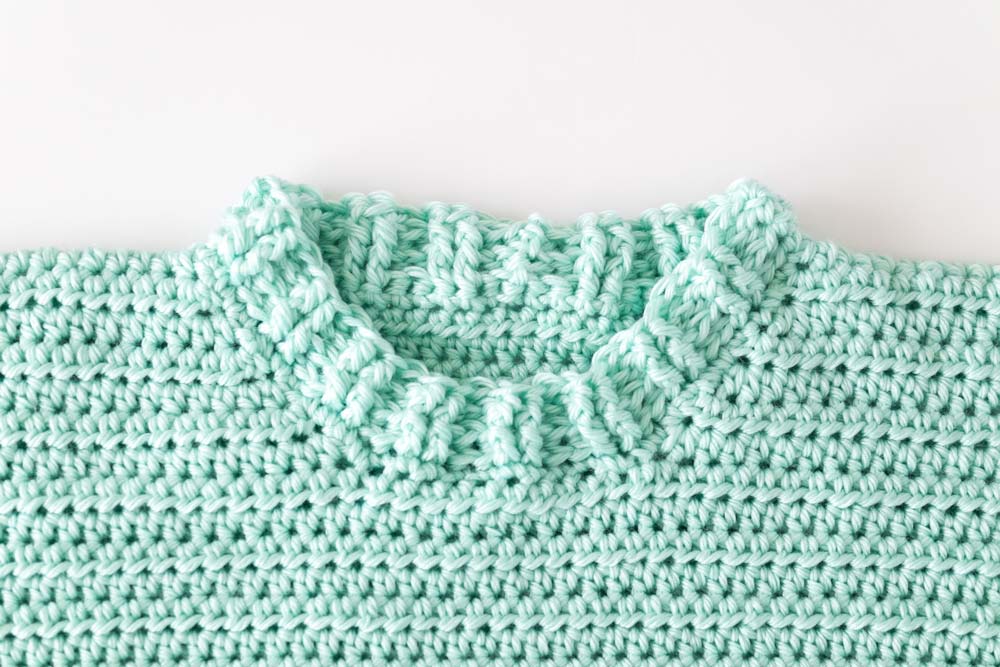
Fasten off.
Finishing
Weave in all of your ends and steam block if desired.
Voilà! You’ve finished your Someday Sweater ?
The post Easy Crochet Sweater – free pattern + video appeared first on For The Frills.