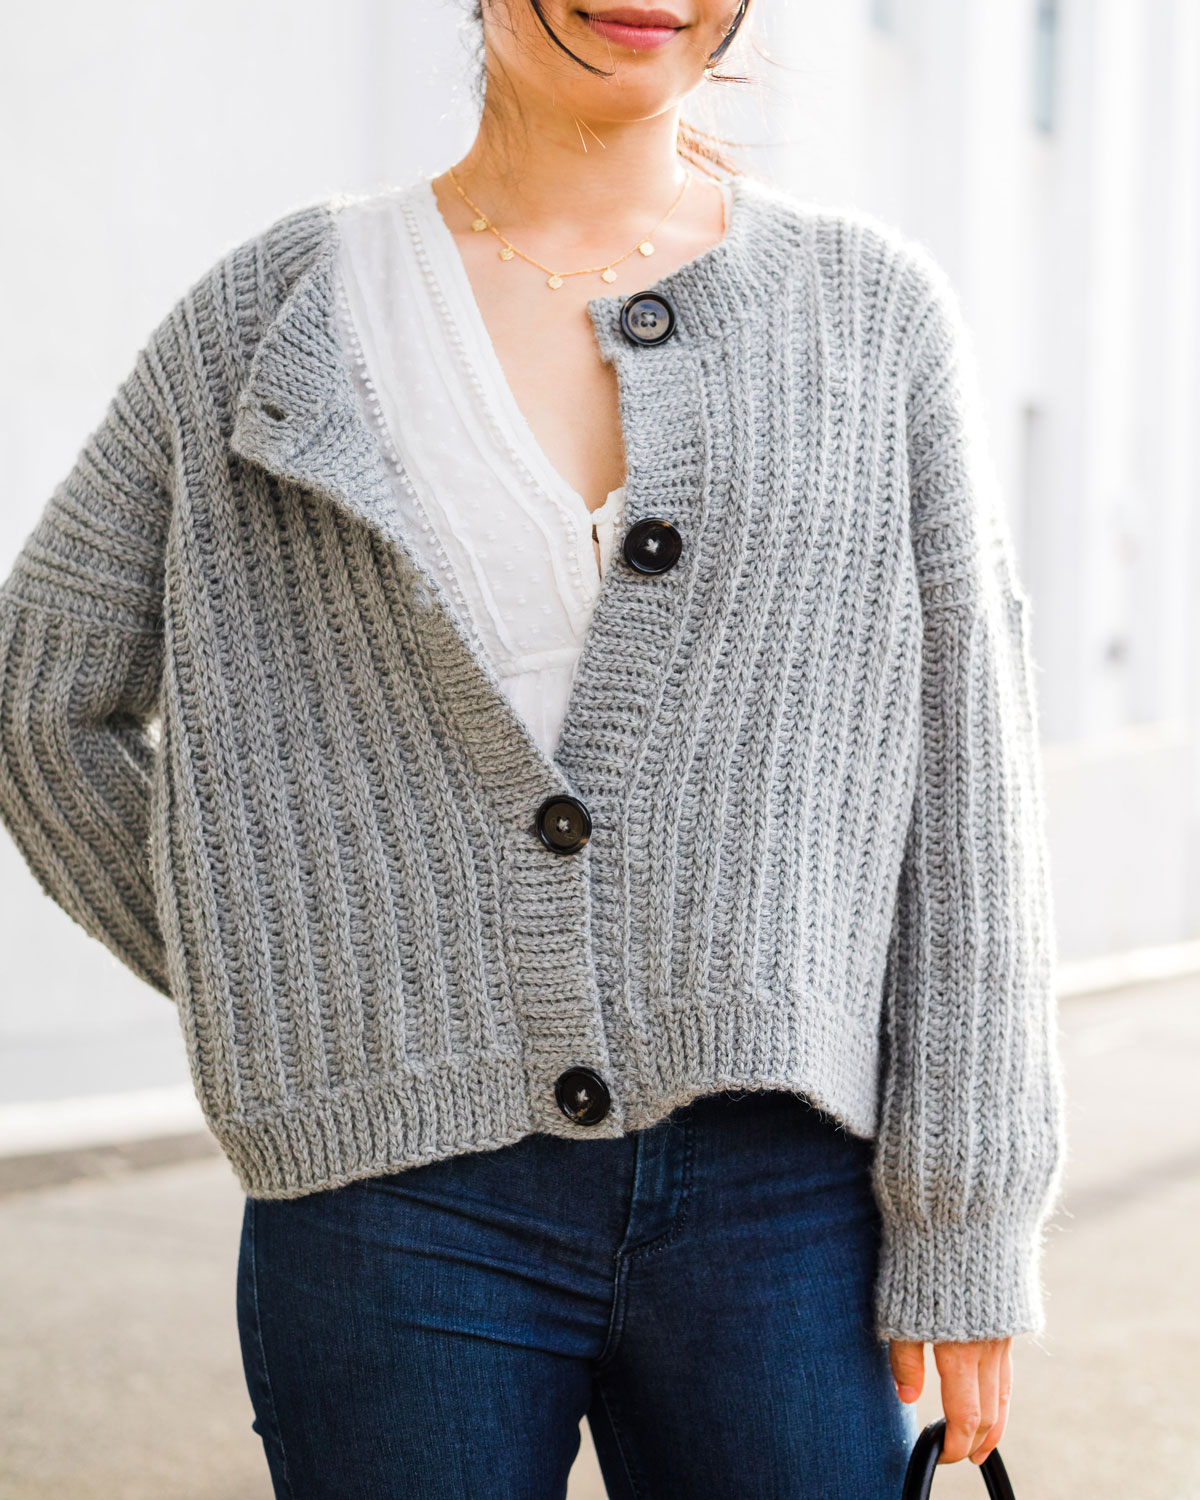
Learn how to crochet a ribbed cardigan with buttons! The Pompeii Cardigan is oversized, slouchy and cosy with a modern knit-like look! Scroll down for free crochet sweater pattern is accompanied by a step-by-step video tutorial.
This post may contain affiliate links, view our disclosure policy for details.
Thank you to WeCrochet for providing the yarn for this free crochet tank top pattern! As always all thoughts and opinions are 100% my own ?
The Pompeii Cardigan is the sister sweater to the Amalfi Pullover! It features the same knit-look stitches with wide ribbing, loose wide sleeves and a boxy oversized silhouette. This ribbed crochet cardigan is finished off with a round neck and large buttons for a casual, relaxed look.

The entire Pompeii cardigan is worked up in double crochets and slip stitches – that’s it! We’ll combine these easy crochet stitches together in a very simple 4 row repeat. To make it even easier the 4 row repeat only consists of 2 different ‘base’ rows and once you’ve crocheted it a few times it will become mindless ?
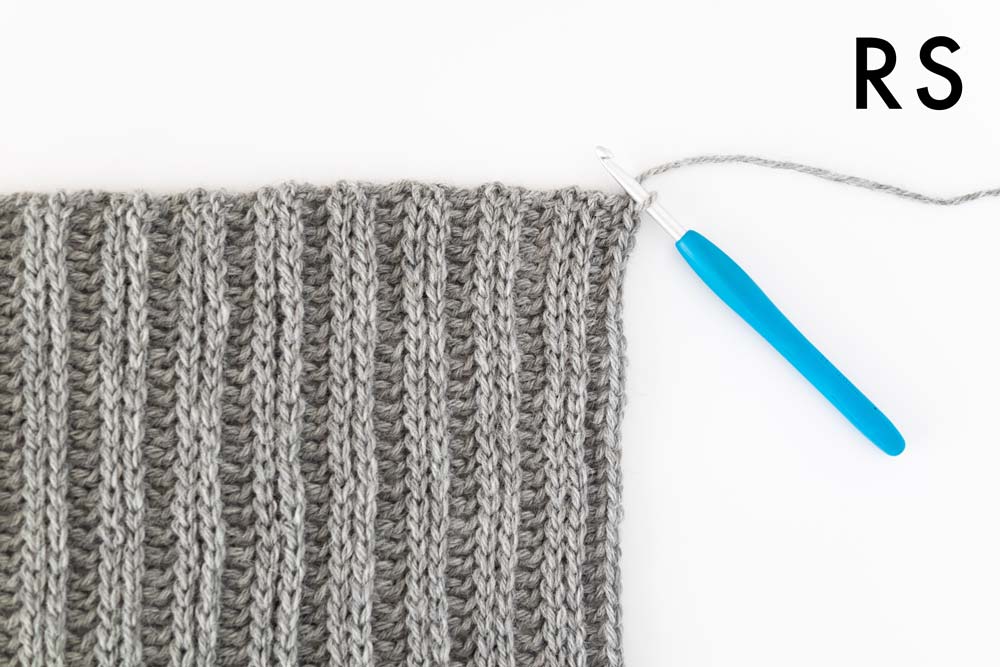
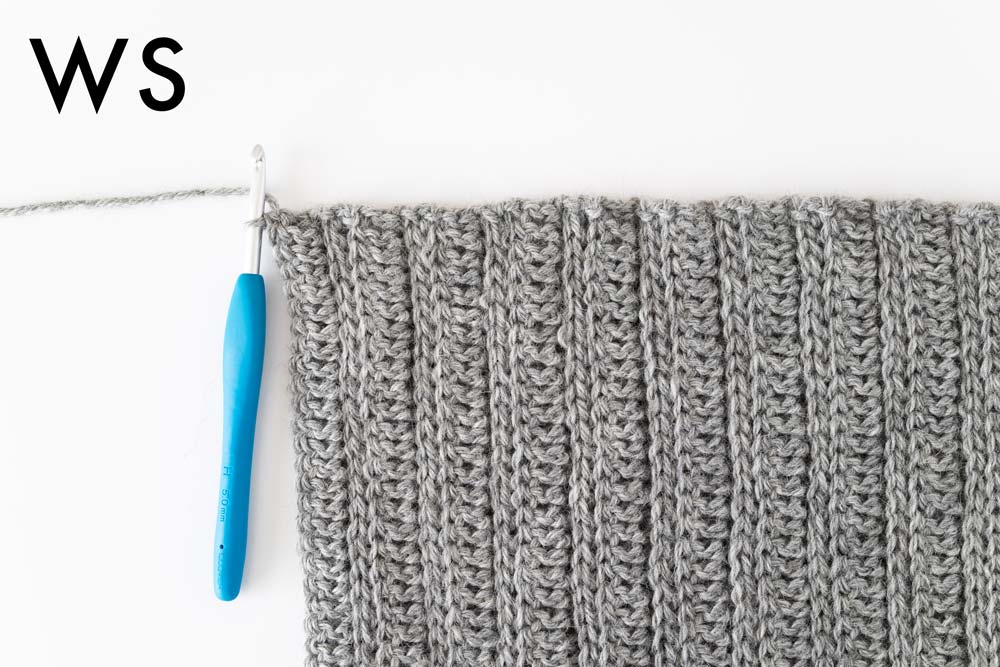
The signature knit-look ribbing is created by working into the back loops of a stitch. Whenever I’m looking for the back loops I rotate the stitches towards me so that the top of the ‘V’ is facing me. The back loop will be the strand of the ‘V’ that’s furthest away from you.
It’s super important to insert your crochet hook into the back loops because that’s what creates the thick ribbing texture. If you don’t work in the back loops the front of your sweater will be flat with no ribbing!
Another tip for crocheting the Pompeii Cardigan is to keep you slip stitches loose and roughly the same width as the double crochets. This will help you maintain even gauge so your sweater will drape nicely when worn and being able to easily insert your crochet hook into the slip stitches helps you to crochet so much faster!
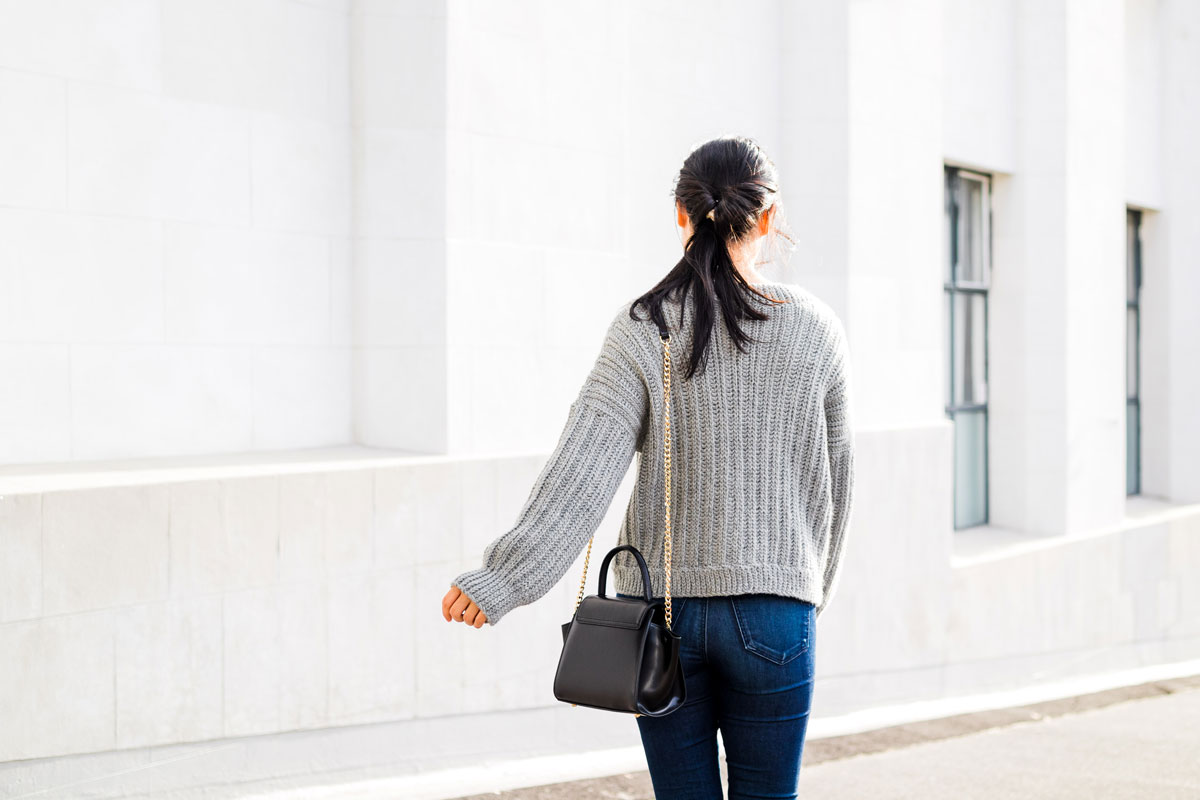
This crochet cardigan is made up of 5 main pieces – back panel, 2 front panels and 2 sleeves. All of these pieces are worked from side to side and that means your foundation chain runs the length of your piece, not the width. You can easily alter the length of your cardigan by simply adding more chains to make your cardi longer or remove chains to make your cardi shorter.
All the pieces are whip stitched together and then the ribbing is crocheted separately and sewn onto the cardigan. The hemline ribbing is completely optional and if you prefer you can leave it off for a raw edge. I think this gives a more modern look (You can see what the raw edge looks like on the Amalfi Sweater) but keep in mind that it will make your cardigan a little bit shorter.
Since I really wanted this cardigan to look as ‘knit-like’ as possible the button holes are crocheted into the back loop slip stitch ribbing and then sewn onto the cardigan. If you’ve never crocheted button holes before, don’t worry the video tutorial goes through all the steps in detail and it’s so satisfying when you finish the project! Button Down cardigans are my favourite type of sweater ?

Design Inspiration
When the Amalfi Sweater pattern was released a few months ago, so many of you asked for a cardigan version. I wasn’t quite sure if I should make a cardigan with just straight panels or a button-down version but you all overwhelmingly voted for a button-down version on Instagram! (If you’d like to send in pattern suggestions you can follow me on Instagram! :))
So I set out to design a button down cardigan … but then I had so many more questions haha. Should I make a V-neck or a round neck? Should I use big buttons or small buttons? Should the cardigan have knit look ribbing or crochet a simpler version?
With a lot of help from all of you (thank you so much for all of your comments!) we settled on a round-neck cardigan with slip stitch ribbing and large buttons. I think this combination of stitches really create a modern looking sweater that you can wear with anything (you all know I love versatile garments that you can wear year after year!) and the chunky buttons add to the casual, cosy vibes ?
(P.s. Lots of you were also hoping for a v-neck cardigan version … which I might make one day … but in the mean time you can check out the Aria Cardigan for a v-neck button cardigan pattern ? )
Looking for more free crochet patterns?
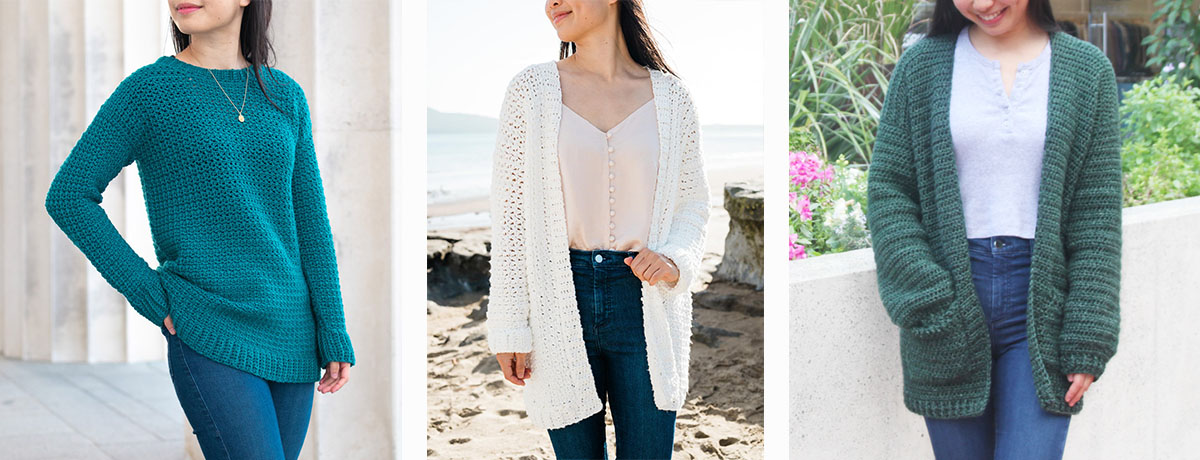
1. Weekend Snuggle Sweater / 2. In The Clouds Cardigan / 3. Briar Pocket Cardigan

Yarn
The Pompeii Cardigan uses WeCrochet’s Andean Treasure in the shade Fog Heather. It’s a lovely true medium grey – not a light grey, not a dark grey, it’s right in between so sometimes it can look light or dark depending on the lightning. Andean Treasure is a 100% Baby Alpaca yarn and it’s soooooo soft and squishy.
Baby Alpaca is one of my favourite fibres because it tends to be very loose and drapey. This yarn has an almost ‘hollow’ feel to it and it doesn’t really have ‘memory’ which is how well the yarn holds a stitch after its been frogged but all of these attributes make Andean Treasure the perfect yarn for an oversized garment!
Andean Treasure is classified as a sport weight yarn but in my opinion it’s really quite thick and if you want to substitute I’d suggest choosing a thick DK/Light (3) or very thin worsted / Medium (4) yarn. As always don’t forget to crochet a gauge swatch to make sure your cardigan will turn out the correct size!
Pin me for later!

Video Tutorial
Add the Pompeii Cardigan to your Ravelry queue!
Pompeii Cardigan – Ad-free, printable version!
NOTES:
*Sample is a size small shown on a 5’3” model with a 32” bust.
*The sizing guide follows size XS(S, M, L, XL)(2XL, 3XL, 4XL, 5XL). E.g. “68(72, 72, 76, 76)(80, 80, 84, 84) means Ch 68 for XS, Ch 72 for Small, Ch 72 for Medium, Ch 76 for Large, Ch 76 for XL, Ch 80 for 2XL, Ch 80 for 3XL, Ch 84 for 4XL and Ch 84 for 5XL.”
If there is only one number, it applies to all sizes.
*”DC 10” means DC into the next 10 stitches.
*The turning chains, ch 1 and ch 2 do NOT count as a stitch.
*Total stitches are indicated between < >.
*This pattern uses US crochet terms.
*The sample sweater uses WeCrochet Andean Treasure which is classified as a Sport/Fine(2) yarn. However, if you want to substitute this yarn, it’s closer to a thick DK/Light(3) or a very thin Worsted/Medium(4).
*The majority of this crochet sweater follows a 4-row repeat comprising of 2 different types of rows which are referred to as BASE DC row and BASE SL ST row.
*The sleeves, back and front panels are worked from side to side, so the foundation chain runs the length of the sleeve/sweater. To make your sweater shorter/longer, remove/add chains.
*Add 1 extra button for every additional 10cm / 4” of length.
*All pieces are sewn together with the RS on the inside and the WS facing outwards.
*The hemline ribbing is optional and you can leave it off if you prefer the look of the raw edge. Just keep in mind that this will make your cardigan 5 cm / 2” shorter in length.

LEVEL: Easy+
Materials
Yarn – WeCrochet Andean Treasure – Sport / Fine (2), 100m/50g, 110yds/1.75oz, 100% Baby Alpaca, Fog Heather
approx. 495(560, 590, 665, 705)(785, 830, 915, 965)g
4(4, 5, 5, 5)(5, 5, 5, 5) buttons – 3cm / 1.25” diameter
*The sample cardigan is a size small and is pictured with 4 buttons. I just managed to get away with 4 buttons but for a more secure opening, I’d recommend 5 buttons for size small.
Stitches & Abbreviations
Ch = Chain
Sl st = Slip Stitch
DC = Double Crochet
BLO = Back Loop
St(s) = Stitch(es)
Rep = Repeat
RS = Right Side
WS = Wrong Side
*Measurements taken from the garment lying flat. This cardigan is oversized and VERY stretchy. Choose your normal t-shirt size for an oversized fit (as pictured). If you are in between sizes, size down.
*Cardigan width and length will stretch out by 3-5cm / 1-2” after being worn a few times.
Measurements cm:
To fit Bust: 71(81, 91, 101, 112)(122, 132, 142, 152)
Back Width: 46(50, 55, 59, 64)(68, 73, 77, 81)
Armhole: 15(16, 16, 18, 19)(20, 21, 23, 24)
Sleeve length: 36(37, 37, 39, 39)(40, 40, 41, 41)
Length: 45(47, 47, 50, 50)(53, 53, 55, 55)
Measurements inches:
To fit Bust: 28(32, 36, 40, 44)(48, 52, 56, 60)
Back Width: 18(19.5, 21.5, 23, 25)(26.5, 28.5, 30, 32)
Armhole: 6(6.5, 6.5, 7, 7.5)(8, 8.5, 9, 9.5)
Sleeve length: 15(15.5, 15.5, 16, 16)(16.5, 16.5, 17, 17)
Length: 17.5(18.5, 18.5, 19.5, 19.5)(21, 21, 22, 22)
GAUGE: 10cm/4” square = 16.5 stitches wide x 21 rows tall (5 DC rows + 16 sl sts rows) in Knit-Look Rib Stitch pattern
Knit-Look Rib Crochet Stitch Pattern.
FOUNDATION CHAIN: Ch any number of stitches.
ROW 1(RS): DC into 3rd ch from hook, DC in each st until end, turn.
ROWS 2 – 4 (BASE SL ST ROW): Ch 1, BLO sl st across, sl st in last st, turn.
ROW 5 (BASE DC ROW): Ch 2, BLO DC across, DC in last st, turn.
Repeat ROWS 2 – 5 until you reach your desired length.
Pompeii Cardigan Pattern
Back Panel
FOUNDATION CHAIN: Ch 68(72, 72, 76, 76)(80, 80, 84, 84).
ROW 1 (RS): DC into 3rd ch from hook, DC in each st until end, turn.
<66(70, 70, 74, 74)(78, 78, 82, 82)>
ROWS 2 – 4 (BASE SL ST ROW): Ch 1, BLO sl st across, sl st in last st, turn.
<66(70, 70, 74, 74)(78, 78, 82, 82)>
ROW 5 (BASE DC ROW): Ch 2, BLO DC across, DC in last st, turn.
<66(70, 70, 74, 74)(78, 78, 82, 82)>
Repeat ROWS 2 – 5 until ROW 81(89, 97, 105, 113)(121, 129, 137, 145).
<66(70, 70, 74, 74)(78, 78, 82, 82)>

Fasten off.
First Front Panel
FOUNDATION CHAIN: Ch 68(72, 72, 76, 76)(80, 80, 84, 84).
ROW 1 (RS): DC into 3rd ch from hook, DC in each st until end, turn.
<66(70, 70, 74, 74)(78, 78, 82, 82)>
ROWS 2 – 4: As BASE SL ST row.
<66(70, 70, 74, 74)(78, 78, 82, 82)>
ROW 5: As BASE DC row.
<66(70, 70, 74, 74)(78, 78, 82, 82)>
Repeat ROWS 2 – 5 until ROW 26(30, 34, 38, 42)(46, 50, 54, 58).
*Final row should be a BASE SL ST ROW.
Don’t fasten off! Proceed directly to ‘FIRST FRONT PANEL DECREASE’.
FIRST FRONT PANEL DECREASE
*Decreasing and increasing the neckline will create ‘corners/steps’ along the edge of the sweater. The corners will be hidden once we sew on the neckline ribbing.
ROW 1: Ch 1, BLO sl st until you have 10 sts left, turn.
<56(60, 60, 64, 64)(68, 68, 72, 72)>
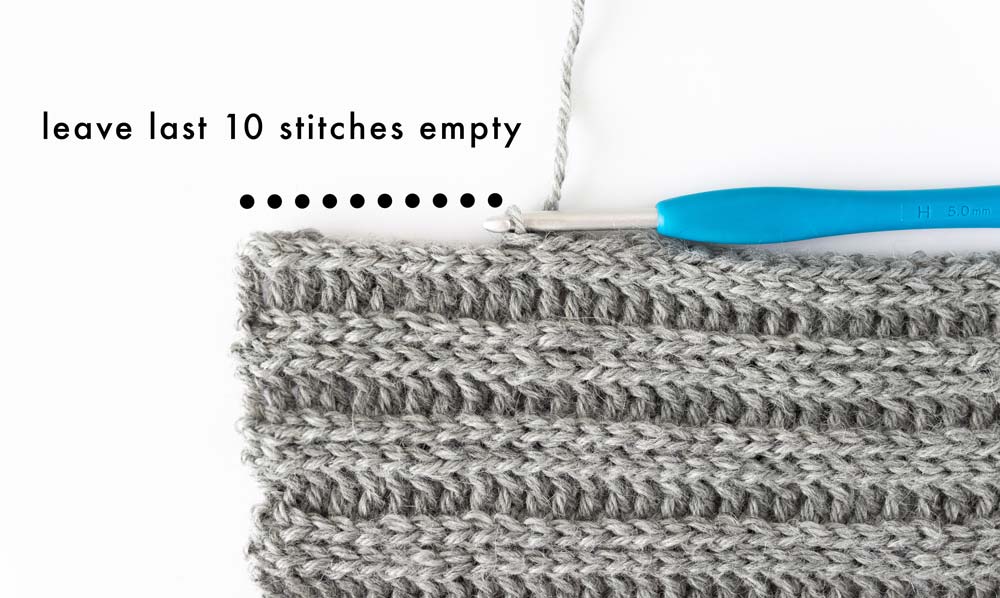
ROW 2: As BASE SL ST row.
<56(60, 60, 64, 64)(68, 68, 72, 72)>

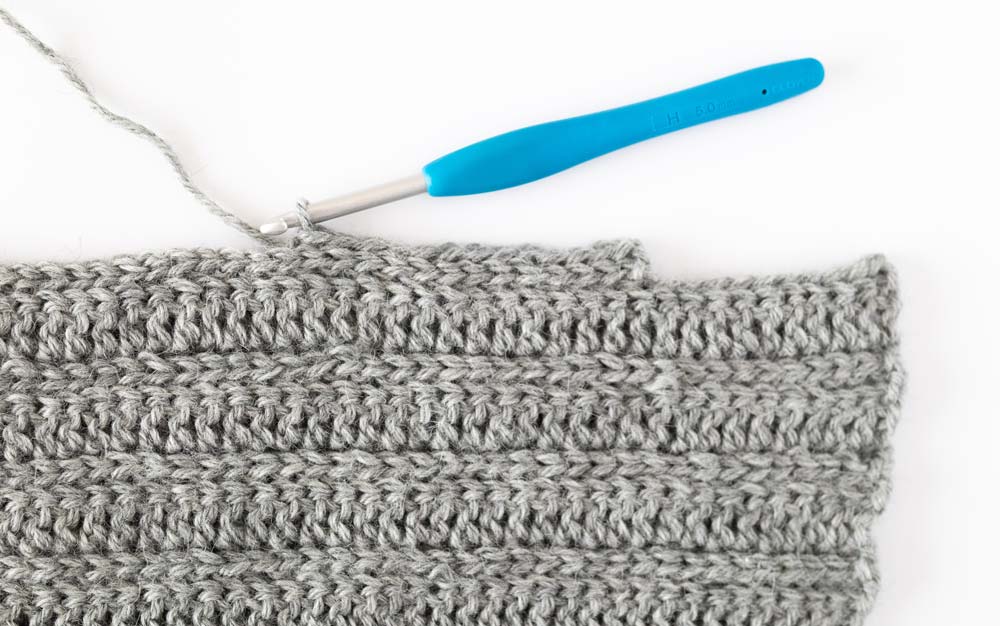
ROW 3: As BASE DC row.
<56(60, 60, 64, 64)(68, 68, 72, 72)>

ROW 4: As BASE SL ST row.
<56(60, 60, 64, 64)(68, 68, 72, 72)>
ROW 5: Ch 1, BLO sl st until you have 3 sts left, turn.
<53(57, 57, 61, 61)(65, 65, 69, 69)>
ROW 6: As BASE SL ST row.
<53(57, 57, 61, 61)(65, 65, 69, 69)>
ROW 7: As BASE DC row.
<53(57, 57, 61, 61)(65, 65, 69, 69)>
ROW 8: As BASE SL ST row.
<53(57, 57, 61, 61)(65, 65, 69, 69)>
ROW 9: Ch 1, BLO sl st until you have 2 sts left, turn.
<51(55, 55, 59, 59)(63, 63, 67, 67)>
ROW 10: As BASE SL ST row.
<51(55, 55, 59, 59)(63, 63, 67, 67)>
ROW 11: As BASE DC row.
<51(55, 55, 59, 59)(63, 63, 67, 67)>
Fasten off.
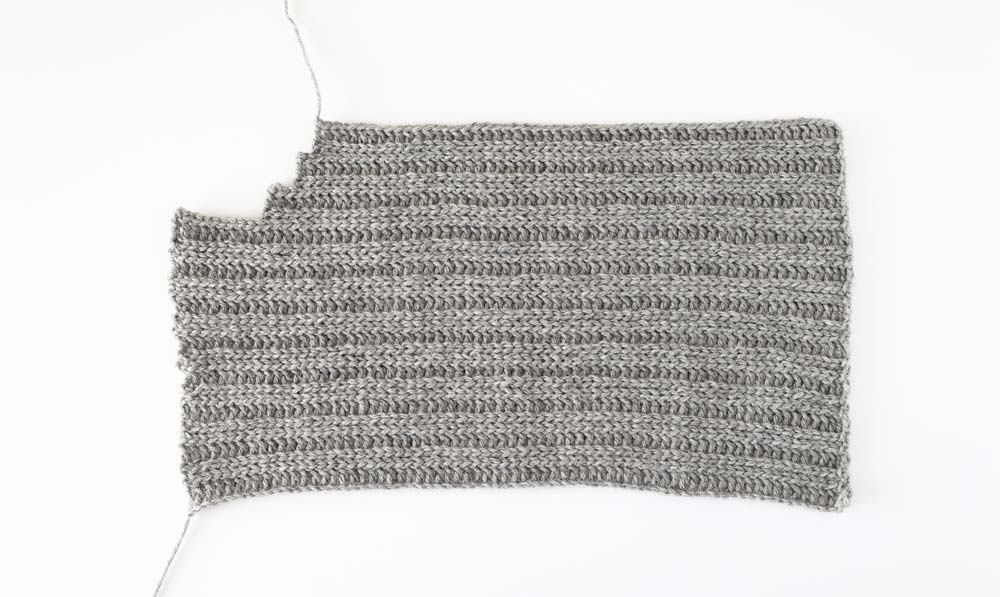
Second Front Panel
SECOND FRONT PANEL INCREASE
FOUNDATION CHAIN: Ch 53(57, 57, 61, 61)(65, 65, 69, 69).
ROW 1 (RS): DC into 3rd ch from hook, DC in each st until end, turn.
<51(55, 55, 59, 59)(63, 63, 67, 67)>
ROW 2: As BASE SL ST row.
<51(55, 55, 59, 59)(63, 63, 67, 67)>
ROW 3: Ch 1, BLO sl st across, sl st in last st, ch 3, turn.
<51(55, 55, 59, 59)(63, 63, 67, 67) + 3 chs>

ROW 4: Sl st into 2nd ch from hook, sl st in next ch, BLO sl st in each st across, sl st in last st, turn.
<53(57, 57, 61, 61)(65, 65, 69, 69)>


ROW 5: As BASE DC row.
<53(57, 57, 61, 61)(65, 65, 69, 69)>

ROW 6: As BASE SL ST row.
<53(57, 57, 61, 61)(65, 65, 69, 69)>
ROW 7: Ch 1, BLO sl st across, sl st in last st, ch 4, turn.
<53(57, 57, 61, 61)(65, 65, 69, 69) + 4 chs>
ROW 8: Sl st into 2nd ch from hook, sl st in each ch, BLO sl st in each st across, sl st in last st, turn.
<56(60, 60, 64, 64)(68, 68, 72, 72)>
ROW 9: As BASE DC row.
<56(60, 60, 64, 64)(68, 68, 72, 72)>
ROW 10: As BASE SL ST row.
<56(60, 60, 64, 64)(68, 68, 72, 72)>
ROW 11: Ch 1, BLO sl st across, sl st in last st, ch 11, turn.
<56(60, 60, 64, 64)(68, 68, 72, 72) + 11 chs>

ROW 12: Sl st into 2nd ch from hook, sl st in each ch, BLO sl st in each st across, sl st in last st, turn.
<66(70, 70, 74, 74)(78, 78, 82, 82)>
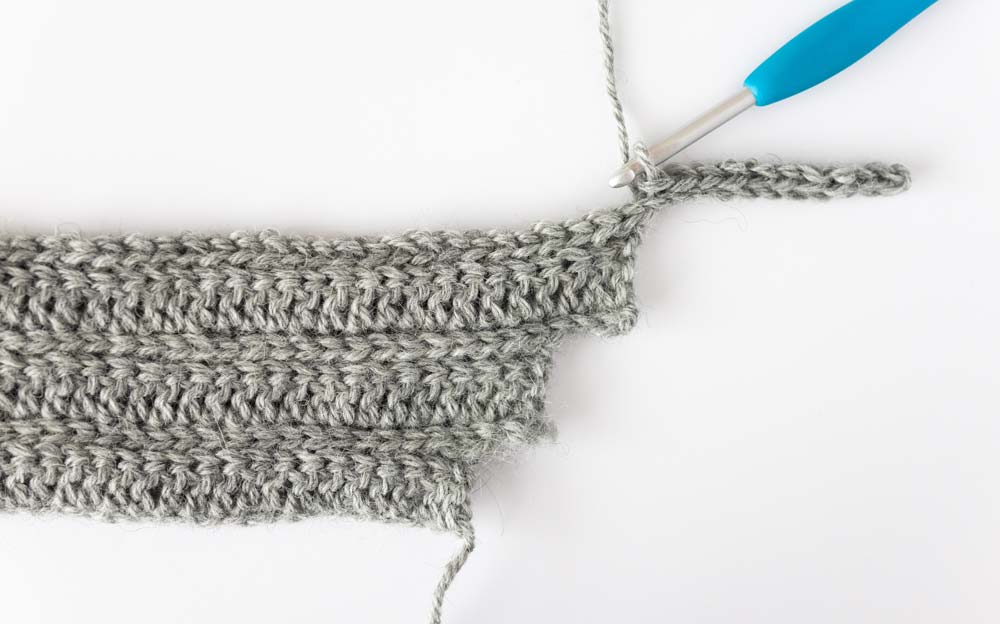
ROW 13: As BASE DC row.
<66(70, 70, 74, 74)(78, 78, 82, 82)>
Don’t fasten off!
Repeat FIRST FRONT PANEL ROWS 2 – 5 until ROW 37(41, 45, 49, 53)(57, 61, 65, 69).
<66(70, 70, 74, 74)(78, 78, 82, 82)>
Fasten off.

Sleeves
*Make 2
FOUNDATION CHAIN: Ch 63(65, 65, 67, 67)(69, 69, 71, 71).
*The foundation chain runs the length of the sleeve, not the width.
ROW 1 (RS): Sl st into 2nd ch from hook, sl st 11, DC in each ch until end, turn.
<62(64, 64, 66, 66)(68, 68, 70, 70)>
ROWS 2 – 4: As BASE SL ST row.
<62(64, 64, 66, 66)(68, 68, 70, 70)>
ROW 5: Ch 1, BLO sl st 12, BLO DC across, DC in last st, turn.
<62(64, 64, 66, 66)(68, 68, 70, 70)>
Repeat ROWS 2 – 5 until ROW 53(57, 57, 61, 65)(69, 73, 77, 81).
<62(64, 64, 66, 66)(68, 68, 70, 70)>
Fasten off.

Fold sleeve in half lengthways. Whip stitch the edges of the sleeve together.

Assembly
Lay the front panels on top of the back panel.

Whip stitch the shoulder seams together.
*For a neat finish and smooth seams, make sure that the ribbing matches on the RS of the sweater and place whip stitches into the centre of the DCs, rather than wrapping around the entire stitch.
Whip stitch up the sides of body panels together, leaving a gap for the sleeves.
*When sewing along the body portion, I find that picking up the back loops of the stitches give a more ‘seamless’ look.
Whip stitch top of sleeves to arm holes.
Turn the cardigan inside out so that the RS is facing you.
Ribbing
HEMLINE RIBBING
*Optional
FOUNDATION CHAIN: Ch 9.
ROW 1: Sl st into 2nd ch from hook, sl st in each ch until end, turn.
<8>
ROW 2: Ch 1, BLO sl st across, sl st in last st, turn.
<8>
Repeat ROW 2 until ribbing equals the width of the back and front panels.

Fasten off.
Whip stitch Hemline Ribbing to hem of Cardigan Body.

SECOND FRONT PANEL RIBBING
*When you are wearing the cardigan, the Second Front Panel is the left panel.
FOUNDATION CHAIN: Ch 9.
ROW 1: Sl st into 2nd ch from hook, sl st in each ch until end, turn.
<8>
ROW 2: Ch 1, BLO sl st across, sl st in last st, turn.
<8>
Repeat ROW 2 until ribbing equals the length of the inside edge of the Second Front Panel / opening of the cardigan.

Fasten off.
Whip stitch Second Front Panel Ribbing to edge of Second Front Panel.

Buttonholes
Place 1 button to the left of the top edge of the second front panel ribbing.
*This button will be sewn onto the round neckline ribbing.

Place 1 button on bottom edge of the second front panel ribbing. Space out your remaining buttons evenly in between the top and bottom buttons.
Line up a SM with the centre of each button and place SM in corresponding row along Second Front Panel ribbing.

FIRST FRONT PANEL RIBBING
FOUNDATION CHAIN: Ch 9.
ROW 1: Sl st into 2nd ch from hook, sl st in each ch until end, turn.
<8>
ROW 2: Ch 1, BLO sl st across, sl st in last st, turn.
<8>
Repeat ROW 2 until ribbing is long enough to reach the 1st SM.

BUTTONHOLE ROW: Ch 1, sl st 2, ch 4, skip 4 stitches, sl st 2, turn.
*Make sure your buttons fit very snugly in the button holes as the button holes will stretch out. If the button hole is too loose, the buttons will slip out. To make the button holes smaller, *ch 1, sl st 3, ch 3, skip 3 stitches, sl st 2, turn.


Continue with *Repeat ROW 2 until the ribbing reaches the next SM, crochet a BUTTONHOLE ROW; until you have crocheted all the button holes and then repeat ROW 2 until the First Front Panel Ribbing is the same length as the Second Front Panel Ribbing.
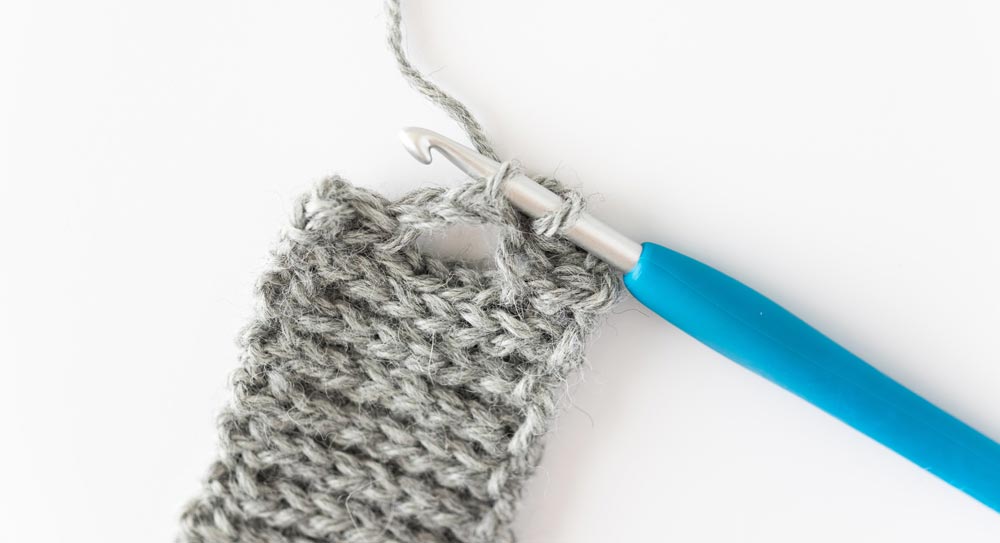

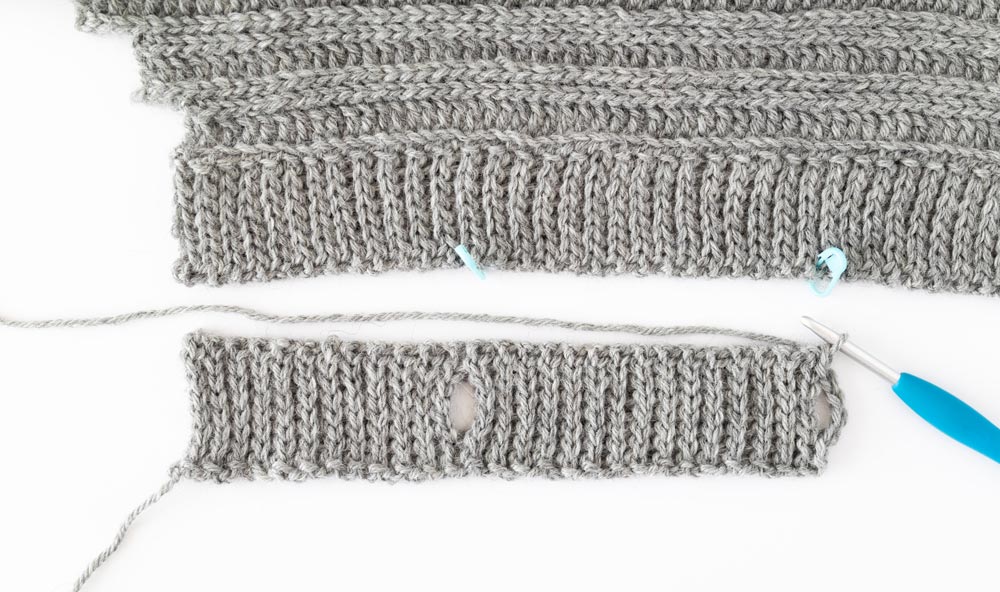

Whip stitch First Front Panel Ribbing to edge of First Front Panel.
*Make sure that the button holes correspond to the SMs on the Second Front Panel Ribbing.


NECKLINE RIBBING
FOUNDATION CHAIN: Ch 9.
ROW 1: Sl st into 2nd ch from hook, sl st in each ch until end, turn.
<8>
ROW 2: Ch 1, BLO sl st across, sl st in last st, turn.
<8>
Repeat ROW 2 until ribbing is 3cm / 1.25” shorter than the head opening (approx. 59cm / 23.25”).
*Last row of the neckline ribbing should line up with the centre of the button holes on the First Front Panel Ribbing.

Repeat the BUTTONHOLE ROW, and then repeat ROW 2 until the ribbing can fit around the head opening (approx. 62 cm / 24.25”).

With the RS of the cardigan facing you, pin neckline ribbing to neckline opening, focusing on creating a smooth curve / round neckline.
*The corners of the ‘steps’ will protrude from the edge of the ribbing, this is ok as we’ll sew over them.
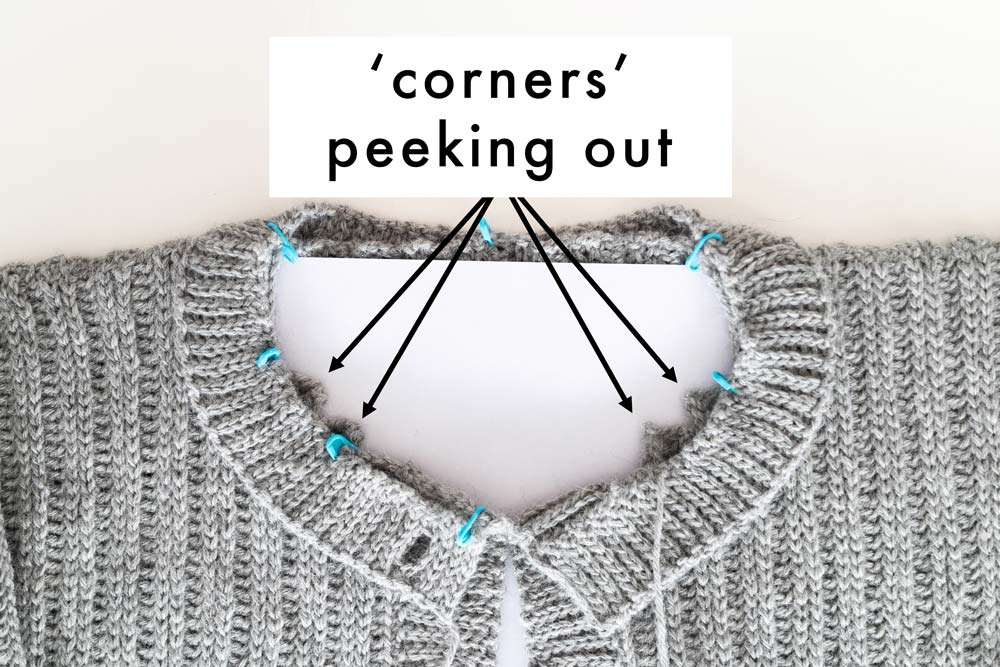
Whip stitch neckline ribbing to head opening, taking care to sew over the ‘corners’.
*After you’ve sewn over the corners they should resemble small ‘bumps’.
*The bumps will not be visible when wearing the cardigan nor should you be able to feel them.


Sew buttons on the Neckline and Second Front Panel Ribbing, taking care to match the buttons to the button holes.
*You can use the SMs to mark the button placement.
*If the neckline is ruffling – you’ve placed the buttons too close together and if the neckline is pulling/puckering – you’ve placed your buttons too far apart.

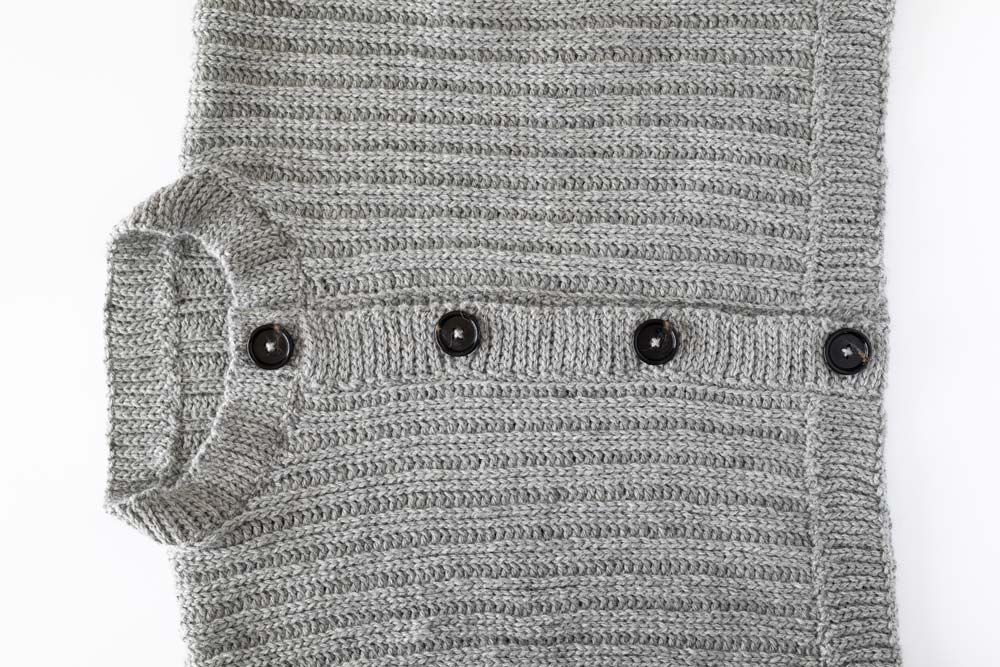
Weave in all of your ends and steam block your cardigan.

Voilà! You’ve finished your Pompeii Ribbed Cardigan ?
The post Crochet Ribbed Button Cardigan – free pattern + video appeared first on For The Frills.