Hey guys, I am back today to share a great project for adding character to your kitchen. I put together this custom wood vent hood tutorial for you, in hopes of breaking down the process so that you can tackle something similar for your own home.

Our kitchen is in “the awkward stage” of making do until we are ready to tackle replacing all of the cabinets and painting the walls and floors. In the mean time I’ve made inexpensive changes like painting the existing 1940’s cabinets- to help it feel more like us! (you can read all about) I blog over at – and am all about creating inspiring spaces you love to live in. I truly believe this is possible on any budget- and in our case as a soon to be family of six, I get the pleasure of utilizing my creativity, and flexing my DIY muscles, in order to make every dollar count.
We are working on this kitchen as budget allows. When our very well used stove broke, it was time to bite the bullet and replace it. We decided to make the switch to a gas range, which meant moving the stove and installing a new vent system. While we hope to tackle the rest of the kitchen soon- this little wood vent range hood project got bumped to the top of the list. Here is a an inspiration sketch for where I want to go with this wall:

The current cabinet and counter top are left over from the previous lay out, and will be replaced. If this photo doesn’t encourage you that all of us bloggers aren’t living in perfectly finished homes… well I’m not sure what else might 

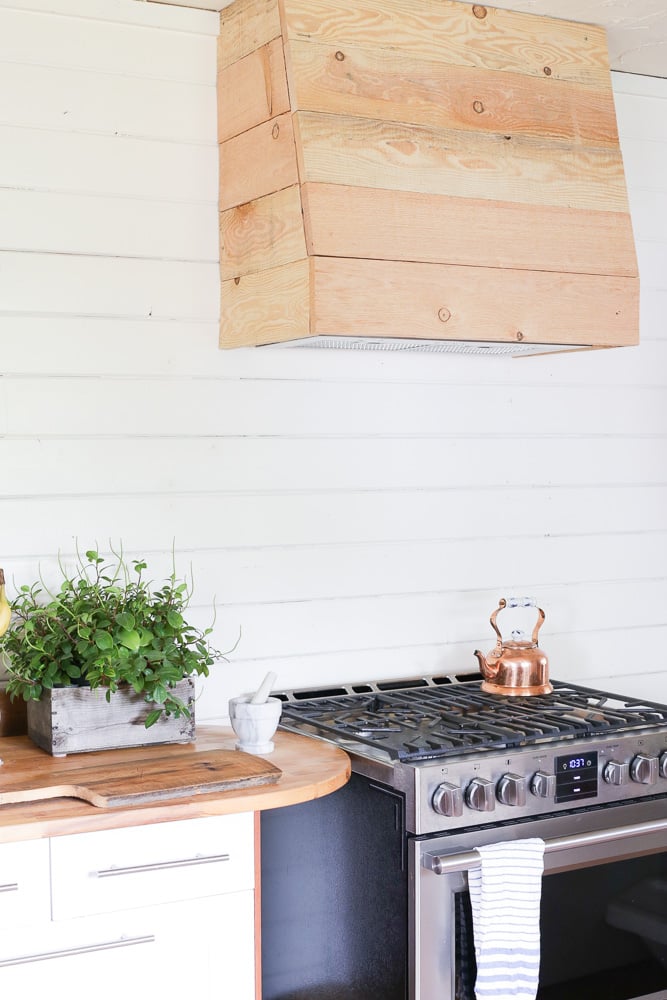
I love the cottage look, mixed with a bit of modern farmhouse… just think lots of neutrals, planked walls and warm reclaimed wood. Our kitchen cabinets will be white, so I wanted to bring in warmth and additional texture with a custom wood vent cover. Be sure to pop over to my blog to see how this kitchen reno progresses- and to see what color I choose for the wood stain.
The finished dimensions of our vent hood are just over 32″ wide, and just under 18″ deep. We have built to the specifications of our range ventilation insert, which is an Ancona Model: Inserta A II 28″. Keep in mind that you will need to modify your plans to suit the needs of your insert. You will also need to take the thickness of your finish boards into account. Today I am working with reclaimed rough sawn fur, which measures 1″ thick. I will include the cut list according to our materials and fan model.
 We decided to design our wood vent hood with a removable front access panel, vs. stick framing it in place. I would classify this as an intermediate level project, though if you are keen- I am sure you could work your way through. Please read through the entire tutorial before tackling this project. Let’s get started!
How to Build a Custom Vent Hood or Range Hood
Tools Required:
- Pocket hole jig
- Drill
- Chop Saw
- Table saw
- Sand Paper
- Clamps
- optional: orbital sander
Supplies Required
- Wood Glue
- Pocket Screws
- Wood Screws
- 2×4 framing lumber
- rough sawn 1×6″ fur, or lumber of your choice for exterior finish
- hood fan insert and installation specifications
- optional: drywall screws and plugs
Building the Frame
To start you will need to determine the full height of your custom wood hood vent. We have 8 foot ceilings. The finished height of our hood fan vent cover was about 29″. Be sure to check the clearance requirements of your specific hood fan insert, as there are minimum and maximum clearances required between the stove top and fan. The minimum recommendation for our model paired with a gas range is 30″ between the fan and cooking surface.

To begin, construct a rectangular frame out of 2×4’s. This will be the lower portion of the range hood vent frame. You can use pocket holes and screws, or pre-drill the holes and use wood screws. Pre-drill 3 pocket holes along the front and sides to attach the first row of fir boards at a later step.
Cut list for this is:
- 2 2×4 @ 16 1/4″
- 2 2×4 @ 26 1/4″

Next construct an additional frame using 2×4’s. This will be the uppper portion of the hood vent frame. Cut list for this is:
- 2 2×4 @ 10″
- 2 2×4 @ 26 1/4″
Now that you have constructed these two rectangles, it is time to mount them in place. Begin by installing the lower frame using wood screws into studs. Check for level, and make sure you are factoring in your clearance requirements.

It is now time to intall the upper portion of the frame using wood screws. I screwed into both the wall and ceiling. The vent will run outside- and we will cut out for appropriate venting through the roof.

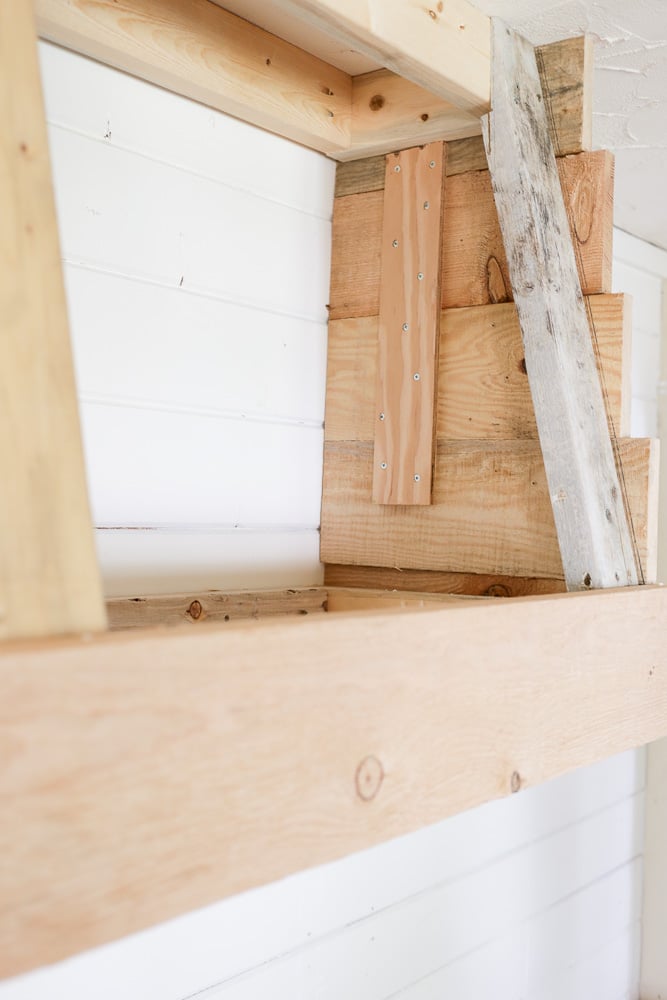
Once your two frame pieces are in place, it is time to mark the angle on your 2×4’s for the angled support brackets. Hold up the board, mark the angle with a pencil and rip down on a table saw. Be sure the lower front portion of the frame is level when you mark the angle. Attach support brackets using wood screws.


Once you have your frame in place it is time to start working on the visible exterior of the hood fan. This includes constructing 2 side panels, a removable front access panel, a stationary first row and a finished interior frame cover for the fan to attach to.
Step 1: Attach First Row
Taking into account the finished height of the vent hood, position first row starting with the front and wrapping the sides. Attach the first row using the pre-drilled pocket holes.

Step 2: Build Side Panels
Build 2 side panels using the 1×6 lumber. Use cleats or pocket holes in the back to secure the pieces. Be sure to sand any cuts, as well as the face if needed. At this point it will look like a stair step. Dry fit the boards to the frame and mark the angle.
Step 3: Cut and Install Range Hood Side Panels
Once you have assembled your panel and marked the angle it is time to cut the side panels. It is important that you pre-mark the appropriate angle based on the finished height and angle of the taper.

Attach 2 2×4 blocks to the wall, and install the side panels using screws on the top and back of the face.

Step 4: Assemble and Install Range Hood Interior Face Frame
Assemble the interior face frame for attaching the fan. Our opening needed to be 10 1/4 by 26 1/4. We ripped down 2 2″ wide side pieces, and 2 3″ wide long pieces. Attach to the 2×4 frame using pocket screws.

Step 5: Assemble Range Hood Front
Assemble the front of the vent hood using cleats and/or pocket screws.

Step 6: Cut and Install Range Hood Front Panel
Dry fit the front panel and mark the angle of the joint between the stationary row and first row of the panel. Cut a mitred joint using the table saw.
Pre-drill holes and mount front panel to the frame using flat head screws.

Step 7: Install the Vent Fan
Install the fan and make any necessary ducting connections.

Because I am in the process of choosing final paint colors and tile, I opted to wait to stain the vent cover. Whether you stain or leave it natural, I would recommend sealing with clear poly to protect against moisture and steam. For simplicity sake, you could stain and seal the panels prior to install.


__________________________
I hope this project inspires you to tackle something similar in your home. I love the simplicity of the clean horizontal lines, and the warmth of the wood, but you could make it more ornate or chunky with just a few pieces of trim. I think this wood vent hood will be just the right touch for our kitchen, and I am so looking forward to bringing in all the pieces of the puzzle.
I would love to see any of your vent covers inspired by this project- so be sure to tag us on instagram using #imaremodelaholc or share to the page. Thanks so much for stopping in!
-Miss Ash
More Tutorials from Ashlea:
 |
 |
|
More DIY range hoods:
The post appeared first on .


