Learn how to crochet a cardigan with buttons! Featuring a wide v-neckline and button up design, this slouchy fall cardigan is features easy stitches and knit-look ribbing. If you’ve never crocheted button holes before, don’t worry! This free crochet cardigan pattern is accompanied by a step-by-step video tutorial.
This post may contain affiliate links, view our for details.
Thank you to for sponsoring this free crochet sweater pattern! As always, all thoughts and opinions are 100% my own ?
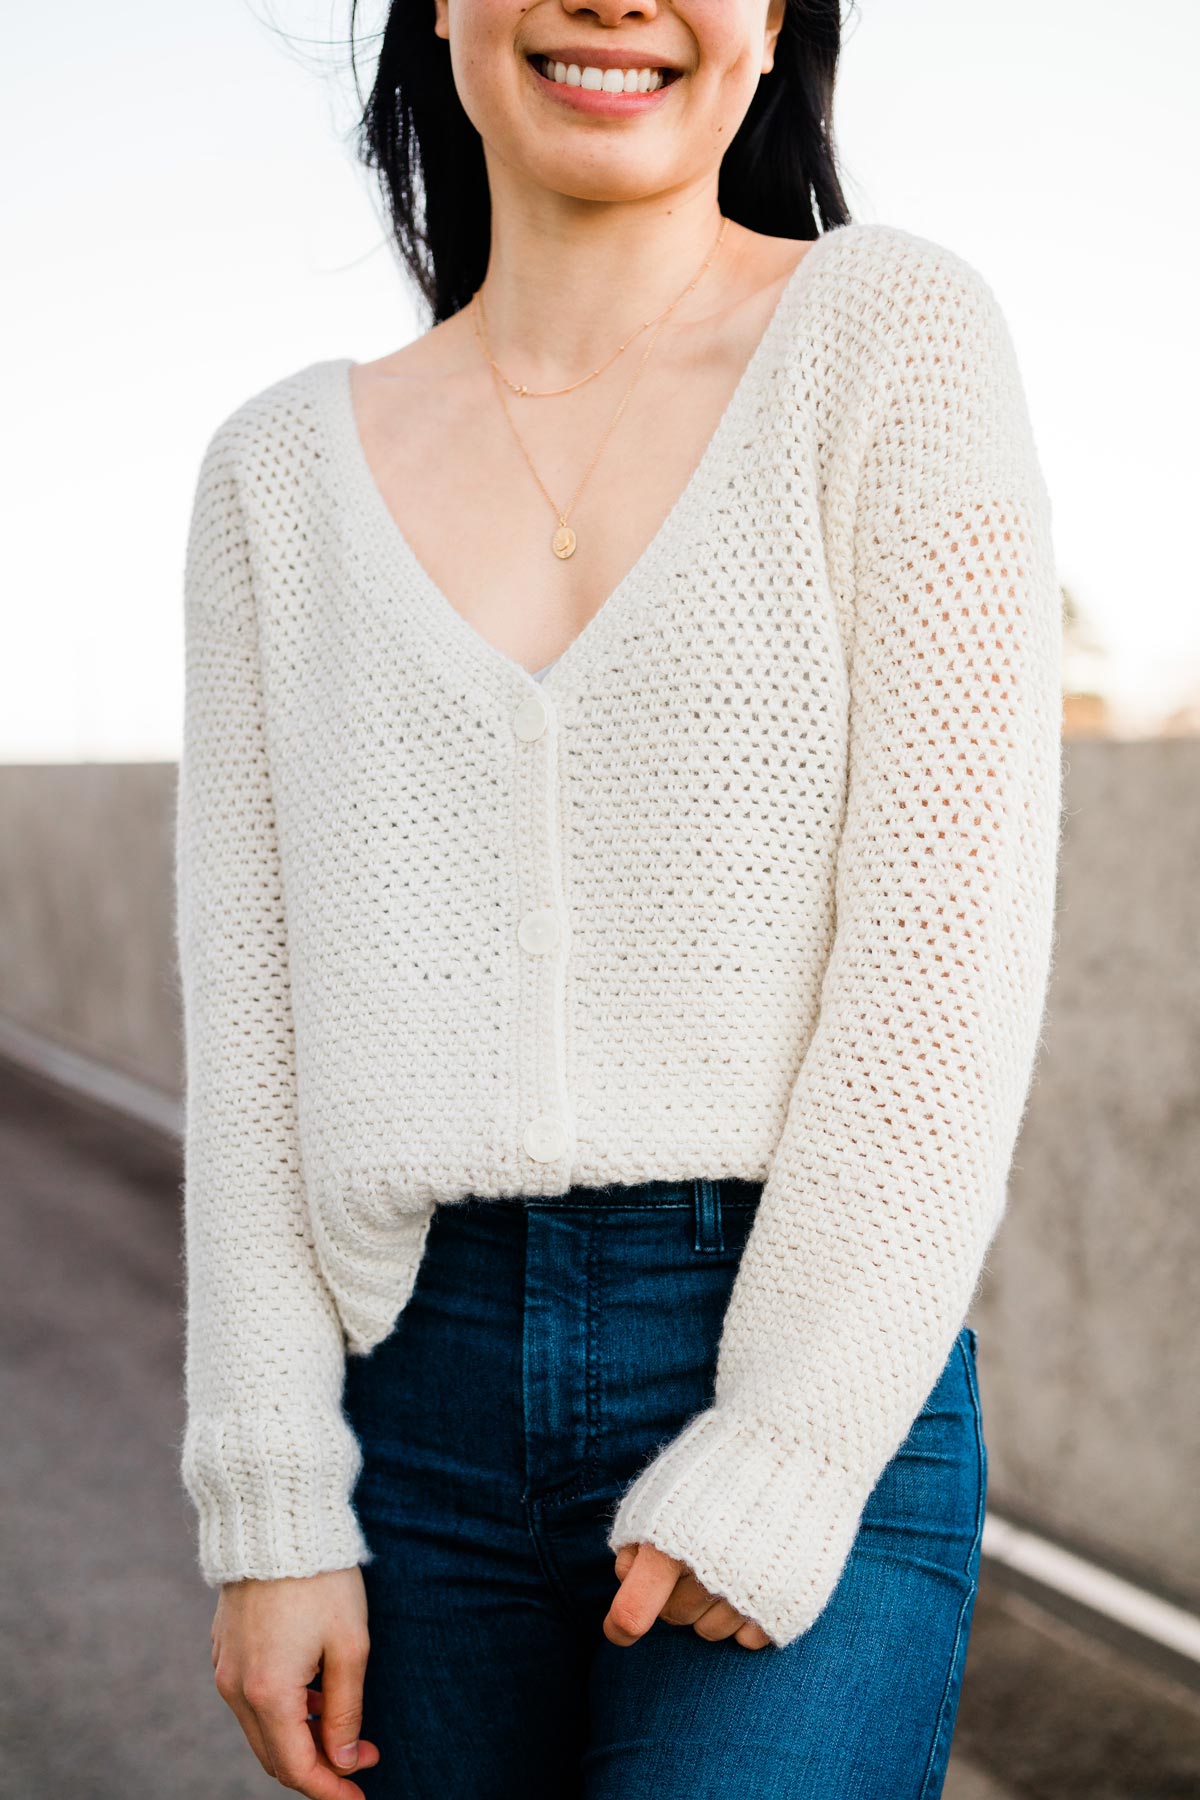
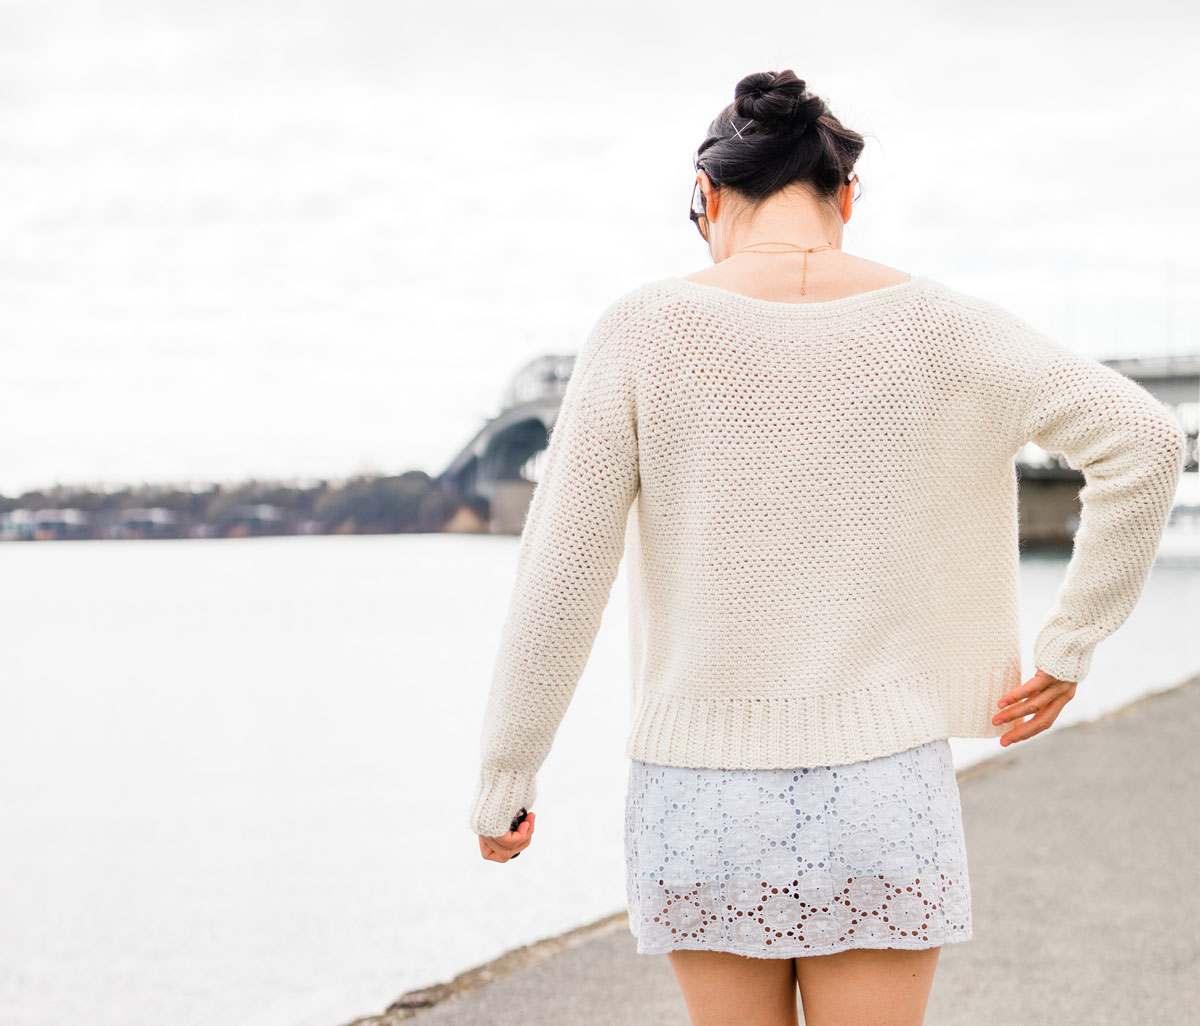
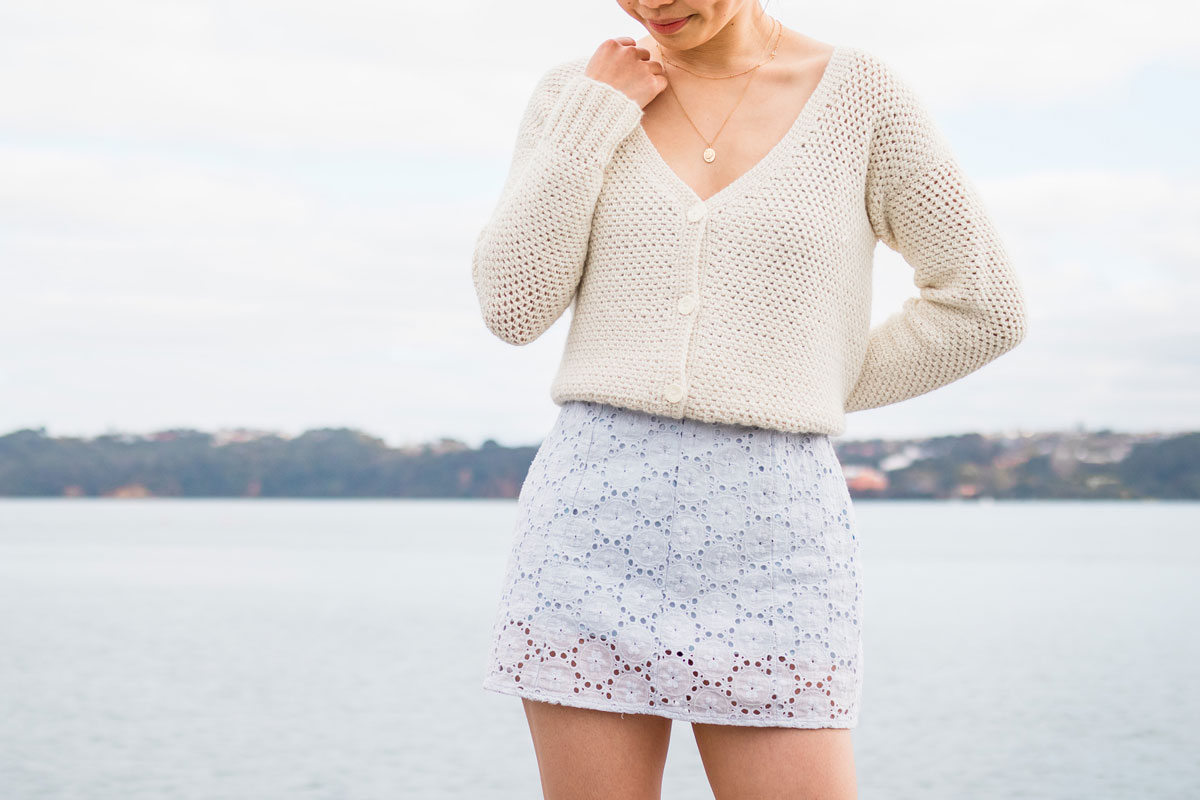
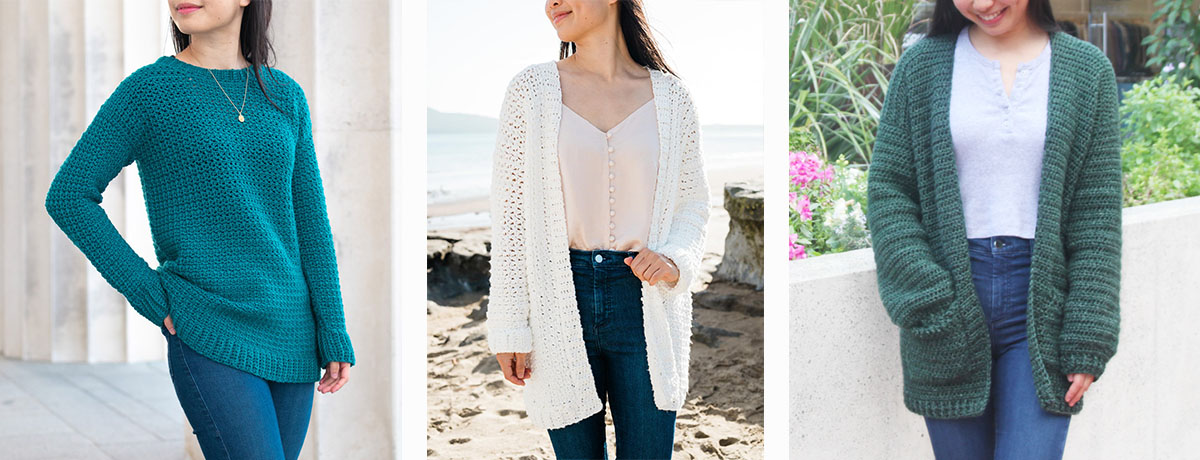
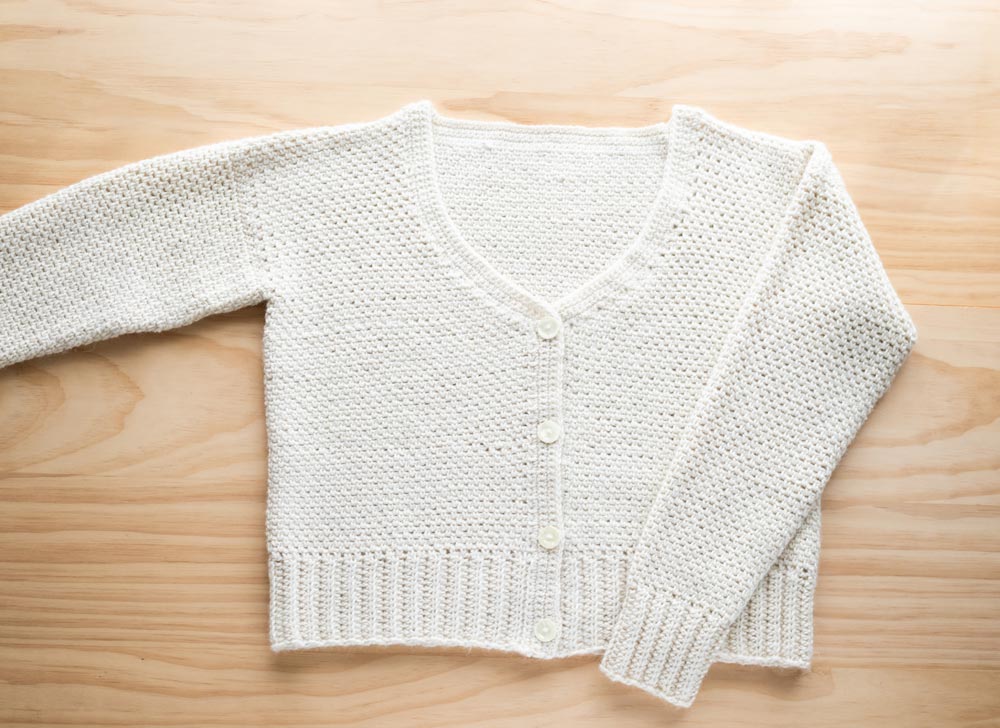
The Aria Cardigan is the ultimate everyday crochet cardigan! In the past few months it has leapfrogged over the and to become my most worn crochet item ? With a flattering v-neck, slouchy body and loosely tapered sleeves, this cardigan is cosy, comfy, extremely versatile and the best part is the length is customisable (long cropped cardigan version is featured the pictures)! You can dress this modern crochet cardigan up with jeans and ankle boots or wear it around the house as a snuggly lounge sweater.
This v-neck button down cardigan uses a stitch pattern called the Linen Stitch (a.k.a the Moss Stitch) which is made up of only single crochets and chains. The simple stitch combination is very easy to get the hang of after a few rows of repeats. It has a solid look to it but upon closer inspection you’ll notice that the chains create a very subtle mesh effect.

The Linen Stitch makes up the bulk of the cardigan while back loop half double crochets form the body and sleeve ribbing. Combined together, these stitches give the Aria Cardigan lovely drape and movement which gives this design a knit-like look!
I love how the stitch texture is so subtle and this v-neck crochet cardigan almost looks store-bought – but in the best way possible! I think that the best crochet garments are designs where you’re not sure if they are made by machine or handmade because they are just so modern and wearable!
You could easily wear this button-up cardigan in fall, winter, spring or even on chilly summer nights! The pattern uses WeCrochet’s which is DK/Light (3) and the thickness of this yarn is the perfect weight to wear in any season. It’s light enough to be worn as a layering piece underneath coats, jackets etc. but at the same time this cardigan will keep you warm by itself. The Aria Cardigan is the perfect transitional sweater for in between seasons!
This simple crochet cardigan is crocheted in 3 panels – 1 body panel and 2 sleeves and only uses 3 different stitches – single crochet, single crochet 2 stitches together and half double crochet!
I’ve classified this pattern as an Easy+ pattern because if you’ve never crocheted button holes before learning this new technique might seem a bit daunting (or at least it was to me haha). But the button hole technique used in this crochet cardigan pattern is seriously SO RIDICULOUSLY EASY!
All you need to do is chain 2, skip 2 stitches, single crochet in the next stitch and then you have a button hole. That’s it! I can’t believe it took me so long to dive into the world of buttons on crochet garments but now that I’ve gotten a hang of it you’ll probably be seeing a lot more button designs in the future.
Crocheting the button holes is a breeze so the (relatively) trickiest part of this slouchy cardigan pattern is the v-neck shaping. However, if you can spot the last stitch of every row while decreasing you’ll find that this is an easy crochet sweater pattern (I just added the ‘+’ as beginners might not be familiar with decreasing stitches).
If you’re an adventurous beginner and you’d like to give this pattern a go, just place a stitch marker in the first stitch at the beginning of the row along the decreases (the pattern instructions let you know which rows to place the stitch marker in). That way you’ll know which stitch is the last stitch of the next row – it’s that simple to create a v-neck cardigan!

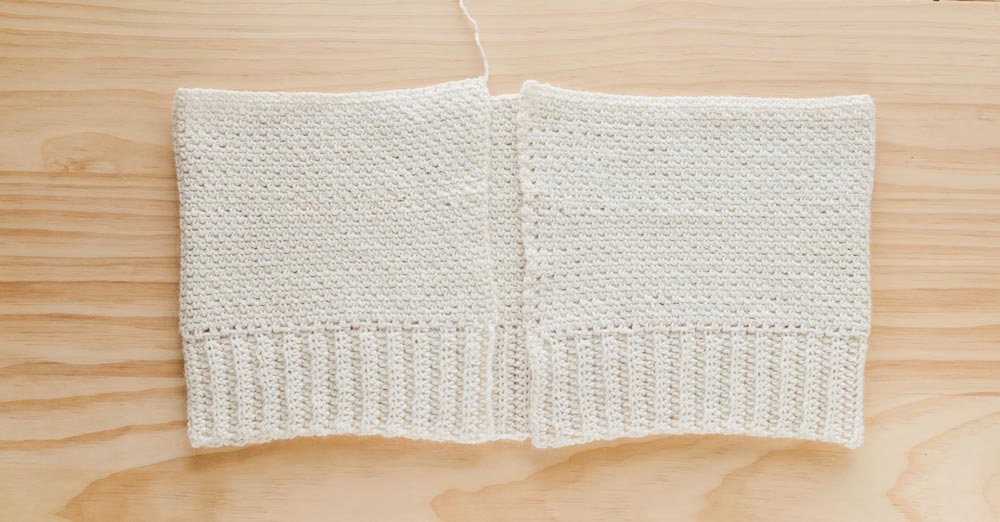
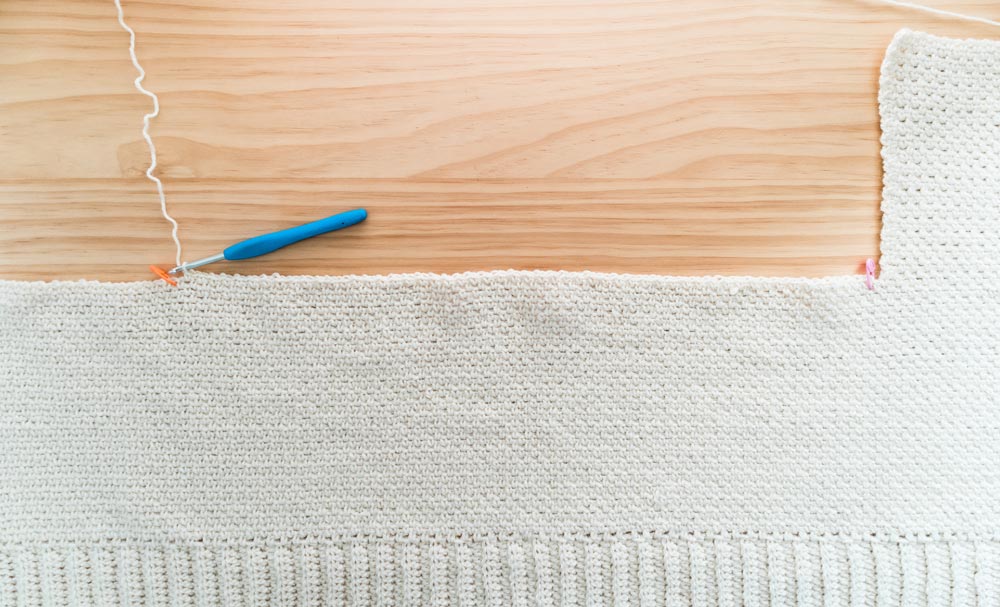
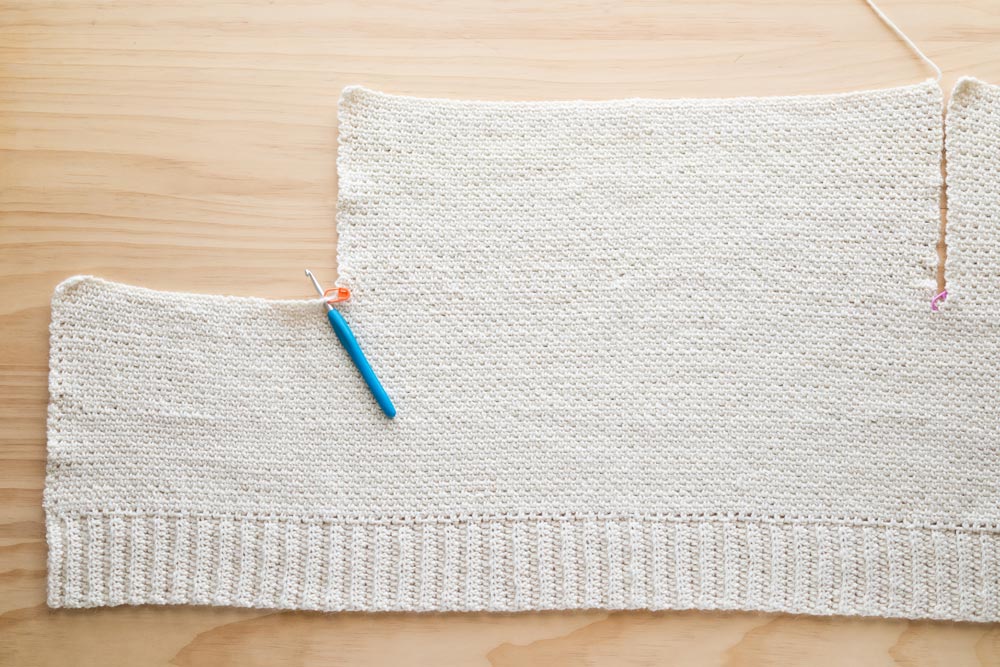
To begin the Aria Button Cardigan, both the body panels and sleeves are crocheted from the bottom up. We’ll start with crocheting the ribbing using back loop half double crochets. Then, we’ll crochet the Linen Stitch along the long edge of the ribbing and extend the body and sleeves.
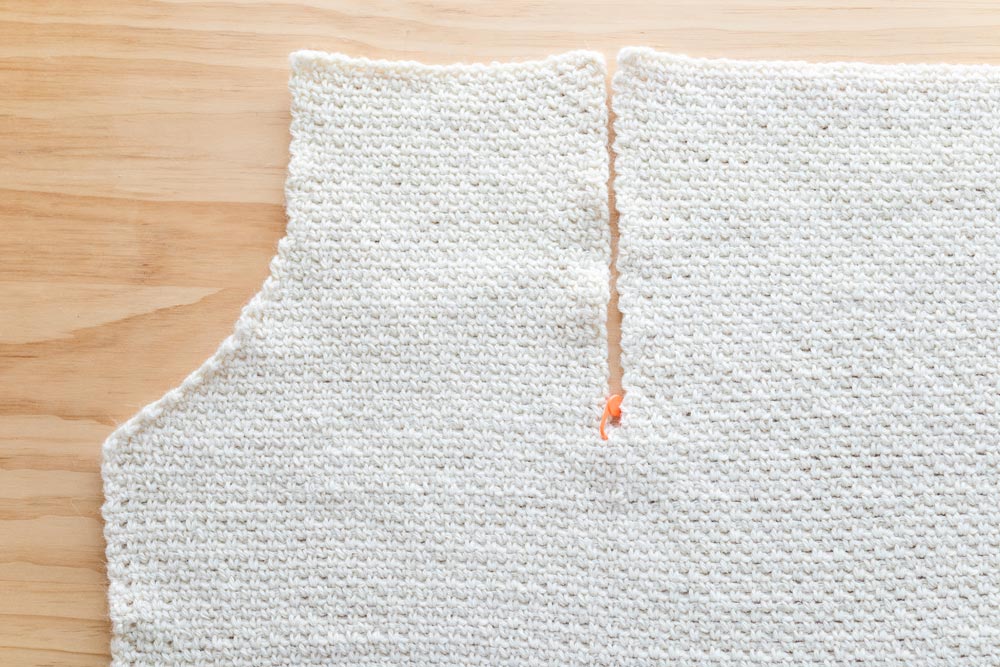
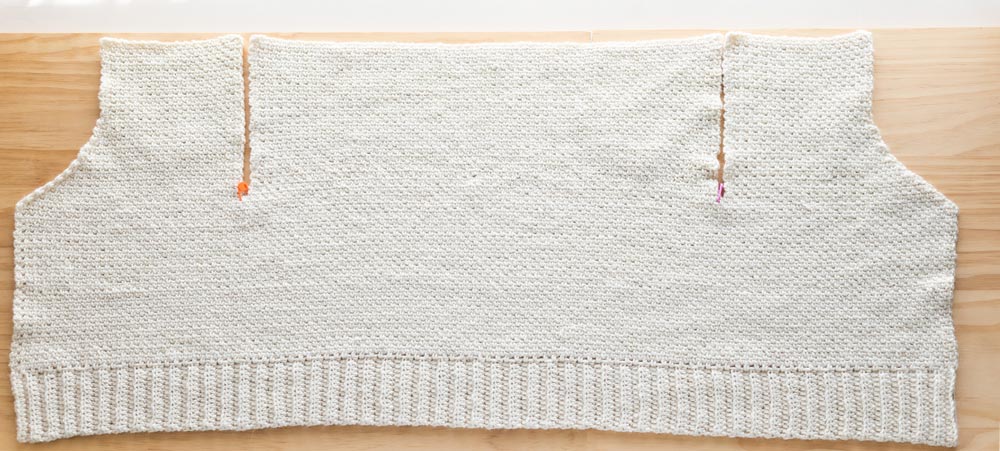
Since the body panel is worked in one piece, we’ll crochet the first front panel with neckline shaping, fasten off, re-insert your hook along the body panel, crochet the back panel, fasten off, re-insert your hook along the body panel and then the second front panel with neckline shaping.
This way the body panel has very minimal seaming – you only need to sew the tops of the shoulders together. The sleeves are sewn together along the long edge and then to assemble simply sew the sleeves to the armholes.
Note: At this point I decided to steam the block the corner edges of my cardigan so that they would lay flat but this step is completely optional! Blocking at the end will also produce the same result.
After assembly you’ll add a single crochet border to your v-neck cardigan, crochet the button holes and then sew the buttons to your cardigan. Weave in your ends, steam your cardigan and you’ll be all done!
Design Inspiration
My most worn item in my wardrobe is a cashmere cropped button-down cardigan and I’ve been determined to crochet my own for years! However, as time passed it kept getting pushed to the bottom of my to-design list as I now have that cardigan in 5 different colours hehe.
Since I didn’t want to re-create the *exact* same cardigan and my love for cropped button-down cardigans has only grown, I decided I wanted to crochet a button-up cardigan that had the drape and look of a knit cardigan! It needed to be a ‘throw on and go’ sweater that you could wear with anything and I’m so happy with how to Aria Cardigan turned out!
You can wear it out, you can wear it at home and you could probably even wear this crochet cardigan to work (I think the sweater’s silhouette would pair so well with pencil skirts!)
The shape of this cardigan is very loose and boxy while the sleeves are generous enough to wear a long-sleeved shirt underneath. The v-neck is wide so that the cardigan has a slouchy and relaxed fit. I think this cardigan looks just as good tucked into pants or skirts as it does when hanging ‘freely’.
When wearing this v-neck button cardigan over a dress, you can also achieve the ‘tucked’ look but simply wearing a thin belt around your waist (as seen in some of the pictures). Tuck the sweater into the belt and then pull it out slightly so that the cardigan drapes over the belt and hides it from view ?
Yarn
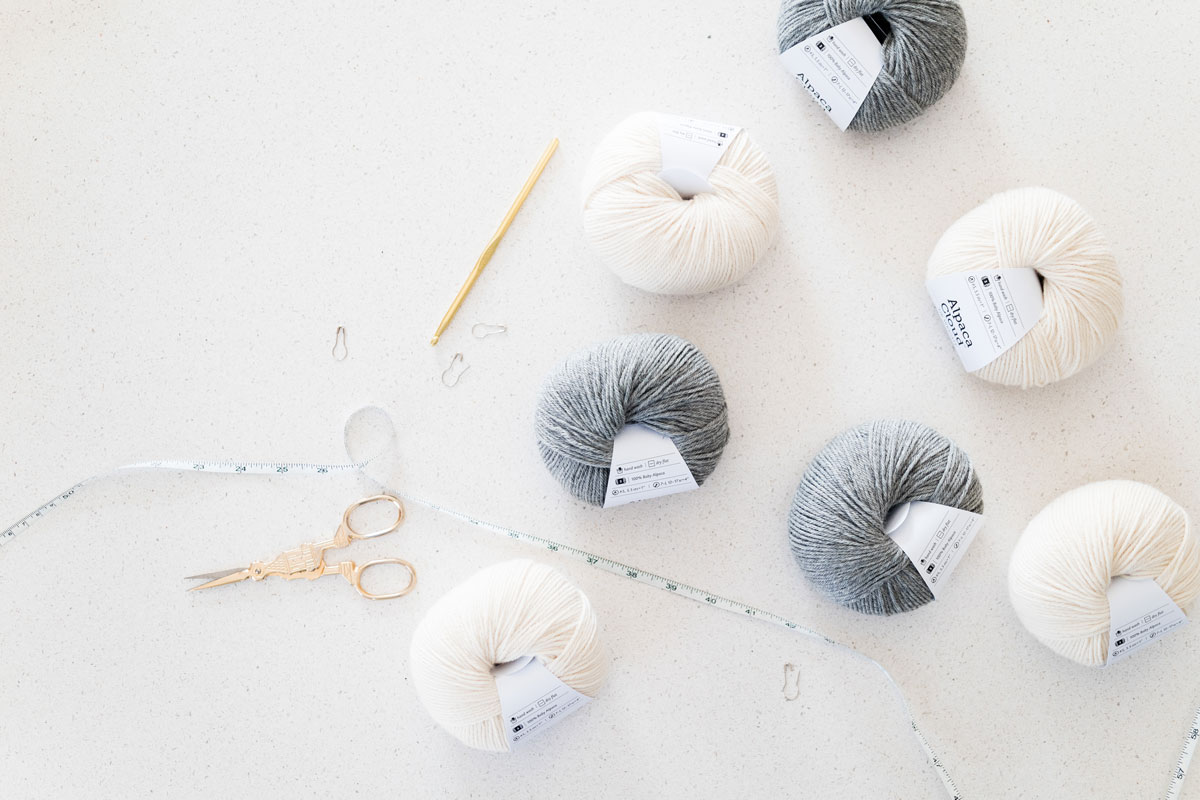
This crochet cardigan pattern uses from WeCrochet which is a 100% Baby Alpaca yarn. This yarn literally feels like a cloud – it’s ridiculously soft, fluffy with a loose-ish spin to give it an airy feel with incredible drape.
Since this yarn is so incredibly soft, light and airy (rather than a bouncy and marshmallowy feel) it will stretch out after you’ve worn your crochet cardigan a few times which is great if you like the slouchy look! But just take this into account when picking your size and if you’re in between sizes you’re probably better off sizing down.
is a true DK weight yarn so you can easily substitute it with for a machine-washable version or any DK / Light (3) that has good drape.
There are over 20 shades of which half are neutrals (a good array of creams, beiges, browns and greys) while the other half are what I would call ‘muted brights’. This is because most of the colour ways have a mix of a few different colours to give off a subtle heather effect which is just gorgeous! I chose the shade ‘Sophia’ which is a perfect cream shade – not too yellow and not too white, a perfect neutral!
Check out more free crochet sweater patterns!
1. / 2. / 3.
Pin me for later!
Video Tutorial
Add the !
Get the !
Notes:
*Sample is a size small shown on a 5’3” model with a 32” bust.
*The sizing guide follows size XS(S, M, L, XL, 2XL, 3XL). E.g. “Ch 71(79, 87, 95, 103, 111, 119) means Ch 71 for XS, Ch 79 for Small, Ch 87 for Medium, Ch 95 for Large, Ch 103 for XL, Ch 111 for 2XL and Ch 119 for 3XL.” If there is only one number, it applies to all sizes.
*”SC 10” means SC into the next 10 stitches.
*The turning chain ch 1 does NOT count as a stitch, otherwise ch 1 counts as a stitch.
*Total stitches are indicated between < >.
*This pattern uses US crochet terms.
*It is very important to maintain gauge and to check gauge regularly throughout this pattern. Linen Stitch / Moss Stitch can become tighter as you crochet more rows.
*This crochet cardigan is constructed from 3 pieces – 1 body panel and 2 sleeves. The body panel and sleeves are crocheted from the bottom up. The ribbing is crocheted lengthways and the body and sleeves are crocheted directly onto the long edge of the ribbing. For the body panel, we’ll then separate the two front panels and back panel to create armhole openings.
*To assemble, fold the sleeves in half lengthways and sew the long edge together. Sew the shoulder seams together and then sew the sleeves to the armholes. Sew all pieces together with the wrong side facing outwards. With this pattern either side of the stitches can be the ‘right side’. Pick whichever side you prefer, just be consistent when sewing your pieces together. The button hole edging is crocheted directly onto the neckline and then sew the buttons onto the ribbing.
*The length of this cardigan is customisable (alteration instructions provided).
Add approx. 9(10, 10, 12, 12, 13, 14)g of yarn for every additional 2.5cm/1” of length.
Add 1 extra button for every additional 10cm/4” of length.
LEVEL: Easy+
Materials
Yarn – – 8ply / DK / Light (3), 112m/50g, 123yds/1.75oz, 100% Baby Alpaca, Sophia
approx. 455(480, 560, 650, 735, 845, 940)g
4 Buttons – 2cm / 0.75” diameter
Stitches & Abbreviations
Ch = Chain
Ch-sp = Chain Space
Sl st = Slip Stitch
SC = Single Crochet
SC2tog = Single Crochet 2 Stitches Together
HDC = Half Double Crochet
BLO = Back Loop
St(s) = Stitch(es)
Rep = Repeat
Sk = Skip
Measurements cm:
To fit Bust: 76(81, 91, 101, 112, 122, 132)
Back Width: 44(48, 53, 58, 62, 68, 73)
Length: 43(45, 49, 52, 55, 60, 64)
Armhole: 15(15, 17, 19, 20, 21.5, 23)
Sleeve length: 41(41, 42, 43, 45, 46, 47)
Measurements inches:
To fit Bust: 30(32, 36, 40, 44, 48, 52)
Back Width: 17.5(19, 21, 23, 24.5, 27, 29)
Length: 17(18, 19, 20.5, 21.5, 23.5, 25)
Armhole: 6(6, 6.5, 7.5, 8, 8.5, 9)
Sleeve length: 16(16, 16.5, 17, 17.5, 18, 18.5)
*Measurements taken from the garment lying flat.
*Note: The length of my cardigan stretched out by 3cm/1.5” after being worn a few times.
GAUGE: 10cm/4” square = 22 stitches wide x 21 rows tall in linen stitch / moss stitch
OR 19 stitches wide x 11 rows tall in back loop half double crochet
Linen Stitch / Moss Stitch:
Chain an even number of chains.
ROW 1: SC in 2nd ch from hook, *ch 1, sk 1 ch, SC; rep from * until end, turn.
ROW 2: Ch 1, SC in 1st st, SC in ch-sp, *ch 1, sk 1 st, SC in ch-sp; rep from * until last st, SC in last st, turn.
ROW 3: Ch 1, SC in 1st st, *ch 1, sk 1 st, SC in ch-sp; rep from * until 2 sts left, ch 1, sk 1 st, SC in last st, turn.
Repeat ROWS 2 – 3 until you reach desired length.
Aria Button Down Cardigan Pattern
Body Panel
*The body panel is crocheted from the bottom up and includes the front and back panels in one piece. The ribbing is worked vertically, and then we crochet along the long edge of the ribbing to create the body panel.
Body Panel Ribbing
FOUNDATION CHAIN: Ch 15.
ROW 1: HDC into 2nd ch from hook, HDC in each st until end, turn.
<14>
ROW 2: Ch 1, BLO HDC 13, HDC in last st, turn.
<14>
Repeat ROW 2 until ROW 96(104, 116, 128, 136, 148, 160).
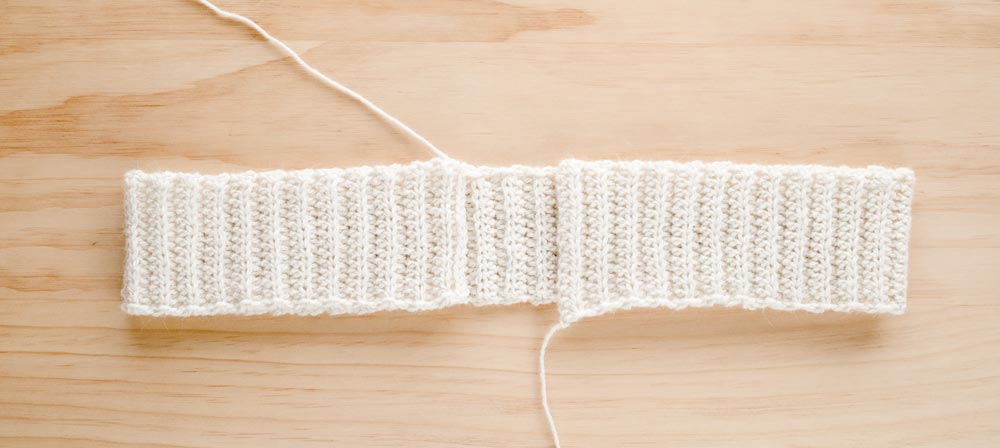
Do not fasten off! We will now work along the long edge of the ribbing.
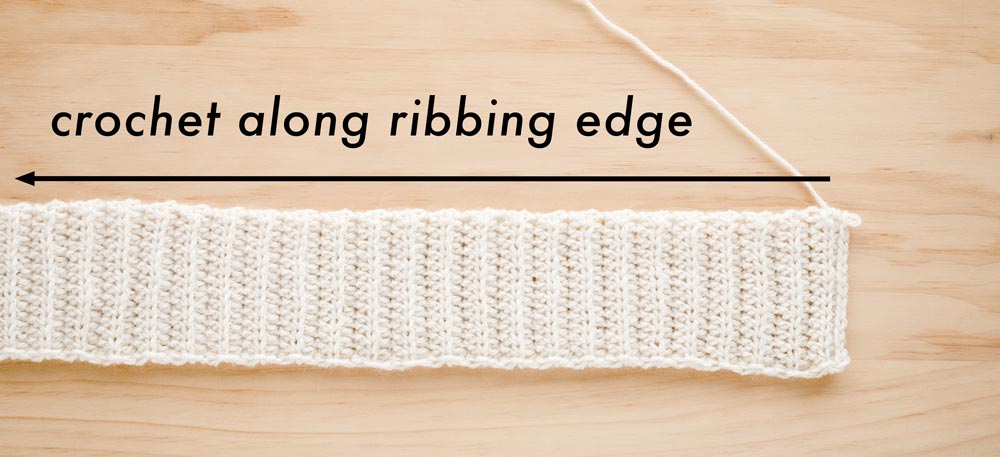
Body
ROW 1: Ch 1, SC in 1st row, *ch 1, SC in next row; rep from * until end, turn.
<191(207, 231, 255, 271, 295, 319)>

ROW 2: Ch 1, SC in 1st st, SC in ch-sp, *ch 1, sk 1 st, SC in ch-sp; rep from * until last st, SC in last st, turn.
<191(207, 231, 255, 271, 295, 319)>
ROW 3: Ch 1, SC in 1st st, *ch 1, sk 1 st, SC in ch-sp; rep from * until 2 sts left, ch 1, sk 1, SC in last st, turn.
<191(207, 231, 255, 271, 295, 319)>
ROW 4: Rep Row 2.
<191(207, 231, 255, 271, 295, 319)>
Repeat ROWS 3 – 4 until ROW 38(38, 40, 44, 48, 52, 56).
<191(207, 231, 255, 271, 295, 319)>
*You can remove/add repeats of Rows 3 – 4 to shorten/lengthen your cardigan.
Keep in mind that the neckline shaping + panel rows add approx. 18(20, 20, 21, 23, 24, 25)cm / 7(8, 8, 8.5, 9, 9.5, 10)” to the current length of your cardigan.
Do not fasten off! Proceed directly to ‘NECKLINE SHAPING’ instructions.
Neckline Shaping
ROW 1: Ch 1, SC2tog, SC in ch-sp, *ch 1, sk 1 st, SC in ch-sp; rep from * until 2 sts left, SC2tog, turn.
<189(205, 229, 253, 269, 293, 317)>
ROW 2: Ch 1, sk 1st st, SC in next st, SC in ch-sp, *ch 1, sk 1 st, SC in ch-sp; rep from * until 2 sts left, SC2tog, turn.
<187(203, 227, 251, 267, 291, 315)>
ROW 3: Ch 1, sk 1st st, SC in next st, SC in ch-sp, *ch 1, sk 1 st, SC in ch-sp; rep from * until 2 sts left, SC2tog, turn.
<185(201, 225, 249, 265, 289, 313)>
Do not fasten off! Proceed directly to ‘FIRST FRONT PANEL’ instructions.
First Front Panel
ROW 1: Ch 1, sk 1st st, SC in next st, SC in ch-sp, *ch 1, sk 1 st, SC in ch-sp; rep from * until you have 42(46, 52, 58, 62, 68, 74) sts in the row, sk 1 st, place SM in next st, turn.
<42(46, 52, 58, 62, 68, 74)>
*The SM should be placed in a ch-sp, not a SC.
ROW 2: Ch 1, SC in 1st st, SC in ch-sp, *ch 1, sk 1 st, SC in ch-sp; rep from * until 2 sts left, SC2tog, turn.
<41(45, 51, 57, 61, 67, 73)>
ROW 3: Ch 1, sk 1st st, SC in next st, SC in ch-sp, *ch 1, sk 1 st, SC in ch-sp; rep from * until 2 sts left, ch 1, sk 1 st, SC in last st, turn.
<40(44, 50, 56, 60, 66, 72)>
*If you have trouble recognising the last st of the row, after you skip the 1st st, place a SM in the first SC of the row to make it easier to find.
Repeat ROWS 2 – 3 until ROW 11.
<32(36, 42, 48, 52, 58, 64)>

Row – by – Row Stitch Count:
ROW 4: Rep Row 2.
<39(43, 49, 55, 59, 65, 71)>
ROW 5: Rep Row 3.
<38(42, 48, 54, 58, 64, 70)>
ROW 6: Rep Row 2.
<37(41, 47, 53, 57, 63, 69)>
ROW 7: Rep Row 3.
<36(40, 46, 52, 56, 62, 68)>
ROW 8: Rep Row 2.
<35(39, 45, 51, 55, 61, 67)>
ROW 9: Rep Row 3.
<34(38, 44, 50, 54, 60, 66)>
ROW 10: Rep Row 2.
<33(37, 43, 49, 53, 59, 65)>
ROW 11: Rep Row 3.
<32(36, 42, 48, 52, 58, 64)>
ROW 12: Ch 1, SC in 1st st, SC in ch-sp, *ch 1, sk 1 st, SC in ch-sp; rep * until 2 sts left, ch 1, sk 1 st, SC in last st, turn.
<32(36, 42, 48, 52, 58, 64)>
ROW 13: Ch 1, sk 1 st, SC in ch-sp, *ch 1, sk 1 st, SC in ch-sp; rep from * until 2 sts left, ch 1, sk 1 st, SC in last st, turn.
<31(35, 41, 47, 51, 57, 63)>
ROW 14: Ch 1, SC in 1st st, *SC in ch-sp, ch 1, sk 1 st; rep from * until 2 sts left, SC2tog, turn.
<30(34, 40, 46, 50, 56, 62)>
ROW 15: Ch 1, SC in 1st st, SC in ch-sp, *ch 1, sk 1 st, SC in ch-sp; rep from * until 2 sts left, ch 1, sk 1 st, SC in last st, turn.
<30(34, 40, 46, 50, 56, 62)>
ROW 16: Ch 1, SC in 1st st, SC in ch-sp, *ch 1, sk 1 st, SC in ch-sp; rep from * until 2 sts left, SC2tog, turn.
<29(33, 39, 45, 49, 55, 61)>
ROW 17: Ch 1, SC in 1st st, *ch 1, sk 1 st, SC in ch-sp; rep from * until 2 sts left, ch 1, sk 1 st, SC in last st, turn.
<29(33, 39, 45, 49, 55, 61)>
Repeat ROWS 14 – 17 until ROW 21(21, 21, 21, 25, 25, 25).
<27(31, 37, 43, 45, 51, 57)>
Row – by – Row Stitch Count:
ROW 18: Rep Row 14.
<28(32, 38, 44, 48, 54, 60)>
ROW 19: Rep Row 15.
<28(32, 38, 44, 48, 54, 60)>
ROW 20: Rep Row 16.
<27(31, 37, 43, 47, 53, 59)>
ROW 21: Rep Row 17.
<27(31, 37, 43, 47, 53, 59)>
Sizes XS(S, M, L) only
ROW 22: Ch 1, SC in 1st st, SC in ch-sp, *ch 1, sk 1 st, SC in ch-sp; rep from * until last st, SC in last st, turn.
<27(31, 37, 43)>
ROW 23: Ch 1, SC in 1st st, *ch 1, sk 1 st, SC in ch-sp; rep from * until last 2 sts, ch 1, sk 1 st, SC in last st, turn.
<27(31, 37, 43)>
ROW 24: Rep Row 22.
<27(31, 37, 43)>
Repeat ROWS 23 – 24 until ROW 34(38, 38, 40).
<27(31, 37, 43)>
Fasten off. Proceed to ‘BACK PANEL’ instructions.
Sizes (XL, 2XL, 3XL) only
ROW 22: Rep Row 14.
<(46, 52, 58)>
ROW 23: Rep Row 15.
<(46, 52, 58)>
ROW 24: Rep Row 16.
<(45, 51, 57)>
ROW 25: Rep Row 17.
<(45, 51, 57)>
ROW 26: Ch 1, SC in 1st st, SC in ch-sp, *ch 1, sk 1 st, SC in ch-sp; rep from * until last st, SC in last st, turn.
<(45, 51, 57)>
ROW 27: Ch 1, SC in 1st st, *ch 1, sk 1 st, SC in ch-sp; rep from * until last 2 sts, ch 1, sk 1 st, SC in last st, turn.
<(45, 51, 57)>
ROW 28: Rep Row 26.
<(45, 51, 57)>
Repeat ROWS 27 – 28 until ROW (44, 48, 50).
<(45, 51, 57)>
Fasten off. Proceed to ‘BACK PANEL’ instructions.
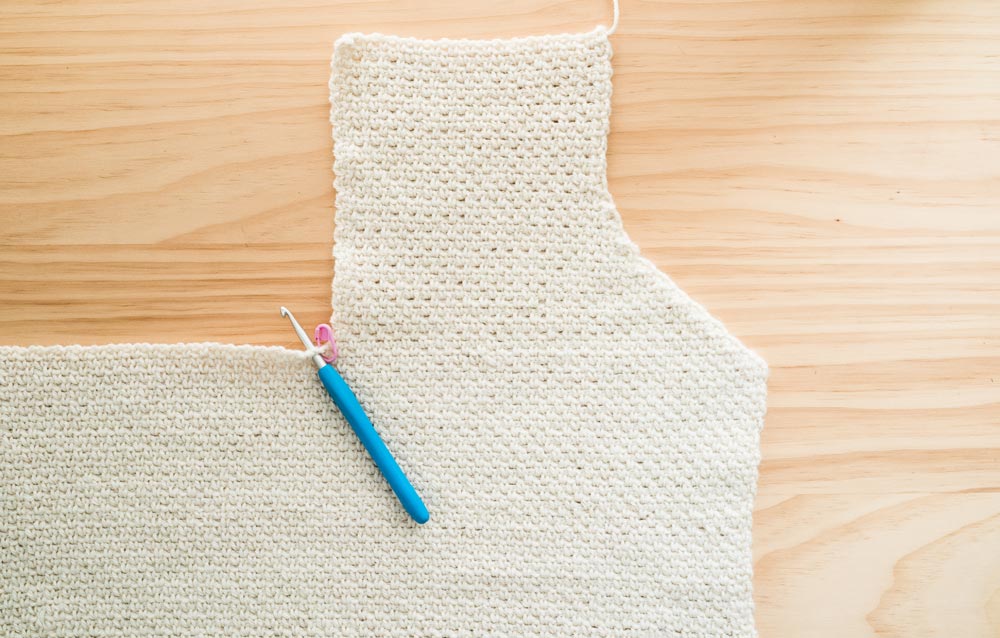
Back Panel
Insert crochet hook into st with SM. Secure yarn and pull up a loop.
ROW 1: Ch 1, SC in 1st ch-sp, *ch 1, sk 1 st, SC in ch-sp; rep from * until you have 97(105, 117, 129, 137, 149, 161) sts in the row, sk 1 st, place SM in next st, turn.
<97(105, 117, 129, 137, 149, 161)>
*The SM should be placed in a ch-sp, not a SC.
ROW 2: Ch 1, SC in 1st st, SC in ch-sp, *ch 1, sk 1 st, SC in ch-sp; rep from * until last st, SC in last st, turn.
<97(105, 117, 129, 137, 149, 161)>
ROW 3: Ch 1, SC in 1st st, *ch 1, sk 1 st, SC in ch-sp; rep from * until 2 sts left, ch 1, sk 1, SC in last st, turn.
<97(105, 117, 129, 137, 149, 161)>
ROW 4: Rep Row 2.
<97(105, 117, 129, 137, 149, 161)>
Repeat ROWS 3 – 4 until ROW 34(38, 38, 40, 44, 48, 50).
Fasten off. Proceed to ‘SECOND FRONT PANEL’ instructions.
Second Front Panel
Insert crochet hook into st with SM. Secure yarn and pull up a loop.
ROW 1: Ch 1, SC in 1st ch-sp, *ch 1, sk 1 st, SC in ch-sp; rep from * until 2 sts left, SC2tog, turn.
<42(46, 52, 58, 62, 68, 74)>
ROW 2: Ch 1, sk 1st st, SC in next st, SC in ch-sp, *ch 1, sk 1 st, SC in ch-sp; rep from * until last st, SC in last st, turn.
<41(45, 51, 57, 61, 67, 73)>
*If you have trouble recognising the last st of the row, after you skip the 1st st, place a SM in the first SC of the row to make it easier to find.
ROW 3: Ch 1, SC in 1st st, *ch 1, sk 1 st, SC in ch-sp; rep from * until 2 sts left, SC2tog, turn.
<40(44, 50, 56, 60, 66, 72)>
Repeat ROWS 2 – 3 until ROW 11.
<32(36, 42, 48, 52, 58, 64)>
Row – by – Row Stitch Count:
ROW 4: Rep Row 2.
<39(43, 49, 55, 59, 65, 71)>
ROW 5: Rep Row 3.
<38(42, 48, 54, 58, 64, 70)>
ROW 6: Rep Row 2.
<37(41, 47, 53, 57, 63, 69)>
ROW 7: Rep Row 3.
<36(40, 46, 52, 56, 62, 68)>
ROW 8: Rep Row 2.
<35(39, 45, 51, 55, 61, 67)>
ROW 9: Rep Row 3.
<34(38, 44, 50, 54, 60, 66)>
ROW 10: Rep Row 2.
<33(37, 43, 49, 53, 59, 65)>
ROW 11: Rep Row 3.
<32(36, 42, 48, 52, 58, 64)>
ROW 12: Ch 1, SC in 1st st, *ch 1, sk 1 st, SC in ch-sp; rep from * until last st, SC in last st, turn.
<32(36, 42, 48, 52, 58, 64)>
ROW 13: Ch 1, SC in 1st st, ch 1, sk 1 st, *SC in ch-sp, ch 1, sk 1 st; rep from * until 2 sts left, SC2tog, turn.
<31(35, 41, 47, 51, 57, 63)>
ROW 14: Ch 1, sk 1st st, SC in ch-sp, *ch 1, sk 1 st, SC in ch-sp; rep from * until last st, SC in last st, turn.
<30(34, 40, 46, 50, 56, 62)>
ROW 15: Ch 1, SC in 1st st, *ch 1, sk 1 st, SC in ch-sp; rep from * until last st, SC in last st turn.
<30(34, 40, 46, 50, 56, 62)>
ROW 16: Ch 1, sk 1st st, SC in next st, SC in ch-sp, *ch 1, sk 1 st, SC in ch-sp; rep from * until last st, SC in last st, turn.
<29(33, 39, 45, 49, 55, 61)>
ROW 17: Ch 1, SC in 1st st, *ch 1, sk 1 st, SC in ch-sp; rep from * until 2 sts left, ch 1, sk 1 st, SC in last st, turn.
<29(33, 39, 45, 49, 55, 61)>
Repeat ROWS 14 – 17 until ROW 21(21, 21, 21, 25, 25, 25).
<27(31, 37, 43, 45, 51, 57)>
Row – by – Row Stitch Count:
ROW 18: Rep Row 14.
<28(32, 38, 44, 48, 54, 60)>
ROW 19: Rep Row 15.
<28(32, 38, 44, 48, 54, 60)>
ROW 20: Rep Row 16.
<27(31, 37, 43, 47, 53, 59)>
ROW 21: Rep Row 17.
<27(31, 37, 43, 47, 53, 59)>
Sizes XS(S, M, L) only
ROW 22: Ch 1, SC in 1st st, SC in ch-sp, *ch 1, sk 1 st, SC in ch-sp; rep from * until last st, SC in last st, turn.
<27(31, 37, 43)>
ROW 23: Ch 1, SC in 1st st, *ch 1, sk 1 st, SC in ch-sp; rep from * until last 2 sts, ch 1, sk 1 st, SC in last st, turn.
<27(31, 37, 43)>
ROW 24: Rep Row 22.
<27(31, 37, 43)>
Repeat ROWS 23 – 24 until ROW 34(38, 38, 40).
<27(31, 37, 43)>
Fasten off. Proceed to ‘SLEEVES’ instructions.
Sizes (XL, 2XL, 3XL) only
ROW 22: Rep Row 14.
<(46, 52, 58)>
ROW 23: Rep Row 15.
<(46, 52, 58)>
ROW 24: Rep Row 16.
<(45, 51, 57)>
ROW 25: Rep Row 17.
<(45, 51, 57)>
ROW 26: Ch 1, SC in 1st st, SC in ch-sp, *ch 1, sk 1 st, SC in ch-sp; rep from * until last st, SC in last st, turn.
<(45, 51, 57)>
ROW 27: Ch 1, SC in 1st st, *ch 1, sk 1 st, SC in ch-sp; rep from * until last 2 sts, ch 1, sk 1 st, SC in last st, turn.
<(45, 51, 57)>
ROW 28: Rep Row 26.
<(45, 51, 57)>
Repeat ROWS 27 – 28 until ROW (44, 48, 50).
<(45, 51, 57)>
Fasten off. Proceed to ‘SLEEVES’ instructions.
Sleeves
(make 2)
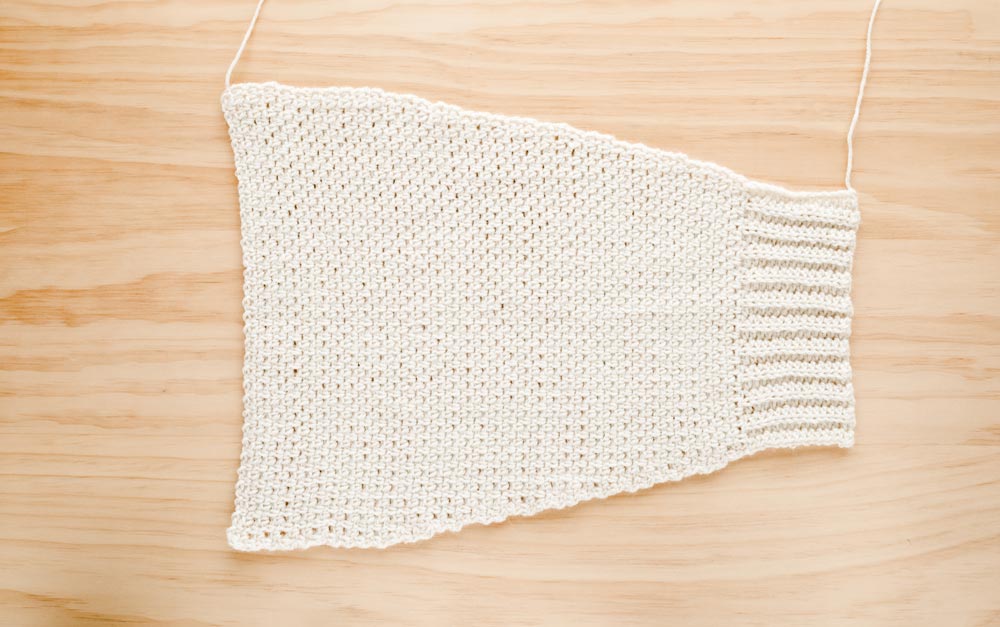
*The sleeves are worked from the cuff up. As with the body panel, we’ll crochet the ribbing vertically and then crochet the sleeve directly on to the edge of the ribbing.
Sleeve Ribbing
FOUNDATION CHAIN: Ch 15.
ROW 1: HDC into 2nd ch from hook, HDC in each ch until end, turn.
<14>
ROW 2: Ch 1, BLO HDC 13, HDC in last st, turn.
<14>
Repeat ROW 2 until ROW 22(22, 24, 26, 28, 30, 32).
Do not fasten off! We will now work along the long edge of the ribbing.
SLEEVE
ROW 1: Ch 1, SC in 1st row, *ch 1, SC in next row; rep from * until end, turn.
<43(43, 47, 51, 55, 59, 63)>
ROW 2: Ch 1, SC in 1st st, SC in ch-sp, *ch 1, sk 1 st, SC in ch-sp; rep from * until last st, SC in last st, turn.
<43(43, 47, 51, 55, 59, 63)>
ROW 3: Ch 1, SC in 1st st, *ch 1, sk 1 st, SC in ch-sp; rep from * until last 2 sts, ch 1, sk 1 st, SC in last st, turn.
<43(43, 47, 51, 55, 59, 63)>
ROW 4: Ch 1, SC in 1st st, ch 1, SC in ch-sp, *ch 1, sk 1 st, SC in ch-sp; rep from * until last st, ch 1, SC in last st, turn.
<45(45, 49, 53, 57, 61, 65)>
ROW 5: Rep Row 2.
<45(45, 49, 53, 57, 61, 65)>
ROW 6: Rep Row 3.
<45(45, 49, 53, 57, 61, 65)>
Repeat ROWS 2 – 6 until ROW 54(54, 64, 39, 39, 39, 39).
<65(65, 73, 67, 71, 75, 79)>
Row-by-Row Stitch Count:
ROWS 7 – 8: Rep Rows 2 – 3.
<45(45, 49, 53, 57, 61, 65)>
ROW 9: Rep Row 4.
<47(47, 51, 55, 59, 63, 67)>
ROWS 10 – 13: Rep Rows 2 – 3 two times.
<47(47, 51, 55, 59, 63, 67)>
ROW 14: Rep Row 4.
<49(49, 53, 57, 61, 65, 69)>
ROWS 15 – 18: Rep Rows 2 – 3 two times.
<49(49, 53, 57, 61, 65, 69)>
ROW 19: Rep Row 4.
<51(51, 55, 59, 63, 67, 71)>
ROWS 20 – 23: Rep Rows 2 – 3 two times.
<51(51, 55, 59, 63, 67, 71)>
ROW 24: Rep Row 4.
<53(53, 57, 61, 65, 69, 73)>
ROWS 25 – 28: Rep Rows 2 – 3 two times.
<53(53, 57, 61, 65, 69, 73)>
ROW 29: Rep Row 4.
<55(55, 59, 63, 67, 71, 75)>
ROWS 30 – 33: Rep Rows 2 – 3 two times.
<55(55, 59, 63, 67, 71, 75)>
ROW 34: Rep Row 4.
<57(57, 61, 65, 69, 73, 77)>
ROWS 35 – 38: Rep Rows 2 – 3 two times.
<57(57, 61, 65, 69, 73, 77)>
ROW 39: Rep Row 4.
<59(59, 63, 67, 71, 75, 79)>
Sizes (L, XL, 2XL, 3XL) only – proceed to ‘Sizes (L, XL, 2XL, 3XL) – SLEEVE INCREASE’
Sizes XS(S, M) only
ROWS 40 – 43: Rep Rows 2 – 3 two times.
<59(59, 63)>
ROW 44: Rep Row 4.
<61(61, 65)>
ROWS 45 – 48: Rep Rows 2 – 3 two times.
<61(61, 65)>
ROW 49: Rep Row 4.
<63(63, 67)>
ROWS 50 – 53: Rep Rows 2 – 3 two times.
<63(63, 67)>
ROW 54: Rep Row 4.
<65(65, 69)>
Sizes XS & S only – proceed to ‘FINAL SLEEVE ROWS’
Size M only
ROWS 55 – 58: Rep Rows 2 – 3 two times.
<(69)>
ROW 59: Rep Row 4.
<(71)>
ROWS 60 – 63: Rep Rows 2 – 3 two times.
<(71)>
ROW 64: Rep Row 4.
<(73)>
Size M only –proceed to ‘FINAL SLEEVE ROWS’
Sizes (L, XL, 2XL, 3XL) – SLEEVE INCREASE
After ROW 39, rep ROWS 2 – 4 until ROW (66, 66, 69, 72).
Row-by-Row Stitch Count:
ROWS 40 – 41: Rep Rows 2 – 3.
<(67, 71, 75, 79)>
ROW 42: Rep Row 4.
<(69, 73, 77, 81)>
ROWS 43 – 44: Rep Rows 2 – 3.
<(69, 73, 77, 81)>
ROW 45: Rep Row 4.
<(71, 75, 79, 83)>
ROWS 46 – 47: Rep Rows 2 – 3.
<(71, 75, 79, 83)>
ROW 48: Rep Row 4.
<(73, 77, 81, 85)>
ROWS 49 – 50: Rep Rows 2 – 3.
<(73, 77, 81, 85)>
ROW 51: Rep Row 4.
<(75, 79, 83, 87)>
ROWS 52 – 53: Rep Rows 2 – 3.
<(75, 79, 83, 87)>
ROW 54: Rep Row 4.
<(77, 81, 85, 89)>
ROWS 55 – 56: Rep Rows 2 – 3.
<(77, 81, 85, 89)>
ROW 57: Rep Row 4.
<(79, 83, 87, 91)>
ROWS 58 – 59: Rep Rows 2 – 3.
<(79, 83, 87, 91)>
ROW 60: Rep Row 4.
<(81, 85, 89, 93)>
ROWS 61 – 62: Rep Rows 2 – 3.
<(81, 85, 89, 93)>
ROW 63: Rep Row 4.
<(83, 87, 91, 95)>
ROWS 64 – 65: Rep Rows 2 – 3.
<(83, 87, 91, 95)>
ROW 66: Rep Row 4.
<(85, 89, 93, 97)>
Sizes L & XL only – proceed to ‘FINAL SLEEVE ROWS’
Sizes 2XL & 3XL only
ROWS 67 – 68: Rep Rows 2 – 3.
<(93, 97)>
ROW 69: Rep Row 4.
<(95, 99)>
Size 2XL only – proceed to ‘FINAL SLEEVE ROWS’
Size 3XL only
ROWS 70 – 71: Rep Rows 2 – 3.
<(99)>
ROW 72: Rep Row 4.
<(101)>
Size 3XL – proceed to ‘FINAL SLEEVE ROWS’
Final Sleeve Rows
Rep ROWS 2 – 3 until sleeve measures 41(41, 42, 43, 45, 46, 47)cm / 16(16, 16.5, 17, 17.5, 18, 18.5)” long.
approx. ROW 69(69, 71, 73, 77, 79, 81)
<65(65, 73, 85, 89, 95, 101)>
Fasten off.
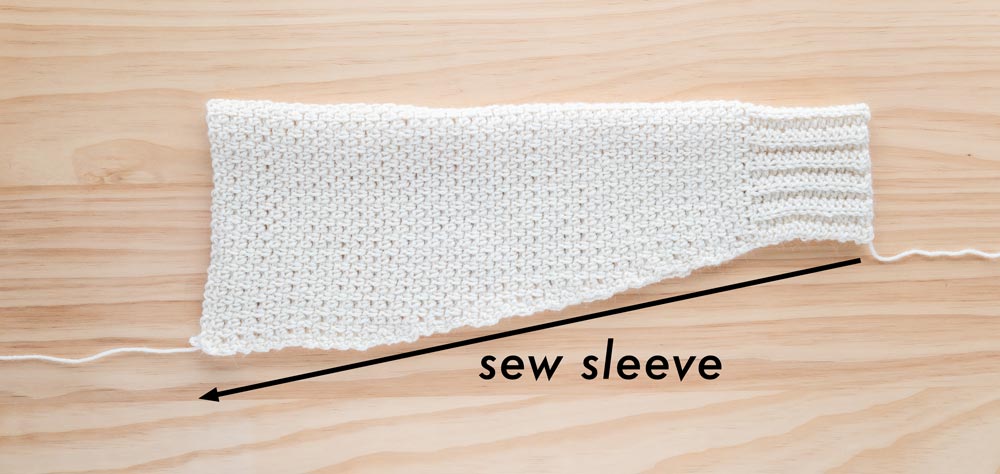
Fold sleeve in half lengthways and whip stitch the long edge of the sleeve together.
Assembly
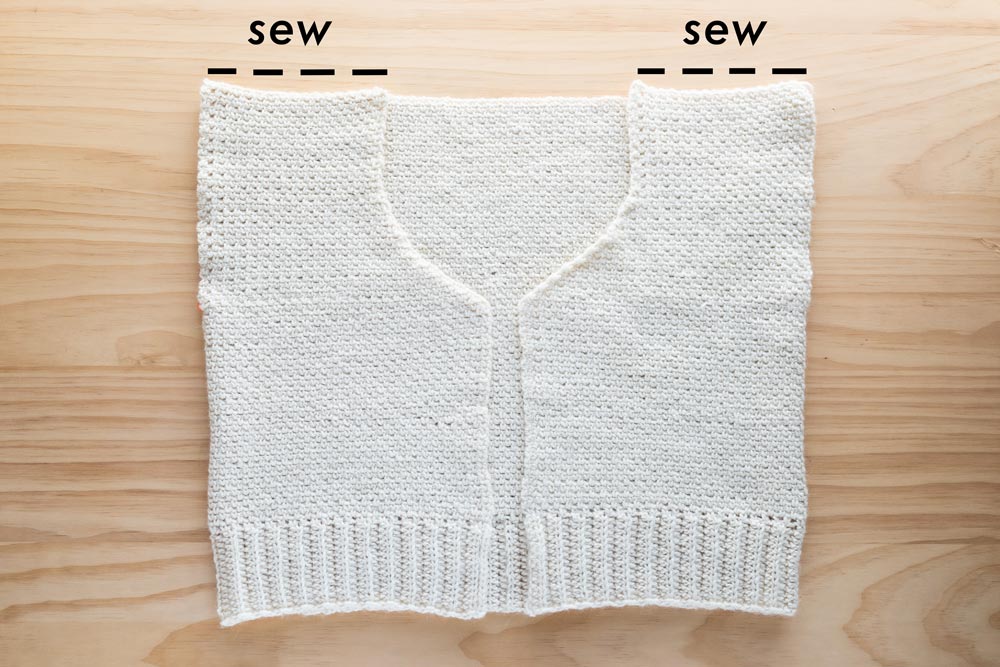
Fold the front panels inwards, whip stitch the shoulder seams together.
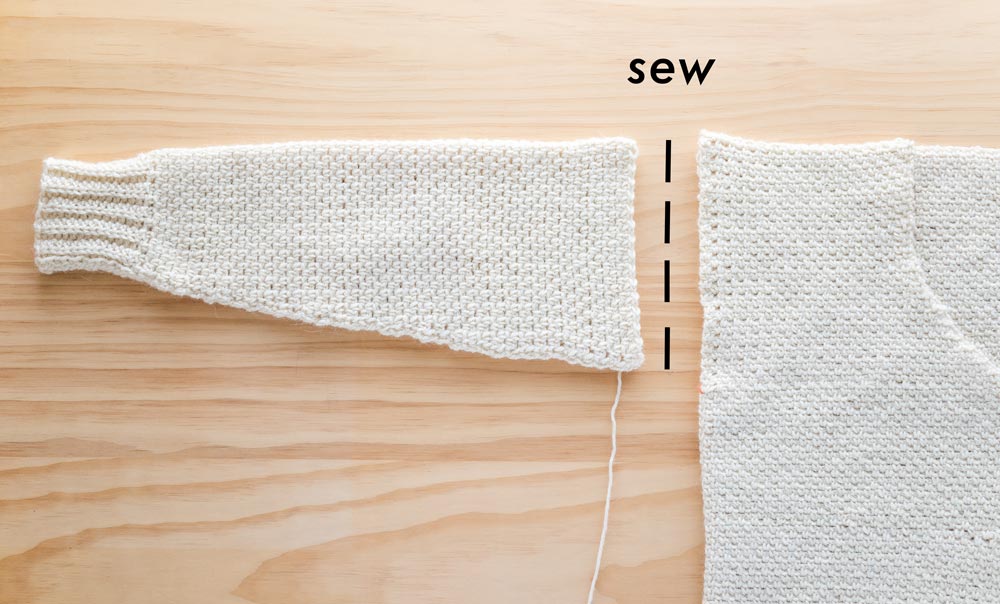
Line up the fold of the sleeve with the shoulder seam. Whip stitch top of sleeves to the arm holes.
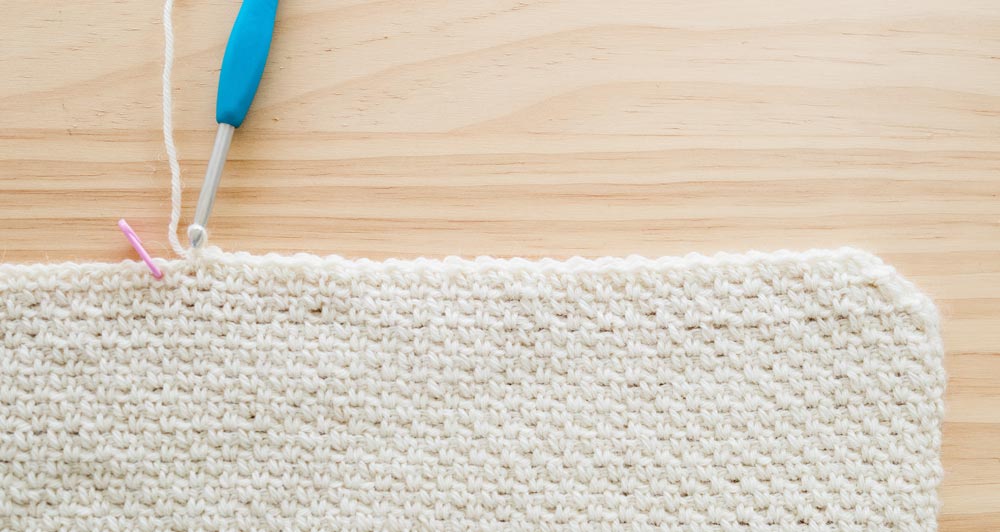
Finishing + Button Hole Tutorial
*If the edges of the body ribbing are curled / uneven, steam block the edges so they lay flat before crocheting the edging.
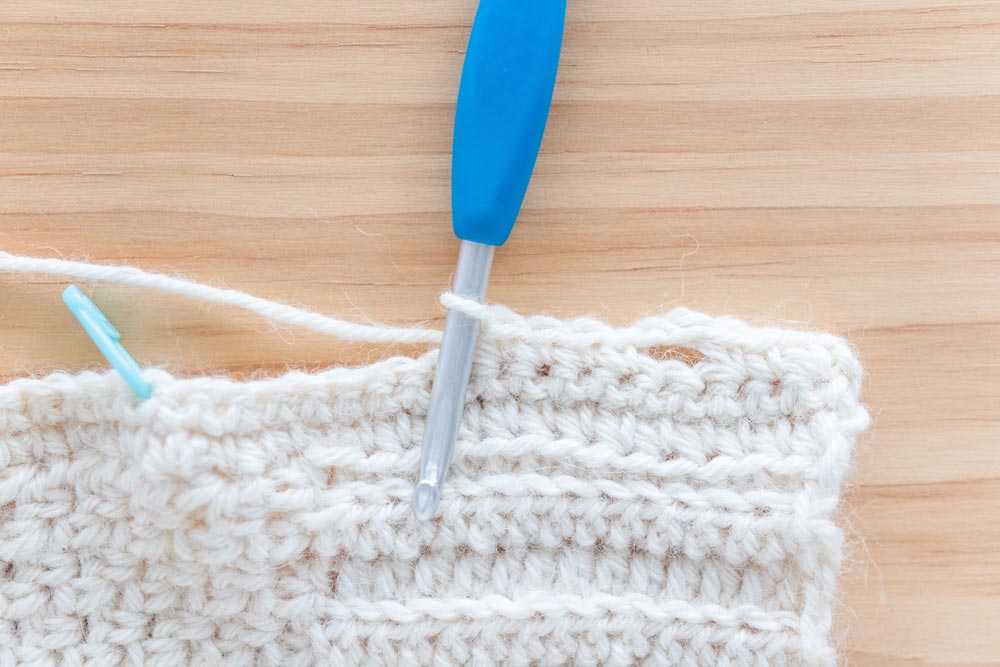
With the right side facing you, insert your crochet hook along the corner of the front panel. Secure your yarn and pull up a loop.
ROW 1: Ch 1, SC evenly along the neckline edge of the cardigan, placing 3 SCs at each point of the ‘V’, turn.
*The exact number of stitches doesn’t matter, rather focus on spacing out your stitches evenly. If your neckline is ruffling you have too many stitches and if your neckline is puckering you have too few stitches.
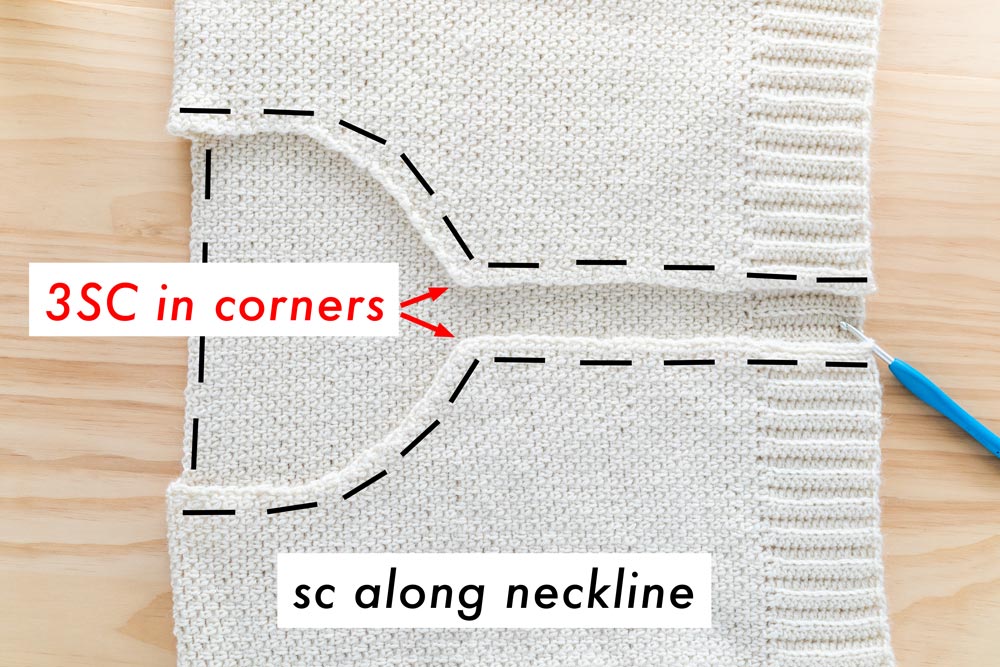
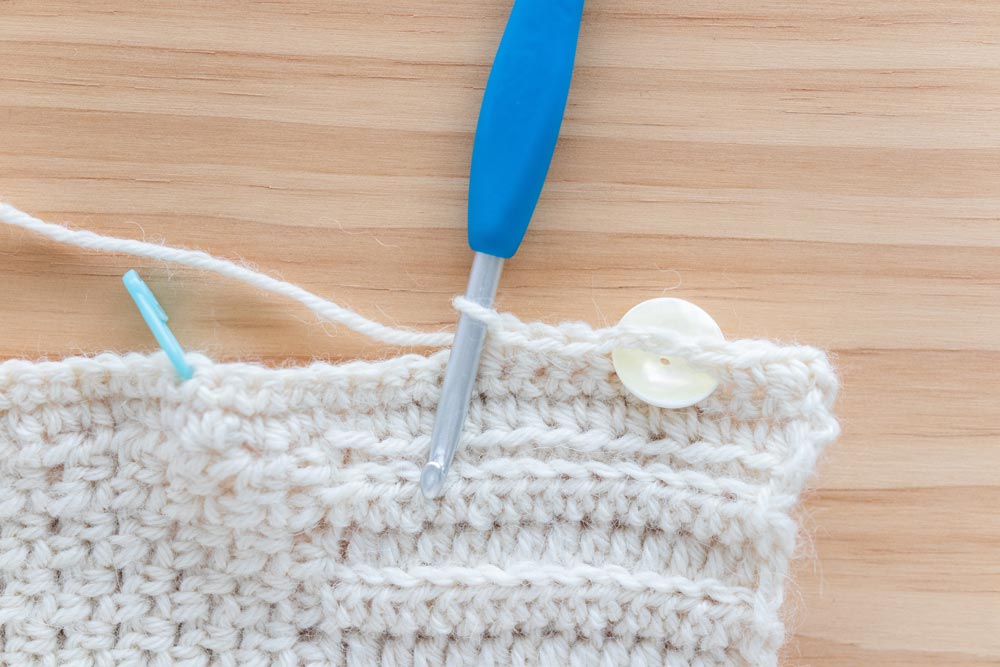
ROW 2: Ch 1, SC in each st until end, turn.
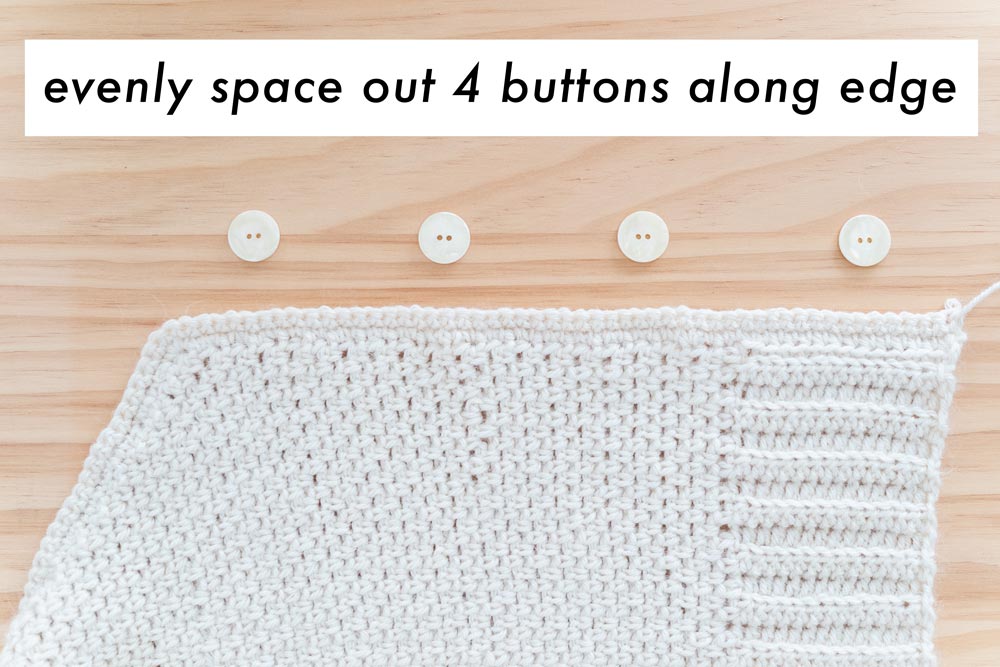
Space out the 4 buttons evenly along the opening edge of the neckline.
*As a point of reference, I placed the 1st (top) button – 1 stitch below the point of the V and the 4th (bottom) button – 3 stitches from the edge of the cardigan. The middle 2 buttons were spaced out evenly in between the 1st and 4th buttons.
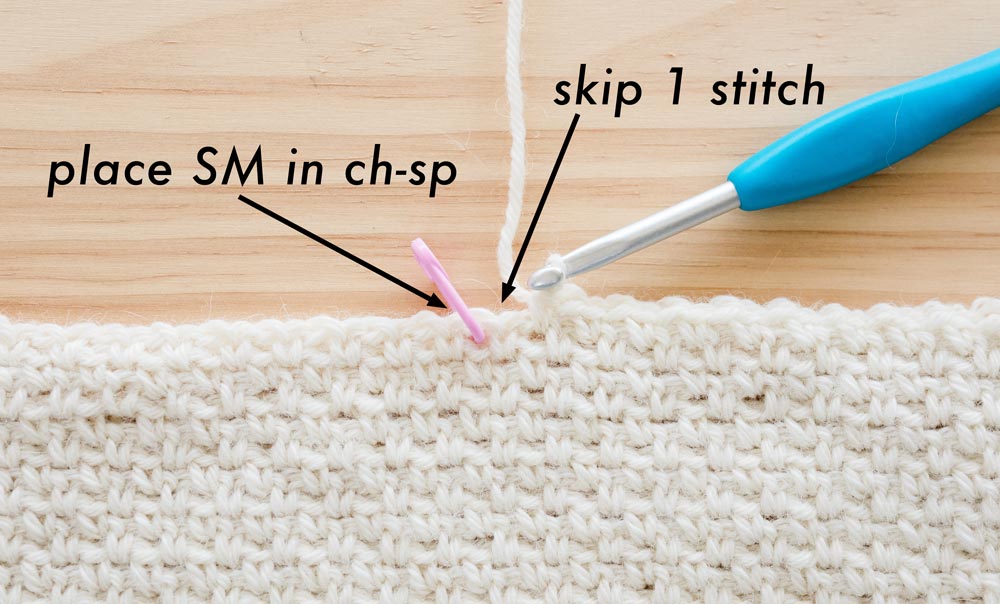
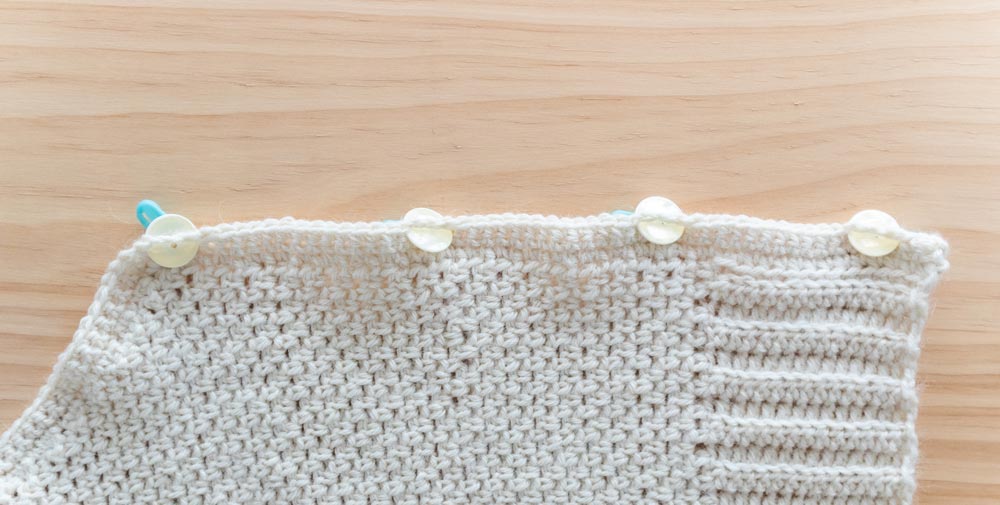
Line up a SM with the bottom of each button and place SM in corresponding st.
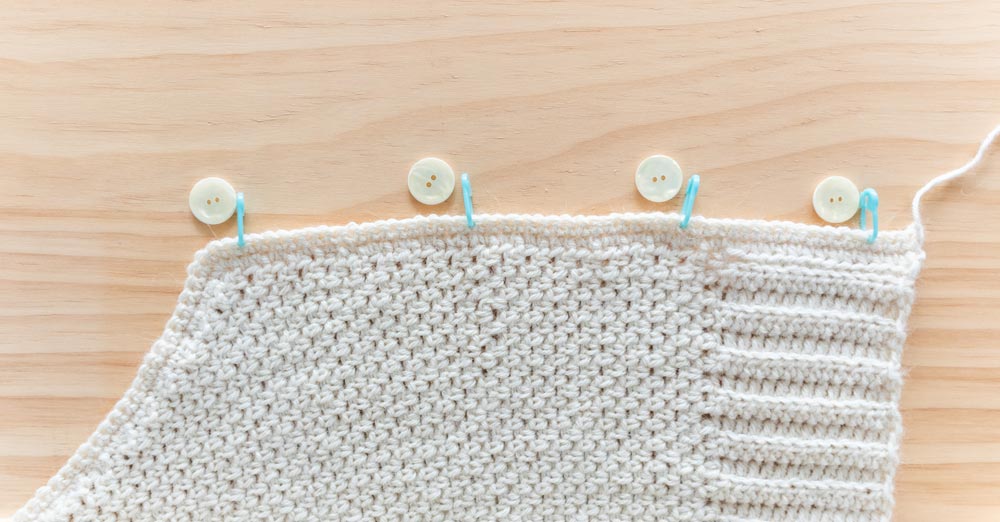
ROW 3: Ch 1, *SC in each st until a SM, ch 2, sk 2 sts, SC in next st;
Rep from * until last SM, SC in each st until end, turn.
*Make sure your buttons fit in the button holes. If the hole is too small, enlarge the gap by *ch 3, sk 3 sts* and if the buttonhole is too large, *ch 1, sk 1 st*.
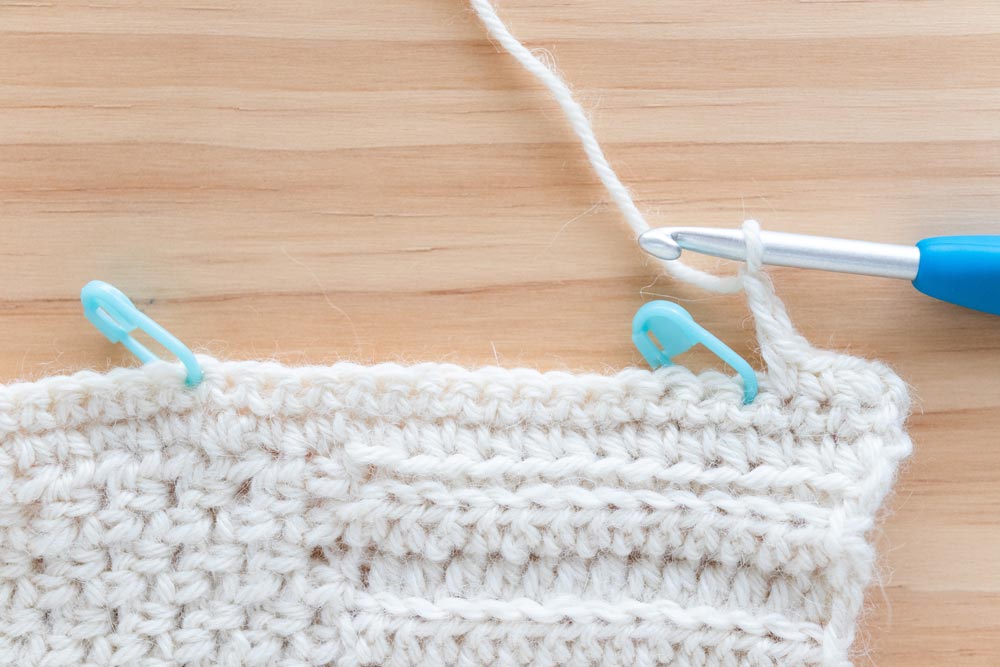
ROW 4: Ch 1, SC in each st until end, turn.
*Remember that each ch counts as 1 st – e.g. place 2 SC in each ch-2-sp.
ROW 5: Ch 1, SC in each st until end, turn.
Fasten off.
Sew buttons on the other side of the neckline opening, taking care to match buttons to button holes.
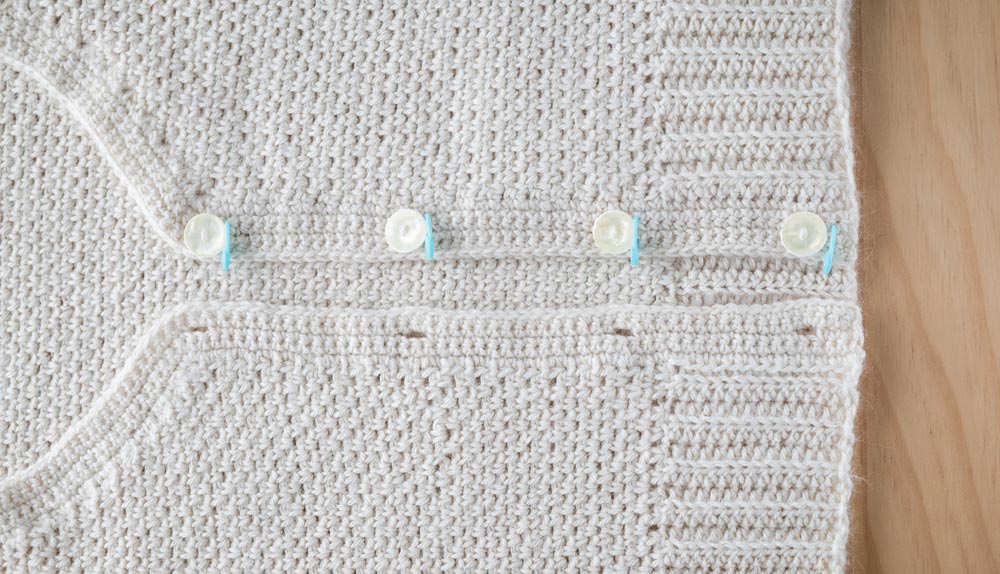
*You can use SMs to mark the button placement.
*If the neckline is ruffling – you’ve placed the button too close together and if the neckline is pulling/puckering – you’ve placed the buttons too far apart.
Weave in all of your ends. Steam block your cardigan.
Voilà! You’ve finished your Aria Button Cardigan ?
The post appeared first on .


