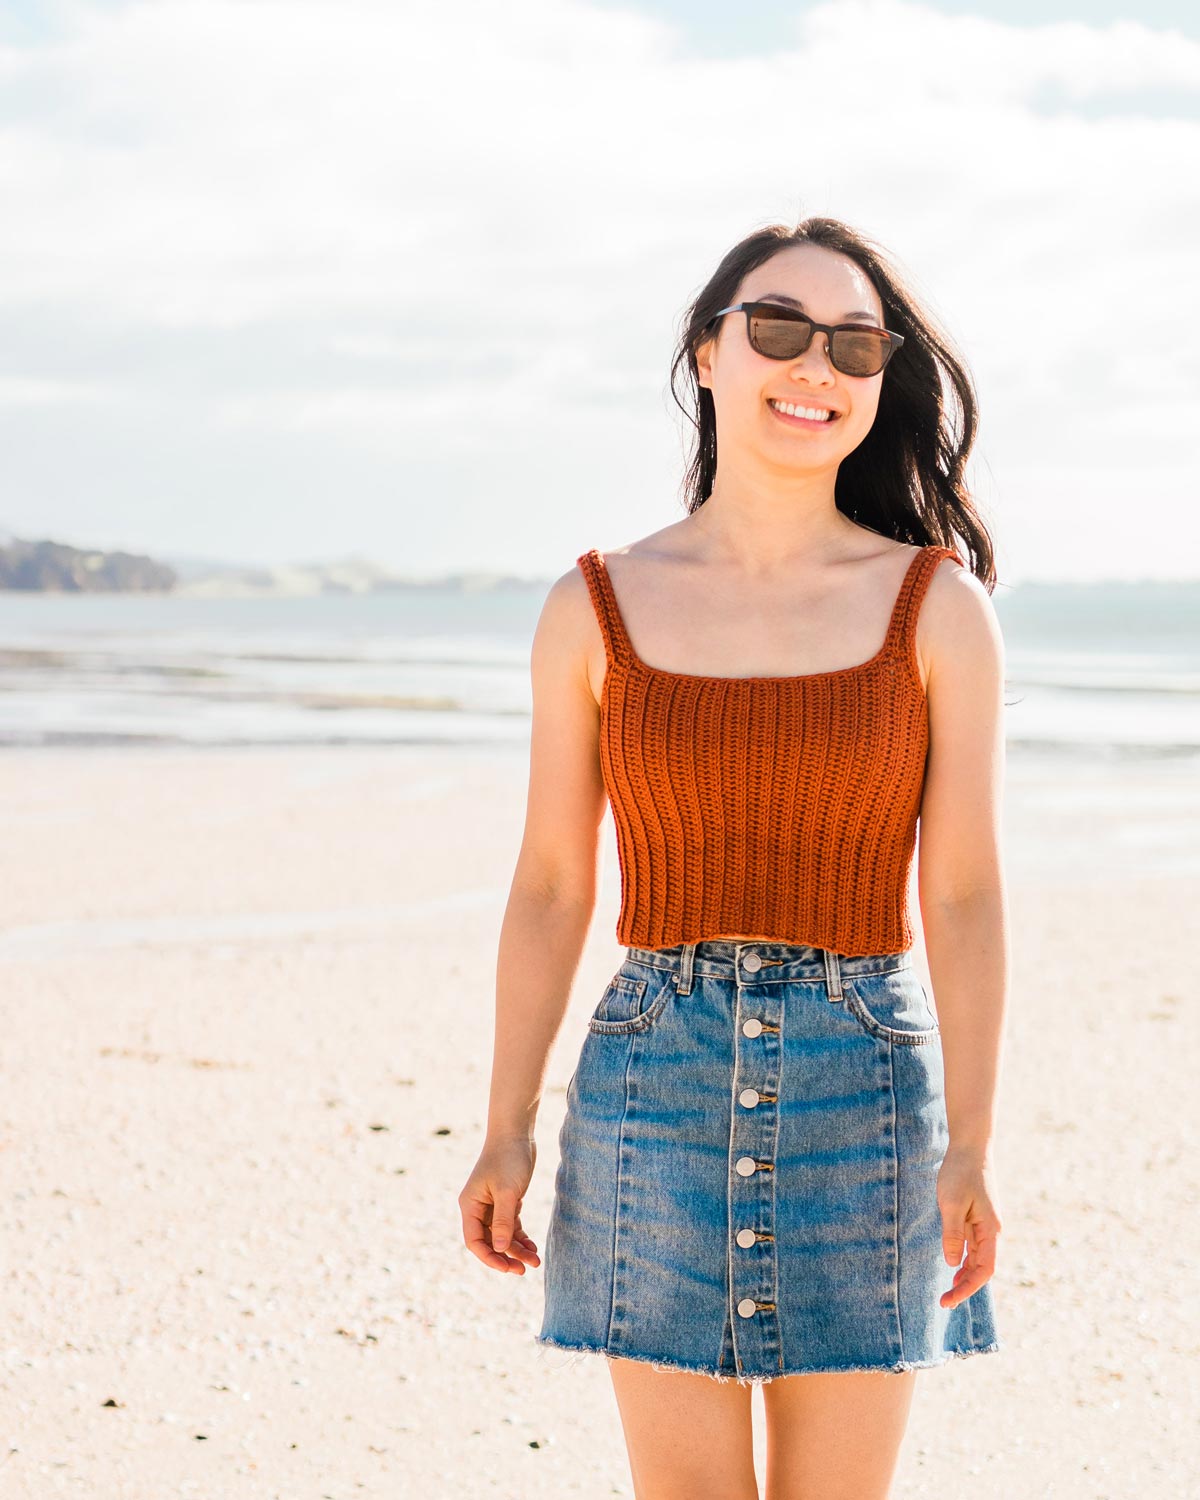
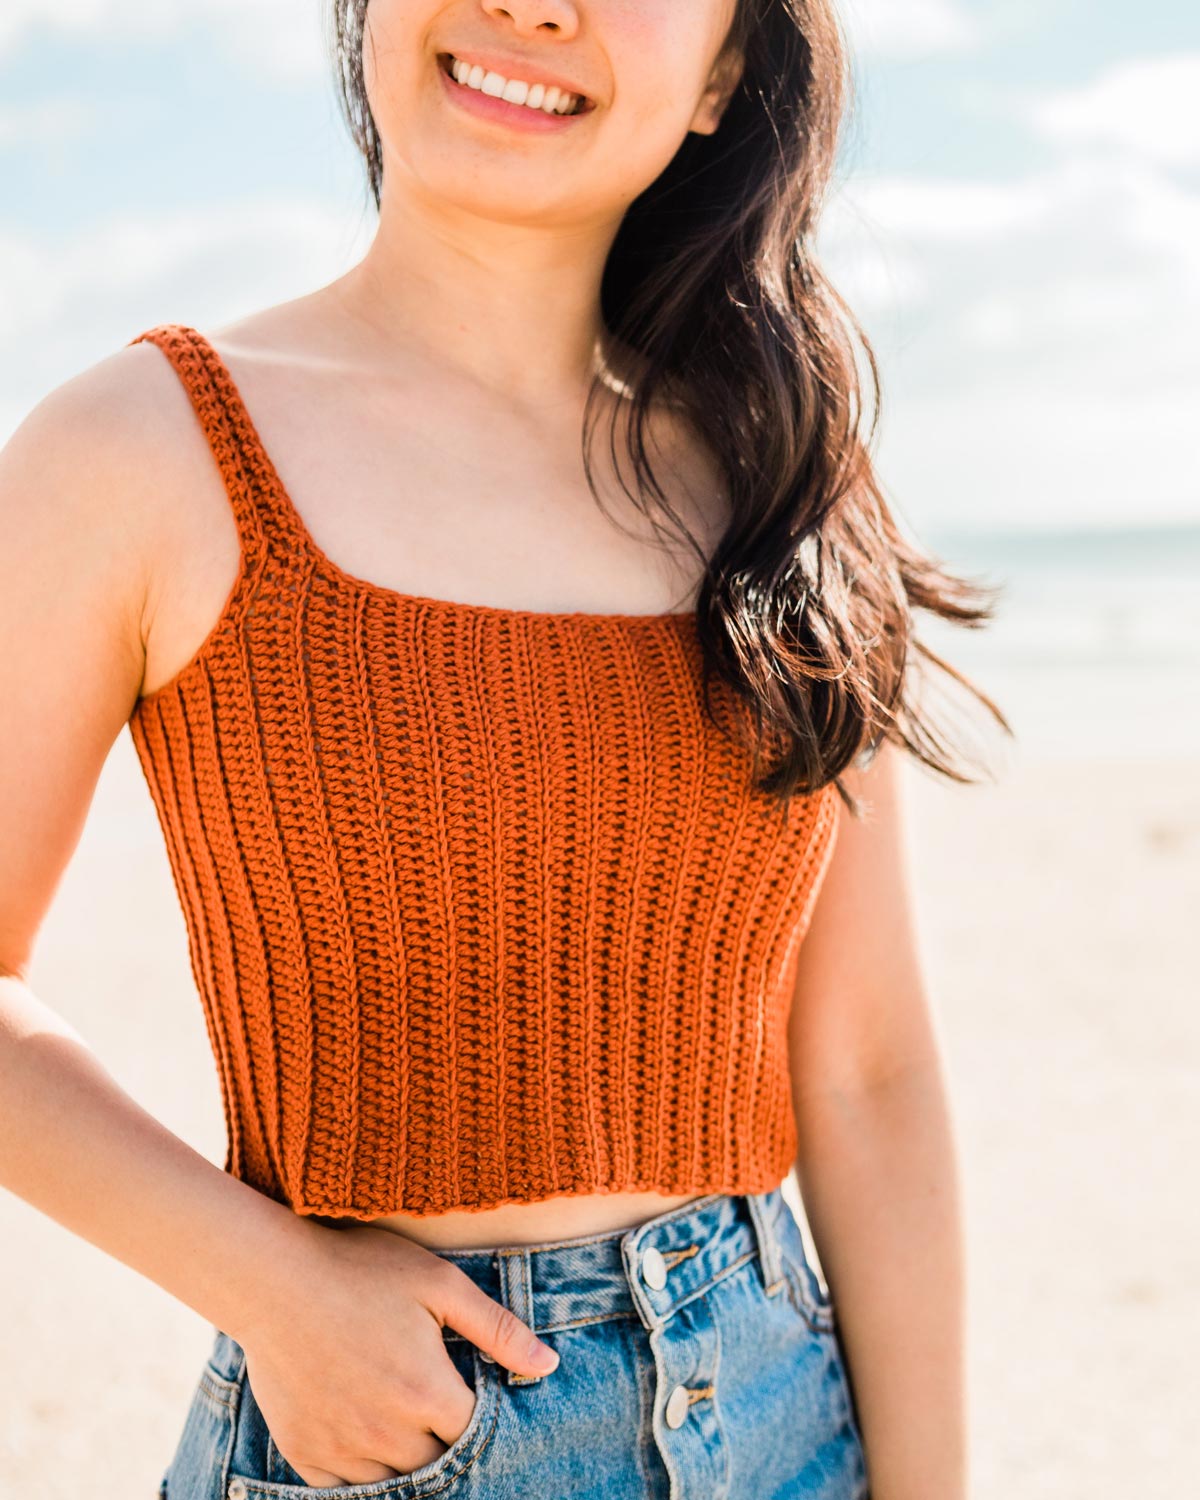
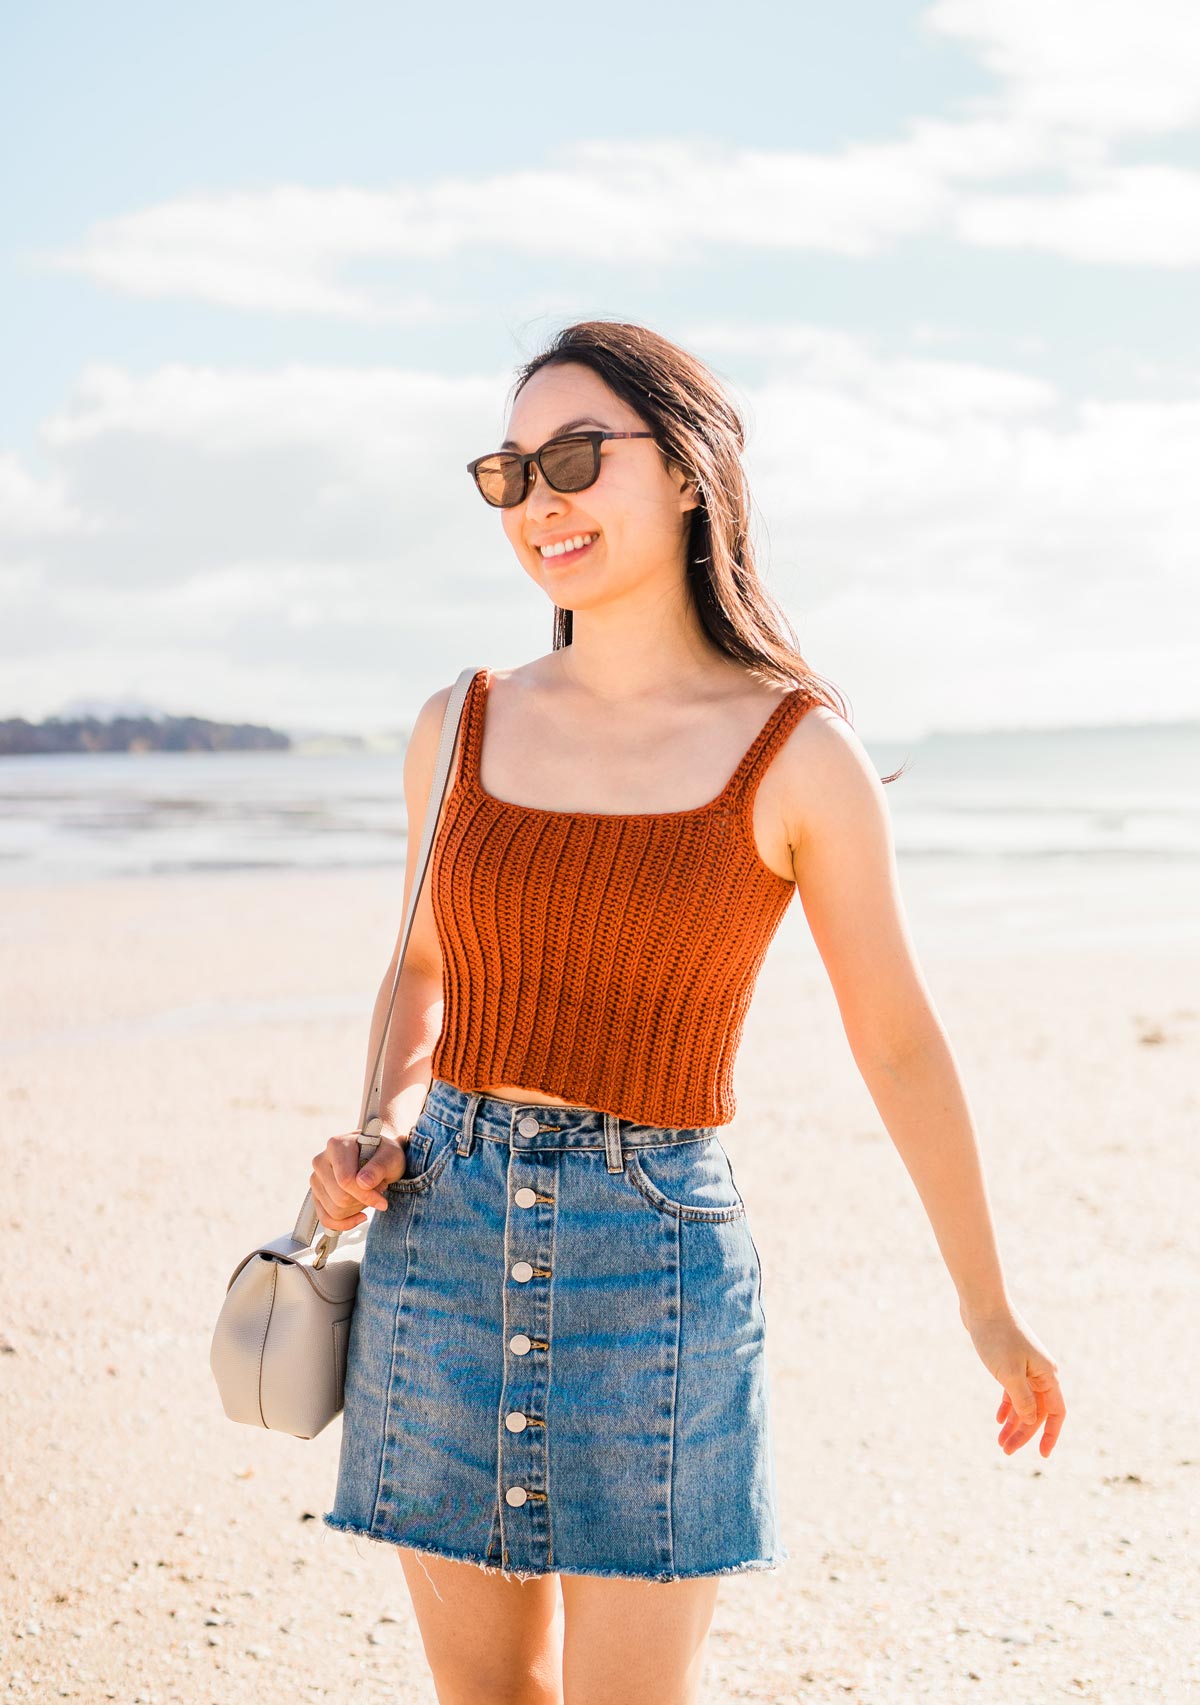
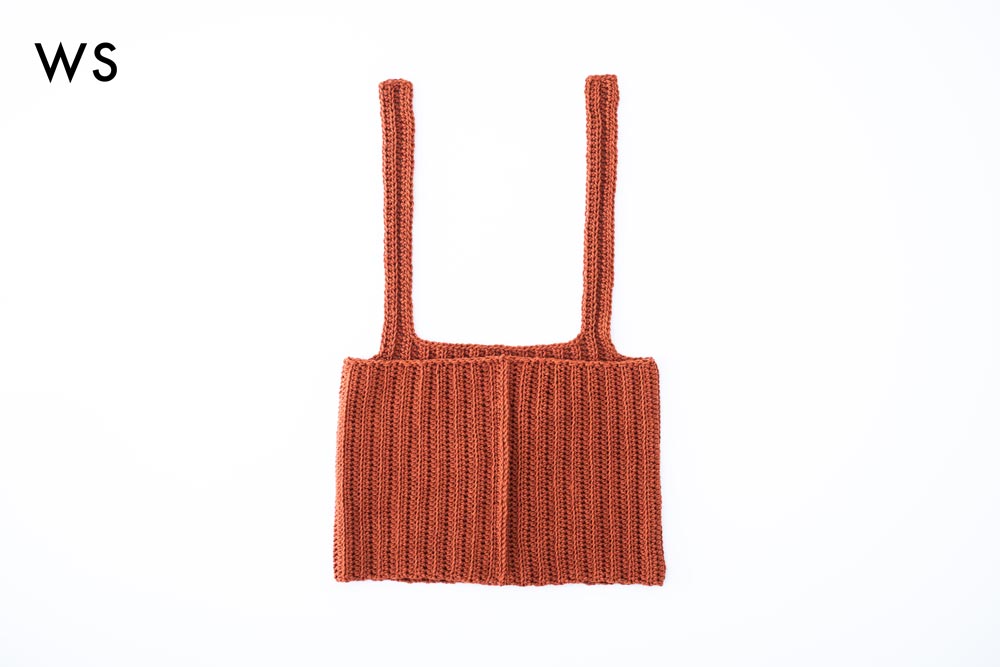
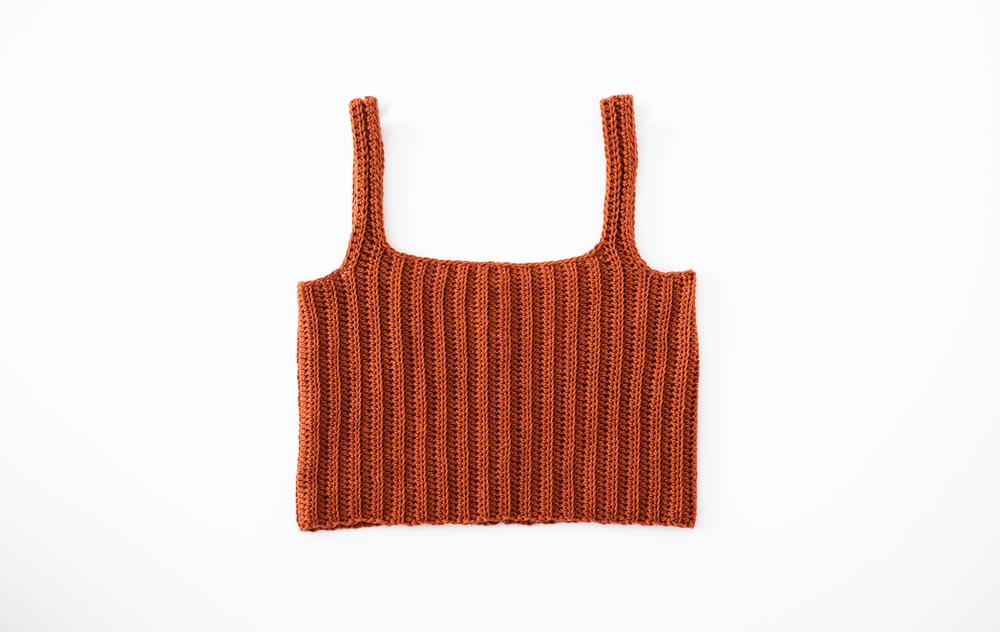
Learn how to crochet a ribbed cropped tank top for summer! The Terracotta Crop Top an easy crochet project featuring, thick straps and an on-trend square neckline. This project works up quickly, so you’ll be able to make the most of the warm summer days!
Scroll down for this free crochet crop top pattern and or purchase the .
This post may contain affiliate links, view our for details.
Thank you to for sponsoring this free crochet crop top pattern!
As always, all thoughts and opinions are 100% my own ?
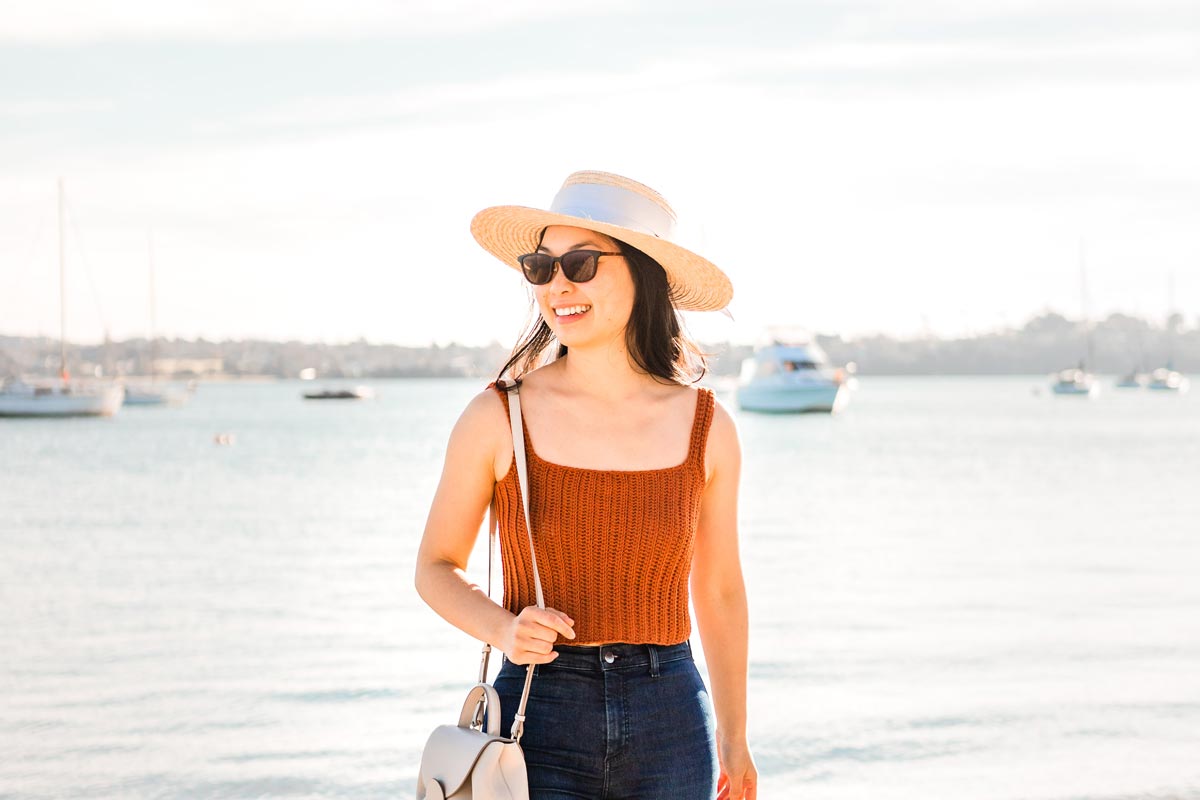
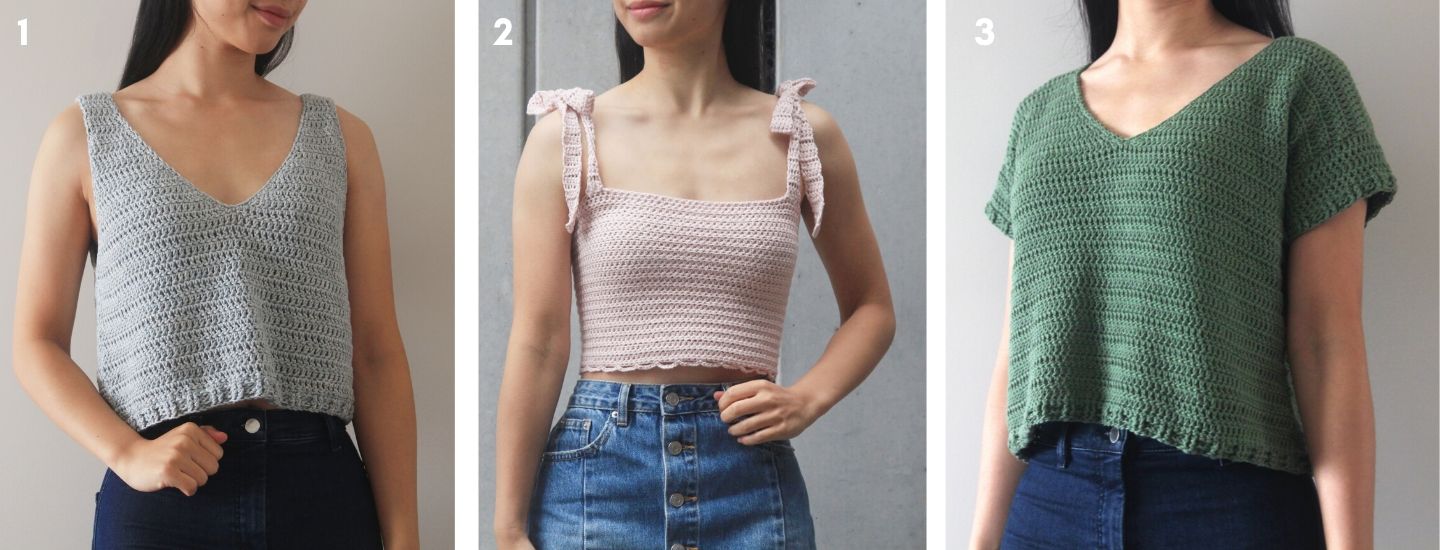
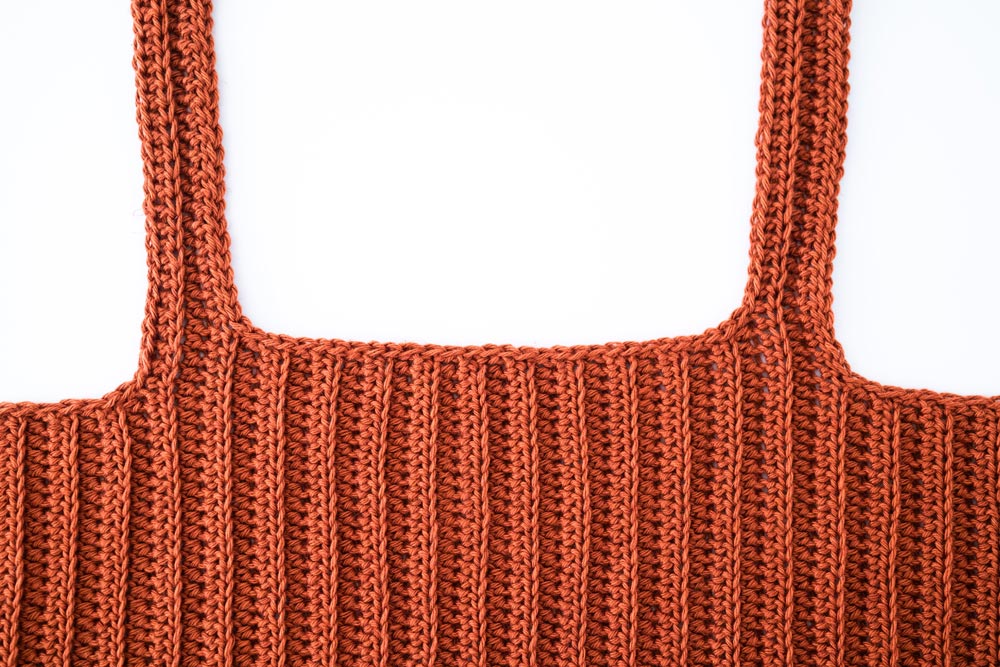
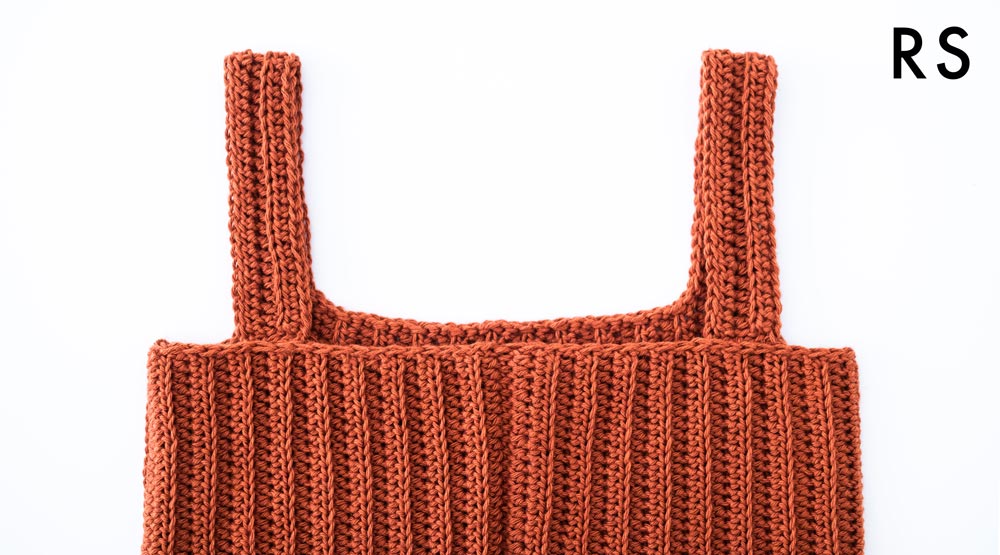
The Terracotta Crop Top is the little sister to the Sagebrush Tank Top! Both crochet tops feature the same beginner-friendly, back loop half double crochet ribbing but have very different necklines and fit.
The Terracotta Top is very much a crop top with a more fitted bust, it’s more like a cropped camisole whereas the Sagebrush Tank Top is more loose and airy. You’ll also notice that the Sagebrush Tank Top has a round neck while the Terracotta Tank Top has a square neck.
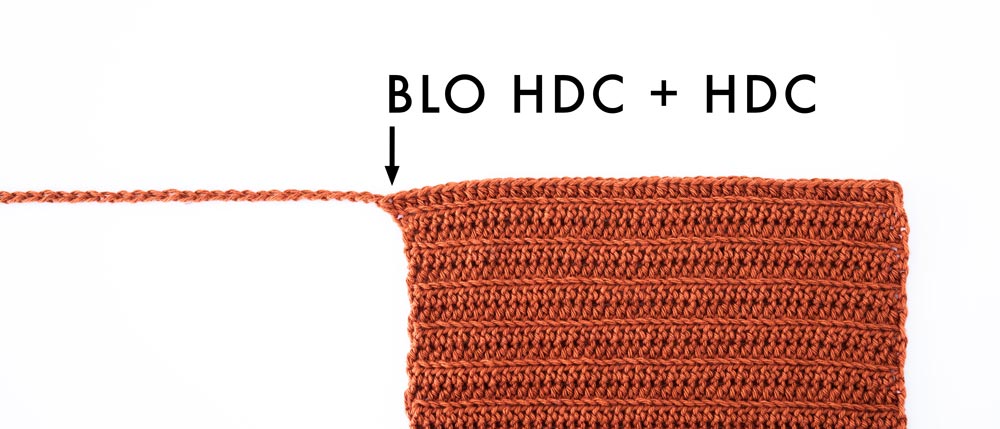
The square neck also means that the Terracotta Tank Top has fewer increase/decrease rows and the vast majority of the top follows one base row – just back loop half double crochets in each stitch!
Construction
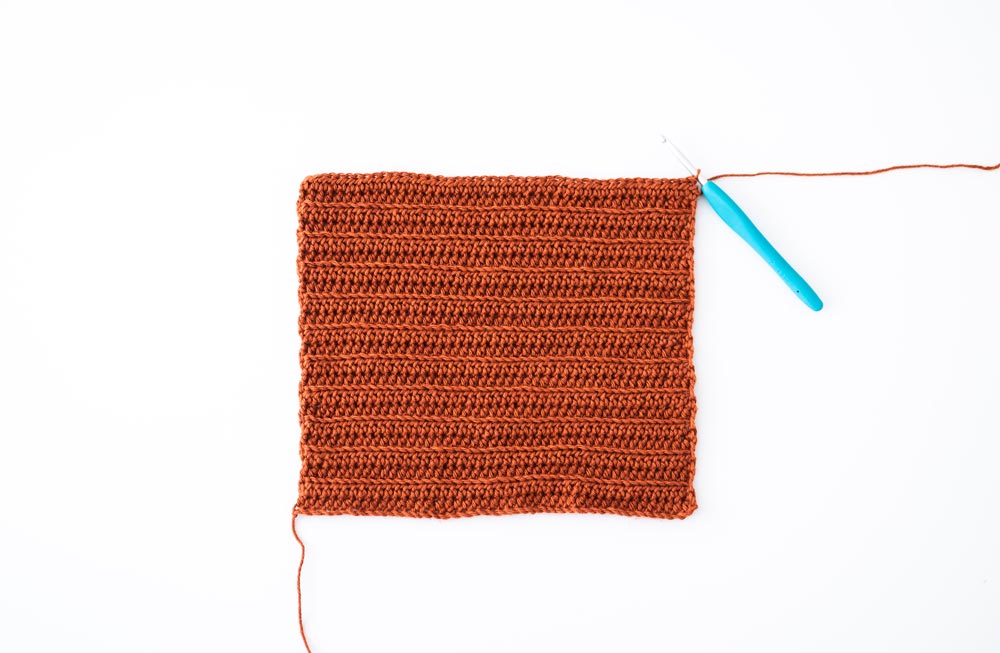
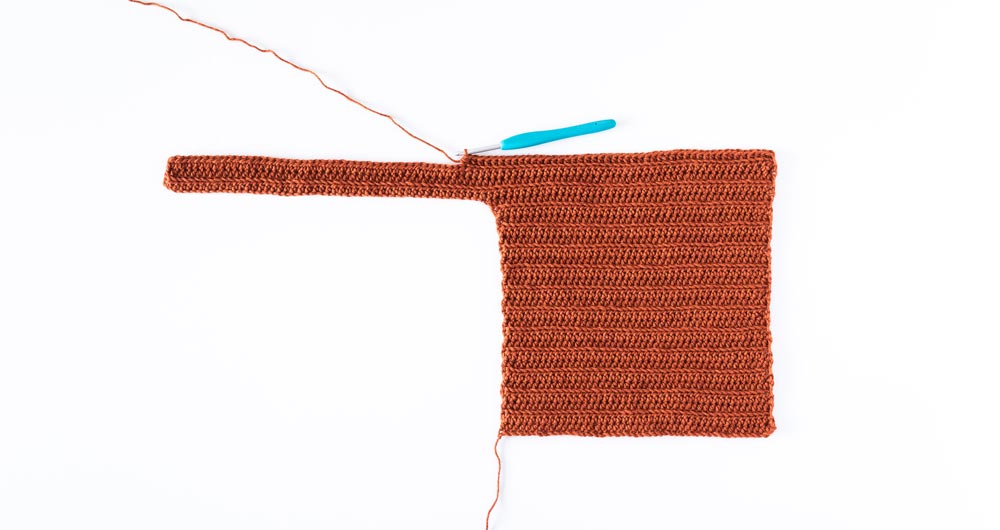
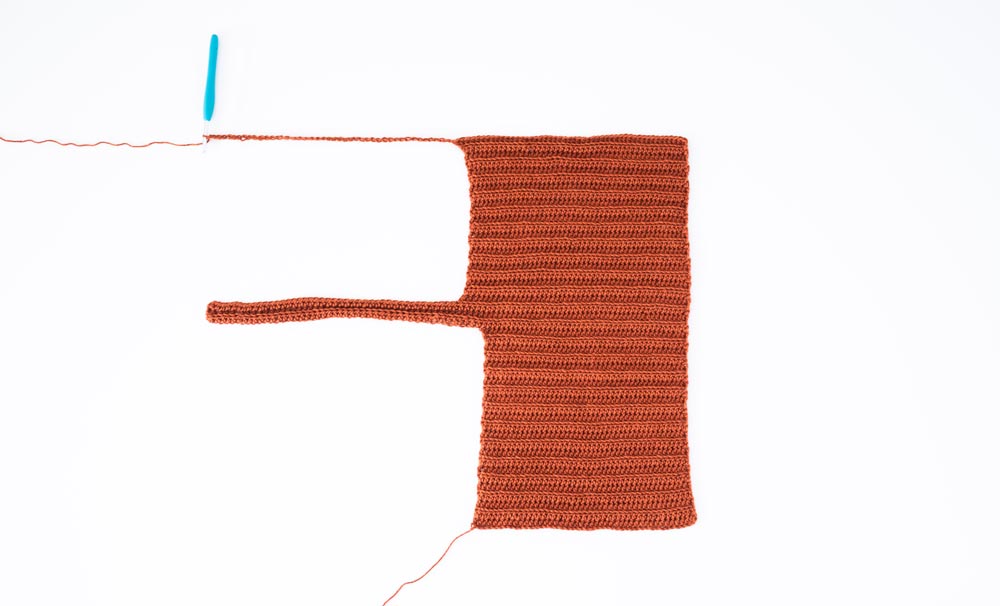
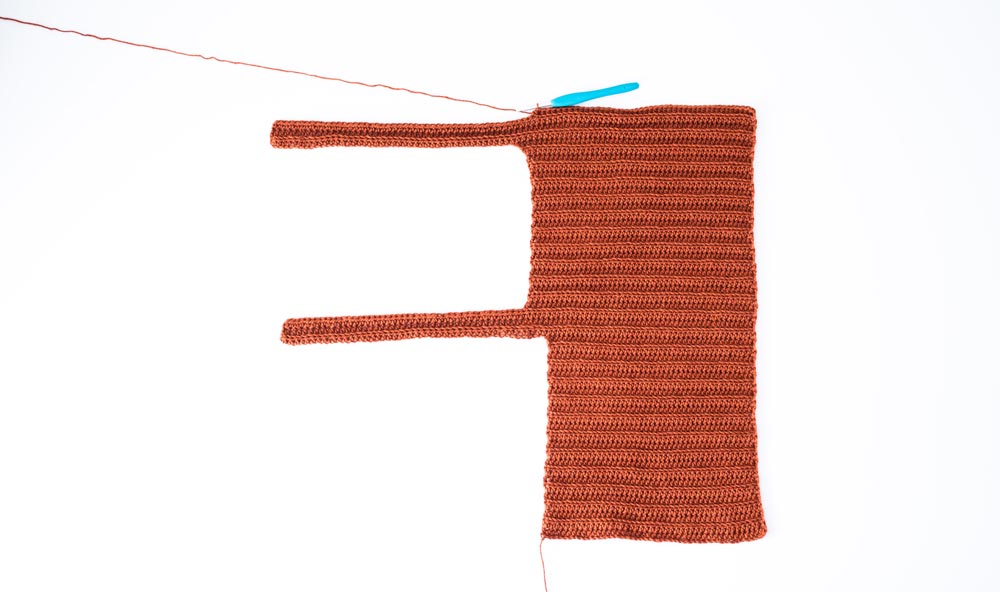
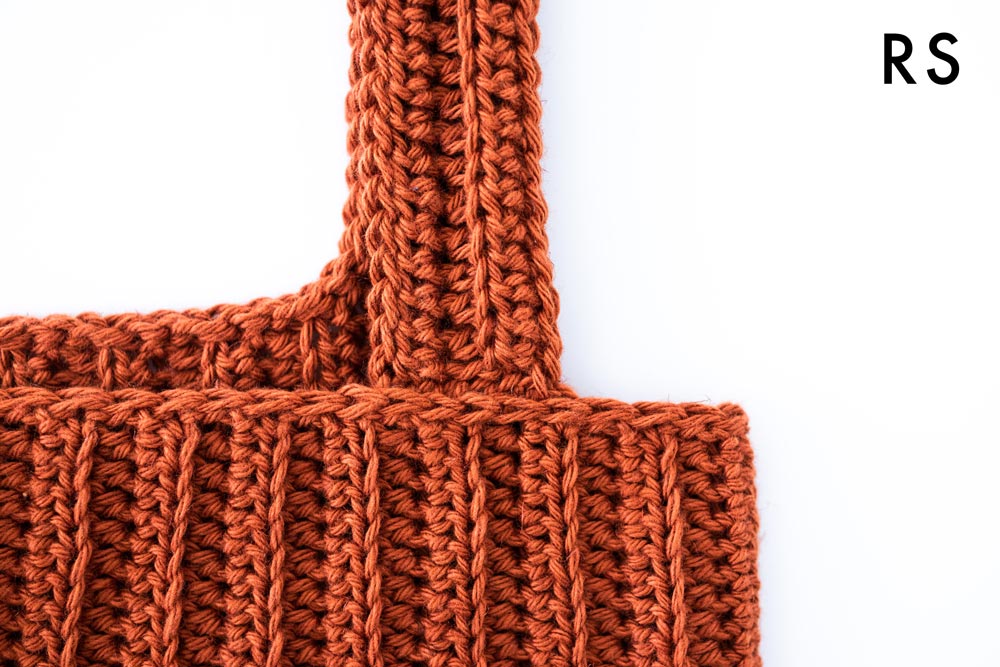
The construction for this crochet camisole is really simple as the entire thing is crocheted in one piece. The foundation chain runs lengthways, not widthways so it forms the length of the top.
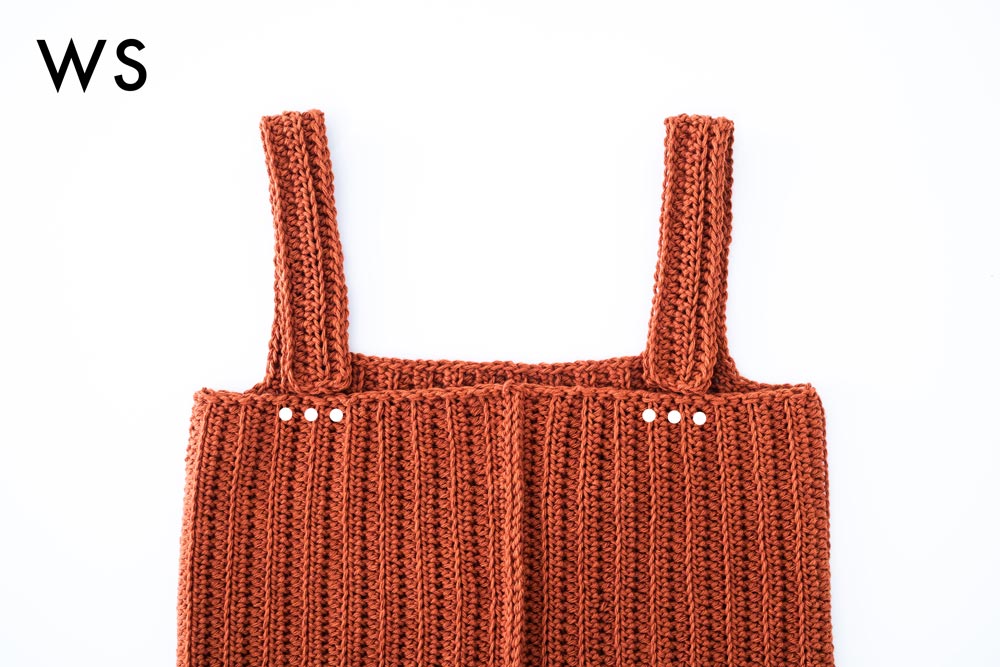
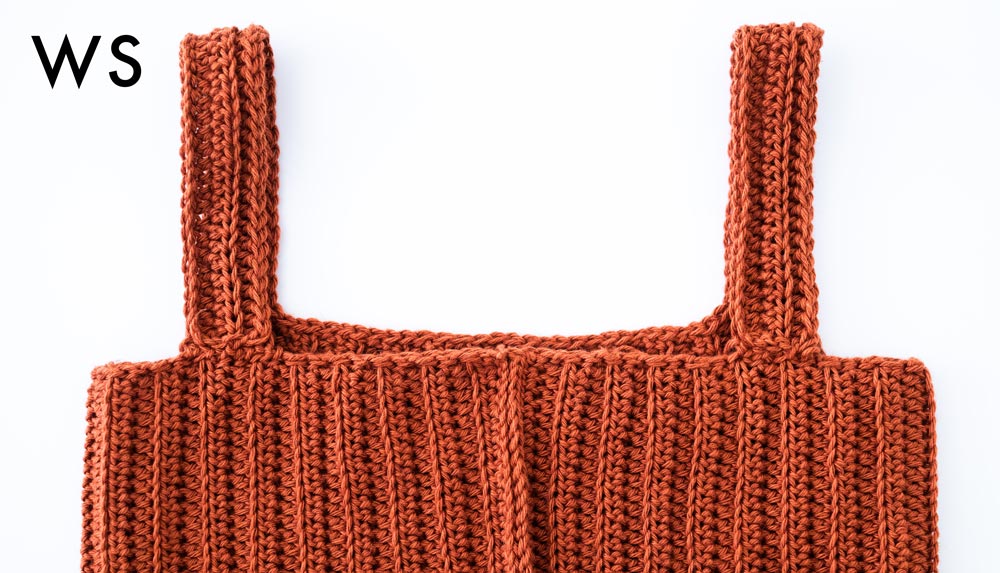
We’ll start by crocheting from the centre back, then the first strap, the front panel, the second strap and then the last back portion.
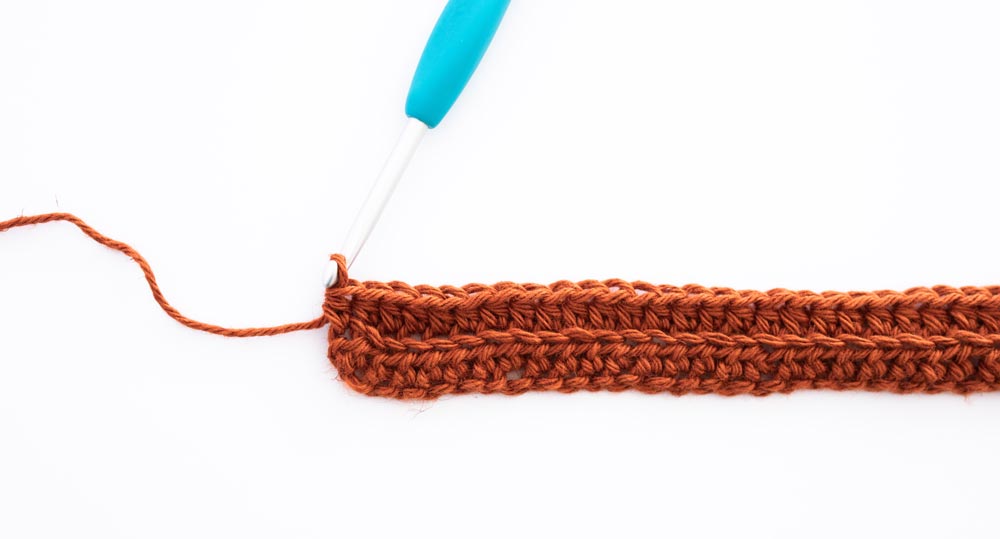
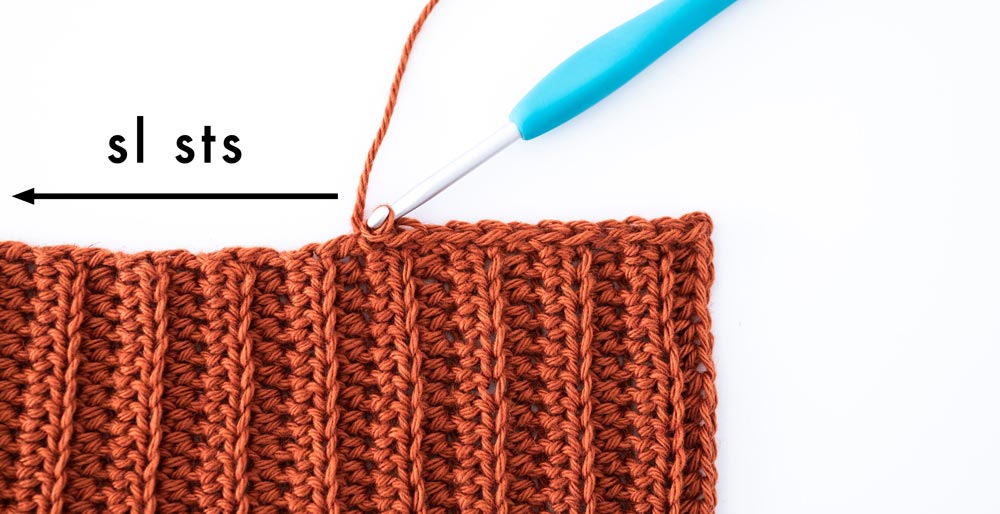
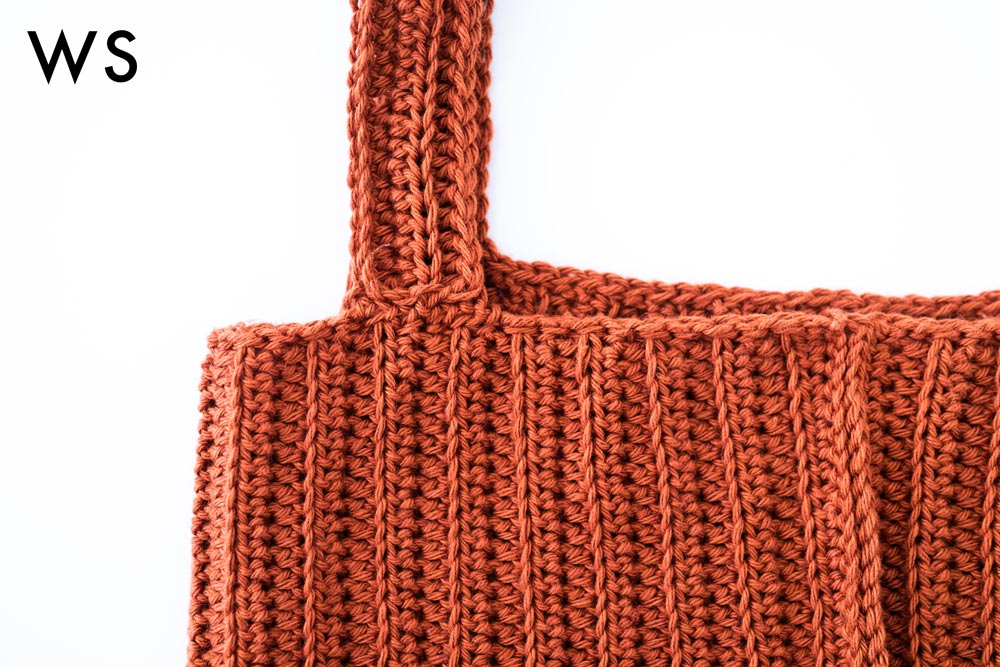
For a nice clean edge, we’ll crochet slip stitches along the neckline and straps. Remember the key to a clean and neat look is even stitches and tension. It’s really important to keep your tension even or your straps might feel too short!
I find it helps to crochet edging for about 10cm/4” and then place my top on a flat surface. You’ll be able to see if your stitches are too tight – they’ll be pulling on the edge causing it to pucker (which shortens your straps). If your stitches are too loose, they’ll make the edges look ruffled.
Another tip for crocheting edging is that I like to crochet the edging entirely in one go. This way you’re more likely to maintain the same tension throughout rather than crocheting a bit, putting down your top and coming back to it.
Once you’ve finished the neckline edging, the edges of the back panels are crocheted together using slip stitches and then we’ll fasten off! You can now try on your top and use stitch markers to hold your straps in place. Adjust your straps as necessary and then sew them to your top.
When sewing your straps, I like to make sure the wrong side is facing me and my darning needle doesn’t go through the slip stitch edging to the right side of the top. That way, you’ll keep the nice, neat edge you just crocheted! If you need more help, this technique is also used with the Blair Crop Top and you can view the video and step-by-step photos here!
Design Inspiration
The design inspiration for this top was simple – it was voted by all of you on Instagram! I often get requests for lots of different styles of tops, sweaters, cardigans so I made a poll on Instagram and a square neck tank top was the most popular one!
This thick strap ribbed top is the kind of style you can wear year after year (like most of my designs haha) and it’s such a simple pattern, you’ll want one in every colour!
Looking for more free crochet patterns?
1. / 2. / 3.
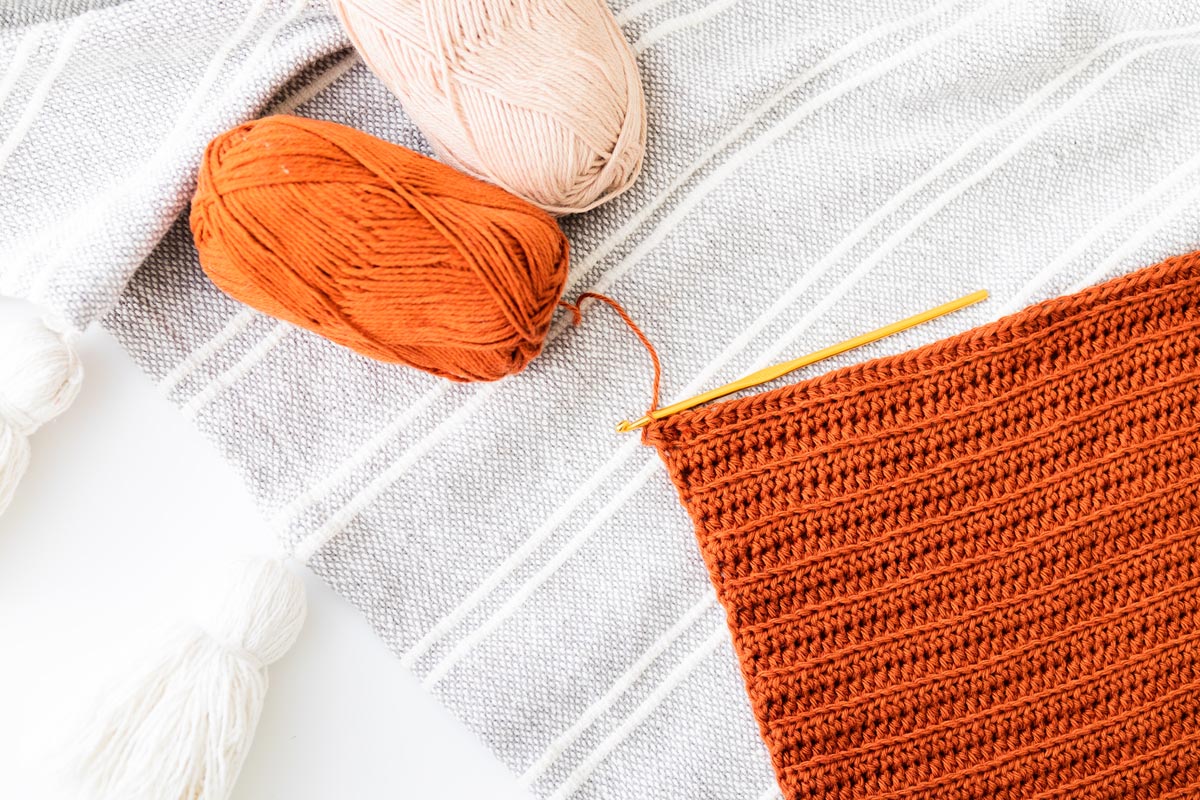
Cotton Linen Yarn
This ribbed cropped singlet uses in the shade Copper. is truly one of my favourite summer yarns (you can find it in the and patterns!) because it’s so easy to crochet with and most importantly – it gets softer over time.
The unique mix of cotton linen really gives this yarn great durability while being machine washable! With over 40+ shades, there is a colour for everyone ?
is also a true DK / Light (3) so if you’re looking to substitute this yarn, any DK yarn should work just make sure to crochet a swatch beforehand to make sure you meet gauge!
Pin me for later!
I love to see your finished projects! Use #forthefrills and tag me on Instagram @forthefrills for a chance to be featured!
Add the !
Purchase the !
PATTERN DESCRIPTION:
Simple and modern, the Terracotta Crop Top is the relaxing crochet project you need for summer! The entire crop top is worked in one piece with beginner friendly stitches (Back Loop Half Double Crochet + Slip Stitches) and only a few rows of shaping. With a ribbed texture, square neck and thick straps, you can pair this crop top jeans, shorts, maxi skirts or over swimsuits. This project also works up quickly, so you’ll be able to make the most of the warm summer days!
Pattern Notes:
*Sample is a size small shown on a 5’3” model with a 32” bust.
*The sizing guide follows size XS(S, M, L, XL)(2XL, 3XL, 4XL, 5XL). E.g. “Ch 45(45, 49, 53, 57)(61, 65, 69, 73) means Ch 45 for XS, Ch 45 for Small, Ch 49 for Medium, Ch 53 for Large, Ch 57 for XL, Ch 61 for 2XL, Ch 65 for 3XL, Ch 69 for 4XL and Ch 73 for 5XL.” If there is only one number, it applies to all sizes.
*”HDC 10″ means HDC into the next 10 stitches.
*”2HDC” means place 2 HDC into the same stitch.
*The turning chain, ch 1 does NOT count as a stitch.
*Total stitches are indicated between < >.
*This pattern uses US crochet terms.
*This crop top is designed with 10 – 15cm/4 – 6” negative ease. For a fitted look around the bust (as in sample photos), pick your normal t-shirt size (to fit bust measurement).
*This crop top is worked lengthways and in one piece starting from the centre back.
*The foundation chain runs the length of the back panel.
*We’ll crochet the 1st half of the back panel, crochet the 1st strap, crochet the front, crochet the 2nd strap and crochet the 2nd half of the back panel.
*Slip stitches are worked along the armholes and neckline to finish off the edges.
*The edges of the back panel are slip stitched together and the straps are sewn onto the back of the top.
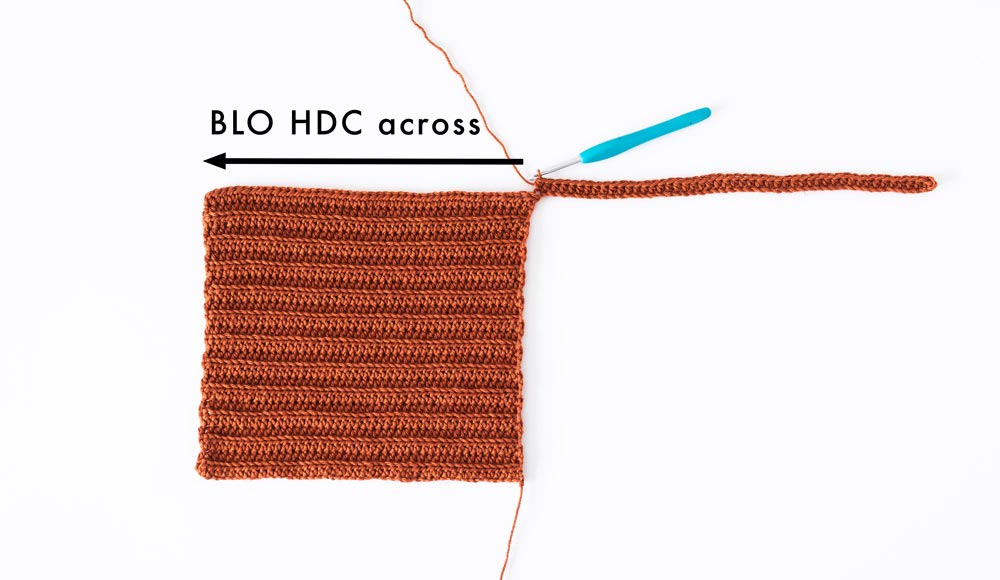
*The majority of this pattern follows a one row repeat called the BASE ROW.
(BASE ROW): Ch 1, BLO HDC in each st until last st, HDC in last st, turn.
LEVEL: Easy
Materials
Yarn – – DK / Light (3), 112m/50g, 123 yds/1.75oz, 70% Tanguis Cotton + 30% Linen, Copper
approx. 115(120, 145, 165, 210)(250, 290, 330, 380)g
Stitches & Abbreviations
Ch = Chain
Sl st = Slip Stitch
HDC = Half Double Crochet
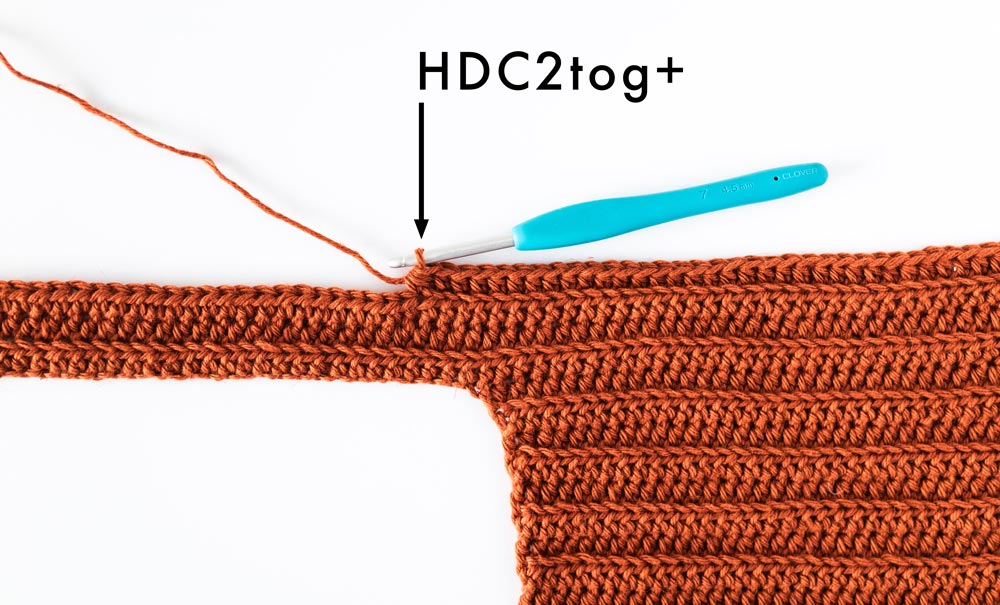
BLO HDC2tog+ = Modified Back Loop Half Double Crochet 2 Stitches Together
BLO = Back Loop
St(s) = Stitch(es)
Rep = Repeat
RS = Right Side
WS = Wrong Side
BLO HDC2tog+
Yarn over, insert hook into BLO of next st, yarn over, pull up a loop (3 loops on hook). Insert hook into next st (pick up both the front and back loop), yarn over, pull up a loop (4 loops on hook), yarn over pull through all 4 loops on hook.
Measurements
*The measurements are taken from the garment lying flat, before it has been worn.
*The straps will stretch out (approx. 5 – 8cm/ 2-4”) after the top has been worn a few times.
Measurements cm:
To fit Bust: 76(81, 91, 101, 112)(122, 132, 142, 152)
Top Bust: 64(70, 77, 85, 96)(106, 115, 125, 136)
Width: 32(35, 33.5, 42.5, 48)(53, 57.5, 62.5, 68)
Armhole/Strap Length: 13(13, 14, 15, 17)(19, 20, 22, 23)
Total Top Length (strap + body): 38(38, 41, 44, 48)(52, 56, 60, 63)
Measurements inches:
To fit Bust: 30(32, 36, 40, 44)(48, 52, 56, 60)
Top Bust: 25(27.5, 30.5, 33.5, 38)(41.5, 45, 49, 53.5)
Width: 12.5(13.75, 15.25, 16.75, 19)(20.75, 22.5, 24.5, 26.75)
Armhole/Strap Length: 5(5, 5.5, 6, 6.5)(7.5, 8, 8.5, 9)
Total Top Length (strap + body): 15(15, 16, 17.5, 19)(20.5, 22, 23.5, 25)
GAUGE: 10cm/4” square = 18 stitches wide x 10.5 rows tall in back loop half double crochet
Terracotta Crop Top Pattern
Back Panel (1ST Half)
FOUNDATION CHAIN: Ch 45(45, 49, 53, 57)(61, 65, 69, 73).
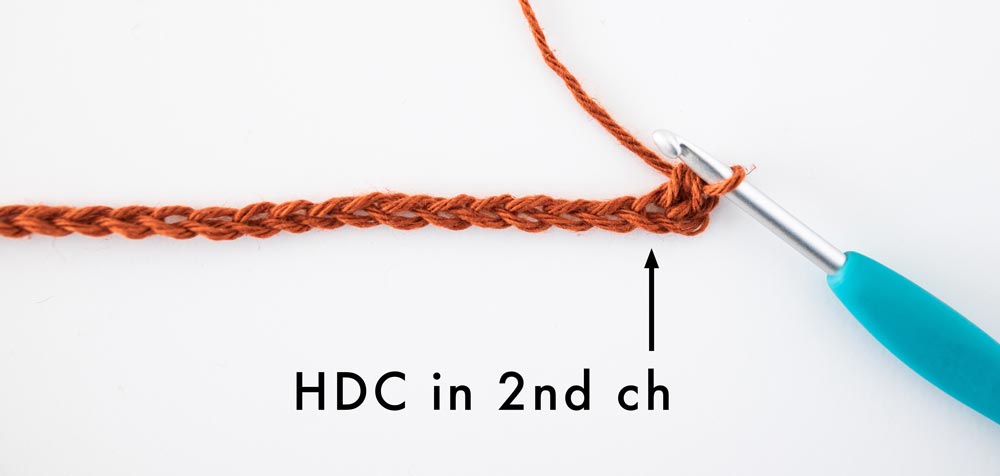
ROW 1 (RS): HDC into 2nd ch from the hook, HDC in each ch, turn.
<44(44, 48, 52, 56)(60, 64, 68, 72)>
ROW 2 (BASE ROW): Ch 1, BLO HDC across, HDC in last st, turn.
<44(44, 48, 52, 56)(60, 64, 68, 72)>
Repeat BASE ROW until ROW 20(22, 24, 26, 30)(32, 36, 38, 42).
Do not fasten off! Proceed directly to ‘FIRST STRAP’ instructions.
First Strap
ROW 1: Ch 1, BLO HDC across, [BLO HDC, HDC] in last st, ch 48(48, 51, 55, 61)(67, 73, 79, 85), turn.
<45(45, 49, 53, 57)(61, 65, 69, 73) + 48(48, 51, 55, 61)(67, 73, 79, 85)chs>
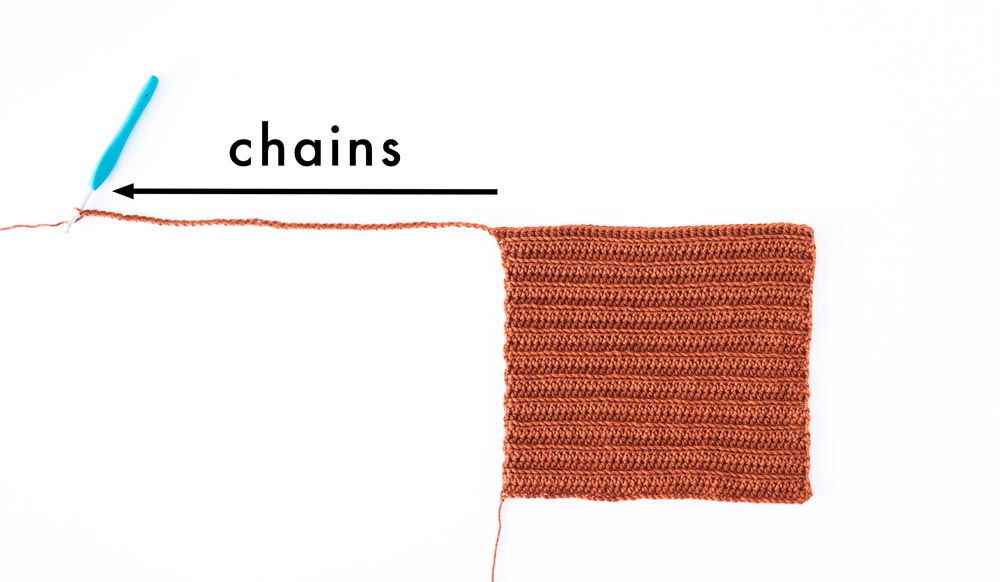
*Note: The chain will seem quite long, but it is total length of the front + back strap together.
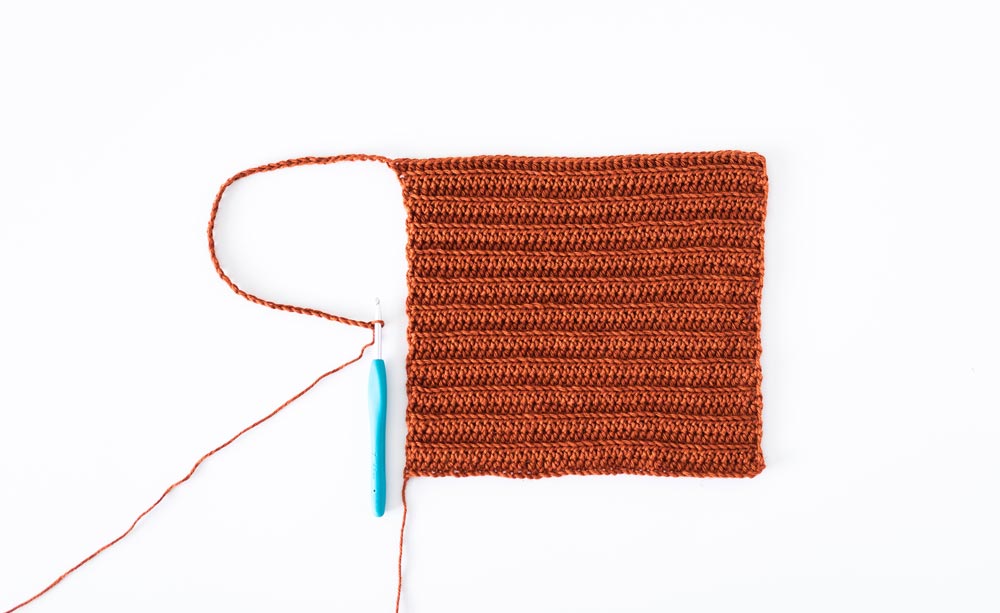
ROW 2: HDC into 2nd ch from the hook, HDC in each ch, BLO HDC across, HDC in last st, turn.
<92(92, 99, 107, 117)(127, 137, 147, 157)>
Repeat BASE ROW until ROW 4(4, 4, 4, 4)(6, 6, 6, 6).
<92(92, 99, 107, 117)(127, 137, 147, 157)>
Total Rows: <24(26, 28, 30, 34)(38, 42, 44, 48)>
Do not fasten off! Proceed directly to ‘FRONT PANEL’ instructions.
Front Panel
ROW 1: Ch 1, BLO HDC 47(47, 52, 56, 61)(65, 70, 75, 80), HDC2tog+, turn.
<48(48, 53, 57, 62)(66, 71, 76, 81)>
Repeat BASE ROW until ROW 18(20, 24, 28, 32)(34, 36, 42, 46).
<48(48, 53, 57, 62)(66, 71, 76, 81)>
Total Rows: <42(46, 52, 58, 66)(72, 78, 86, 94)>
Do not fasten off! Proceed directly to ‘SECOND STRAP’ instructions.
Second Strap
ROW 1: Ch 1, BLO HDC across, [BLO HDC, HDC] in last st, ch 44(44, 46, 50, 55)(61, 66, 71, 76), turn.
<49(49, 54, 58, 63)(67, 72, 77, 82) + 44(44, 46, 50, 55)(61, 66, 71, 76)chs)>
ROW 2: HDC into 2nd ch from the hook, HDC in each ch, BLO HDC across, HDC in last st, turn.
<92(92, 99, 107, 117)(127, 137, 147, 157)>
Repeat BASE ROW until ROW 4(4, 4, 4, 4)(6, 6, 6, 6).
<92(92, 99, 107, 117)(127, 137, 147, 157)>
Total Rows: <46(50, 56, 62, 70)(78, 84, 92, 100)>
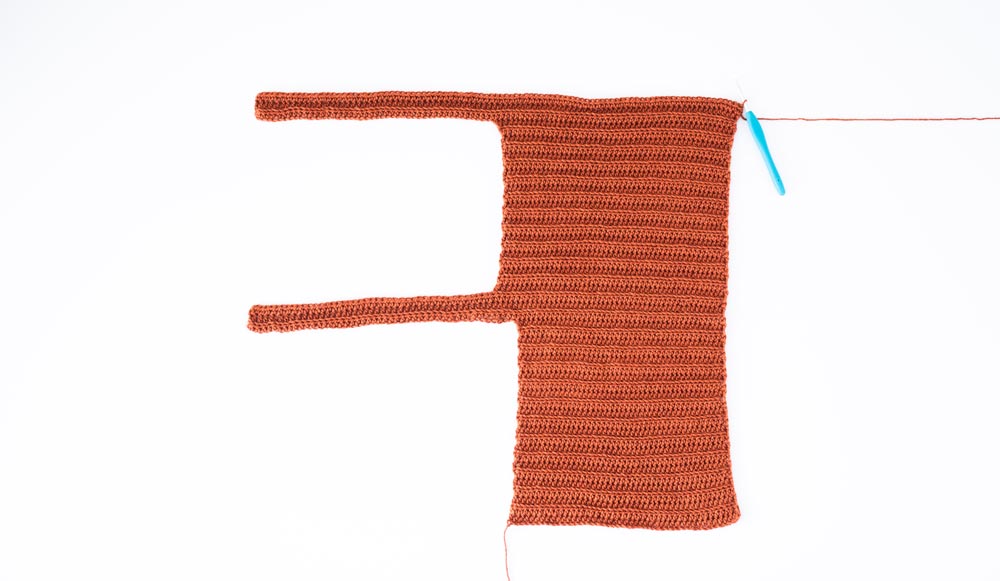
Do not fasten off! Proceed directly to ‘BACK PANEL (2ND HALF)’ instructions.
Back Panel (2ND Half)
ROW 1: Ch 1, BLO HDC 43(43, 47, 51, 55)(59, 63, 67, 71), HDC2tog+, turn.
<44(44, 48, 52, 56)(60, 64, 68, 72)>
Repeat BASE ROW until ROW 21(23, 25, 27, 31)(33, 37, 39, 43).
Total Rows: <67(73, 81, 89, 101)(111, 121, 131, 143)>
*At the end of the last row, do not turn your work.
Do not fasten off! Proceed directly to ‘EDGING’ instructions.
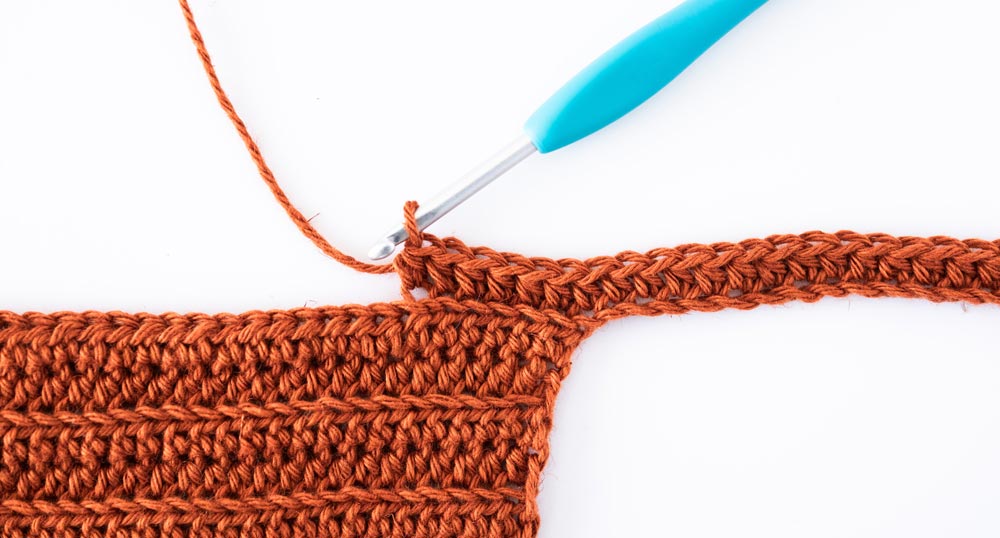
Edging
Rotate your work 45 degrees. Slip stitch along the top edge of the back panel, along the straps, neckline and armholes.

Do not fasten off! Proceed directly to ‘ASSEMBLY’ instructions.
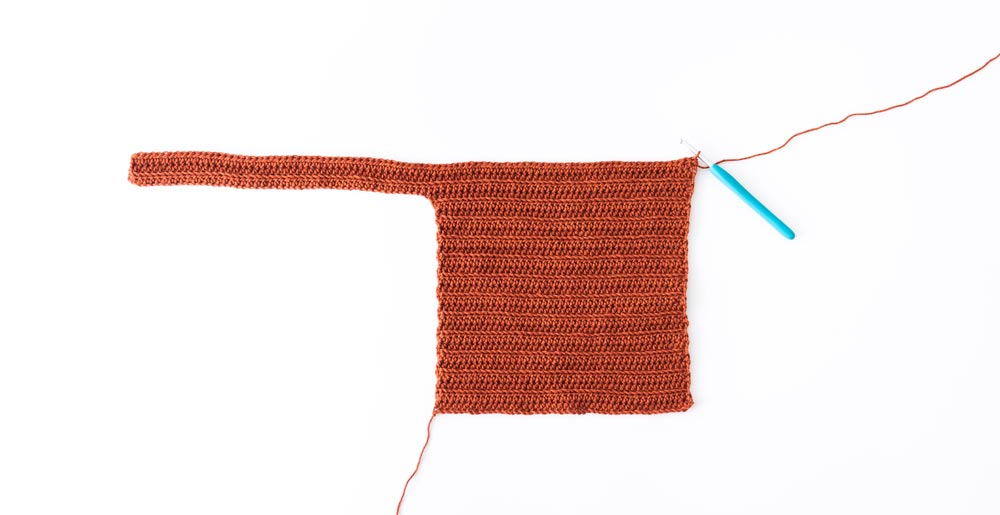
Assembly
Fold your top in half lengthways with the WS facing you.
Slip stitch the edges of the back panel together.
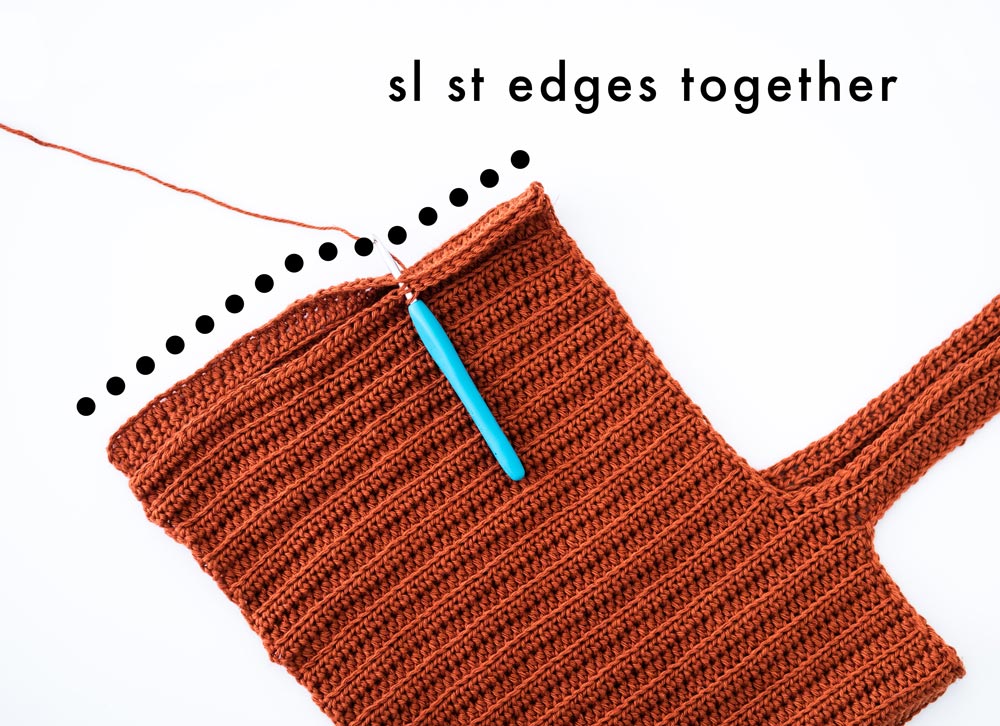
Fasten off.
With the WS facing up (the slip stitch centre back seam should be facing you), pin the straps to the back of the top.
*Before sewing, I recommend trying on your top. Adjust the strap placement as necessary.
Whip stitch the straps to back panel.
*For a neat edge, don’t insert your needle through to the RS of the slip stitch edging. Make sure your darning needle only picks up the strands of yarn that are facing you.
Weave in all of your ends.
Turn your top inside out.
Voilà! You’ve finished your Ribbed Crop Top ?
Ready for your next crochet project?
Check out more , or !
The post appeared first on .


