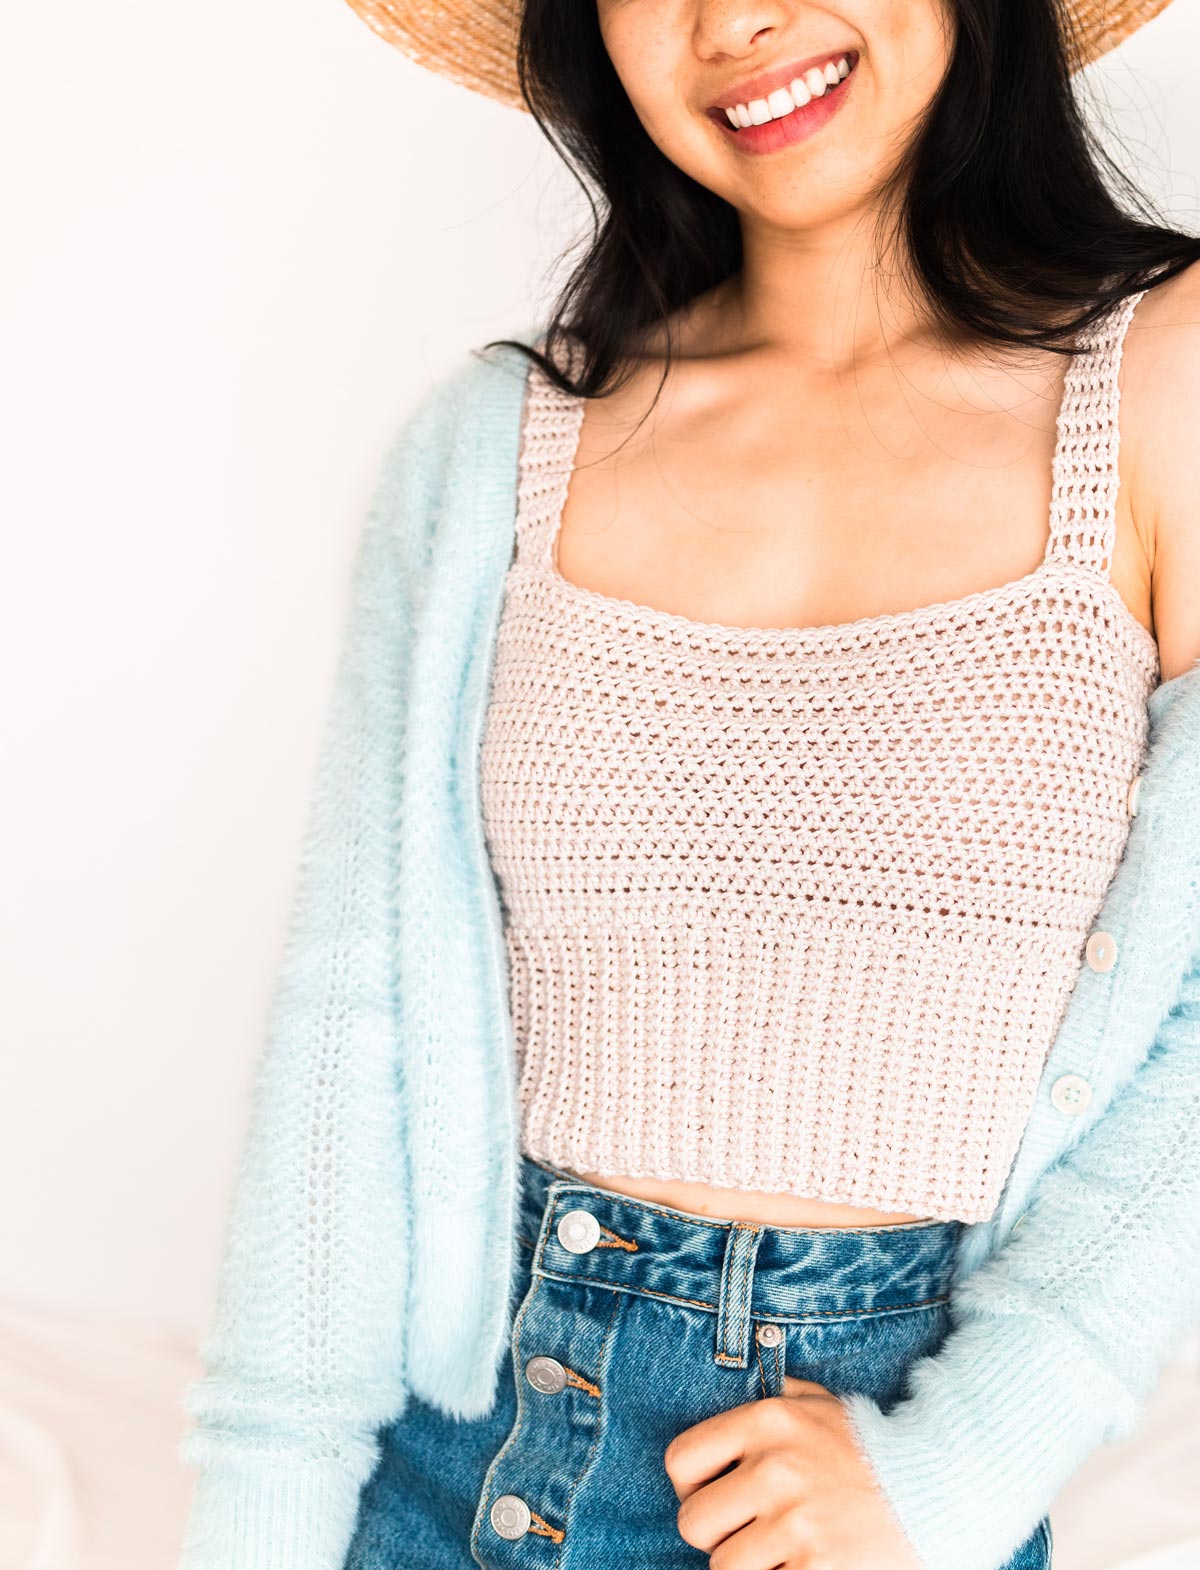
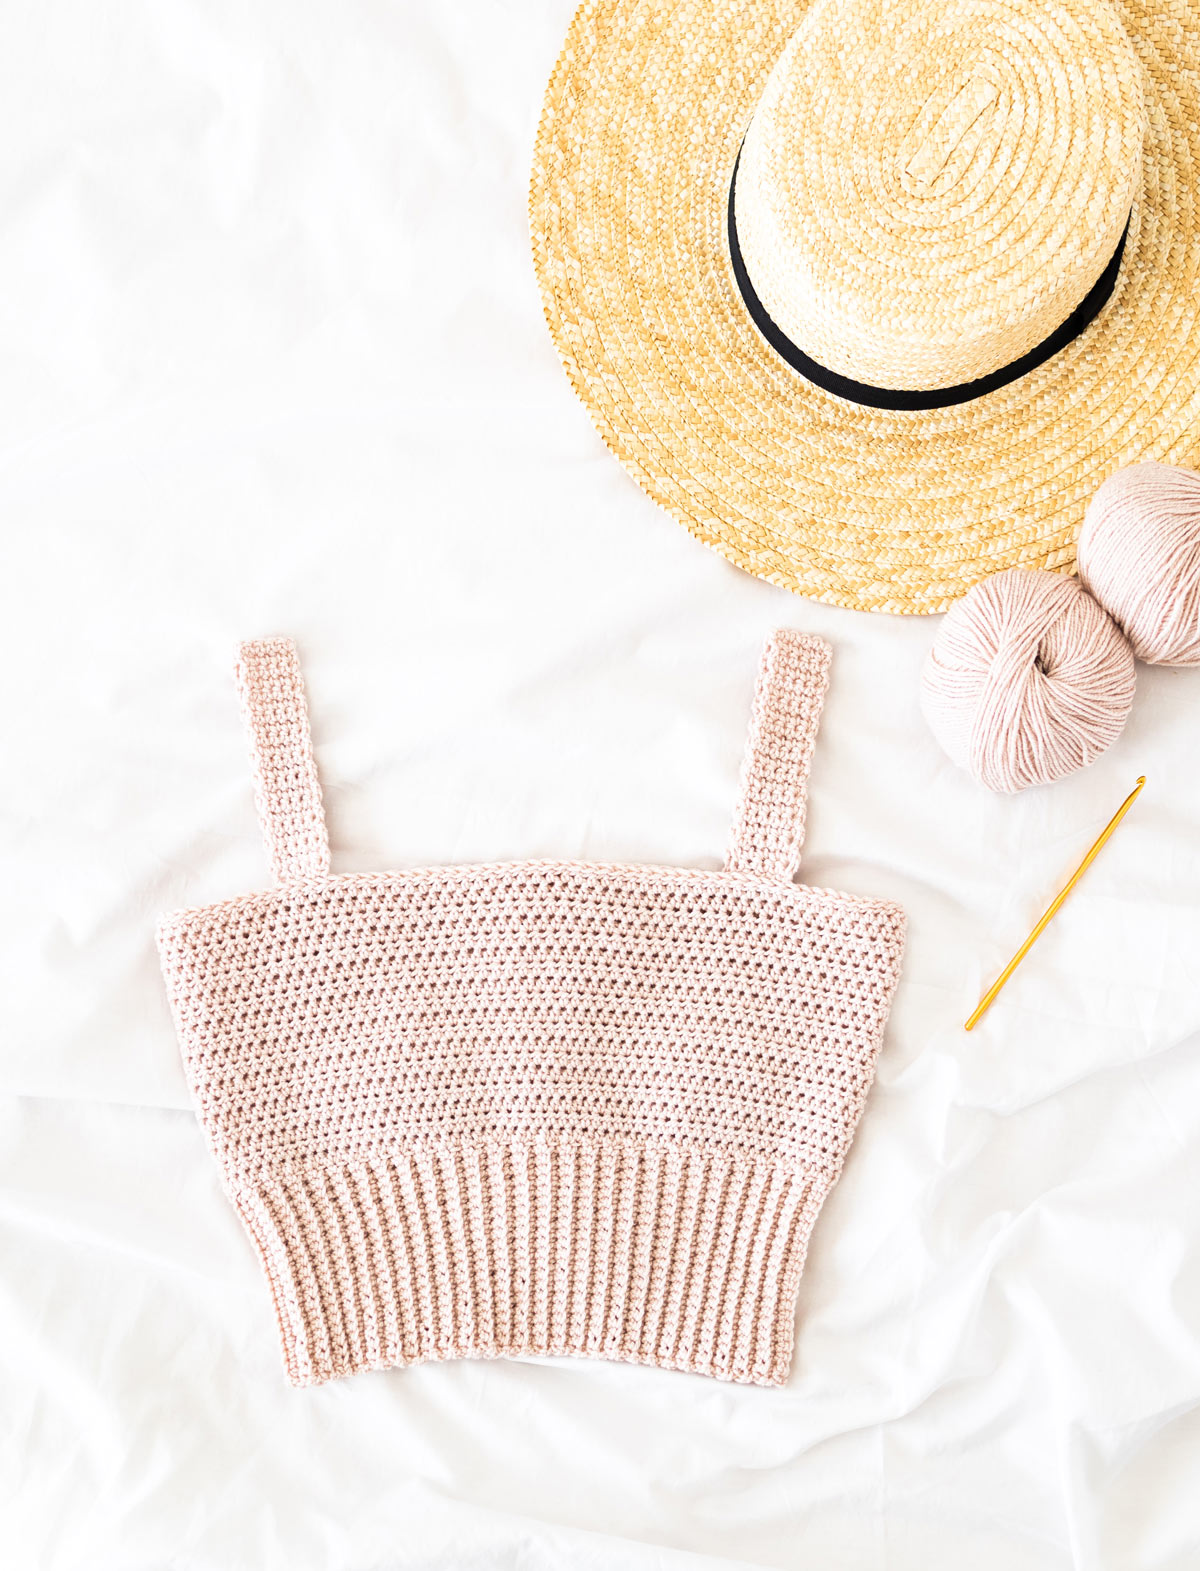
Learn how to crochet a square neck crop top for summer! The Blair Crop Top is the perfect everyday crochet staple for your spring me-made wardrobe. This beginner-friendly project uses simple stitches – single crochet and half double crochet – to create a modern and wearable tank top.
Scroll down for this free crochet crop top pattern and step-by-step video tutorial, or purchase the !
This post may contain affiliate links, view our for details.
Thank you to for sponsoring the free crochet crop top pattern!
As always, all thoughts and opinions are 100% my own ?
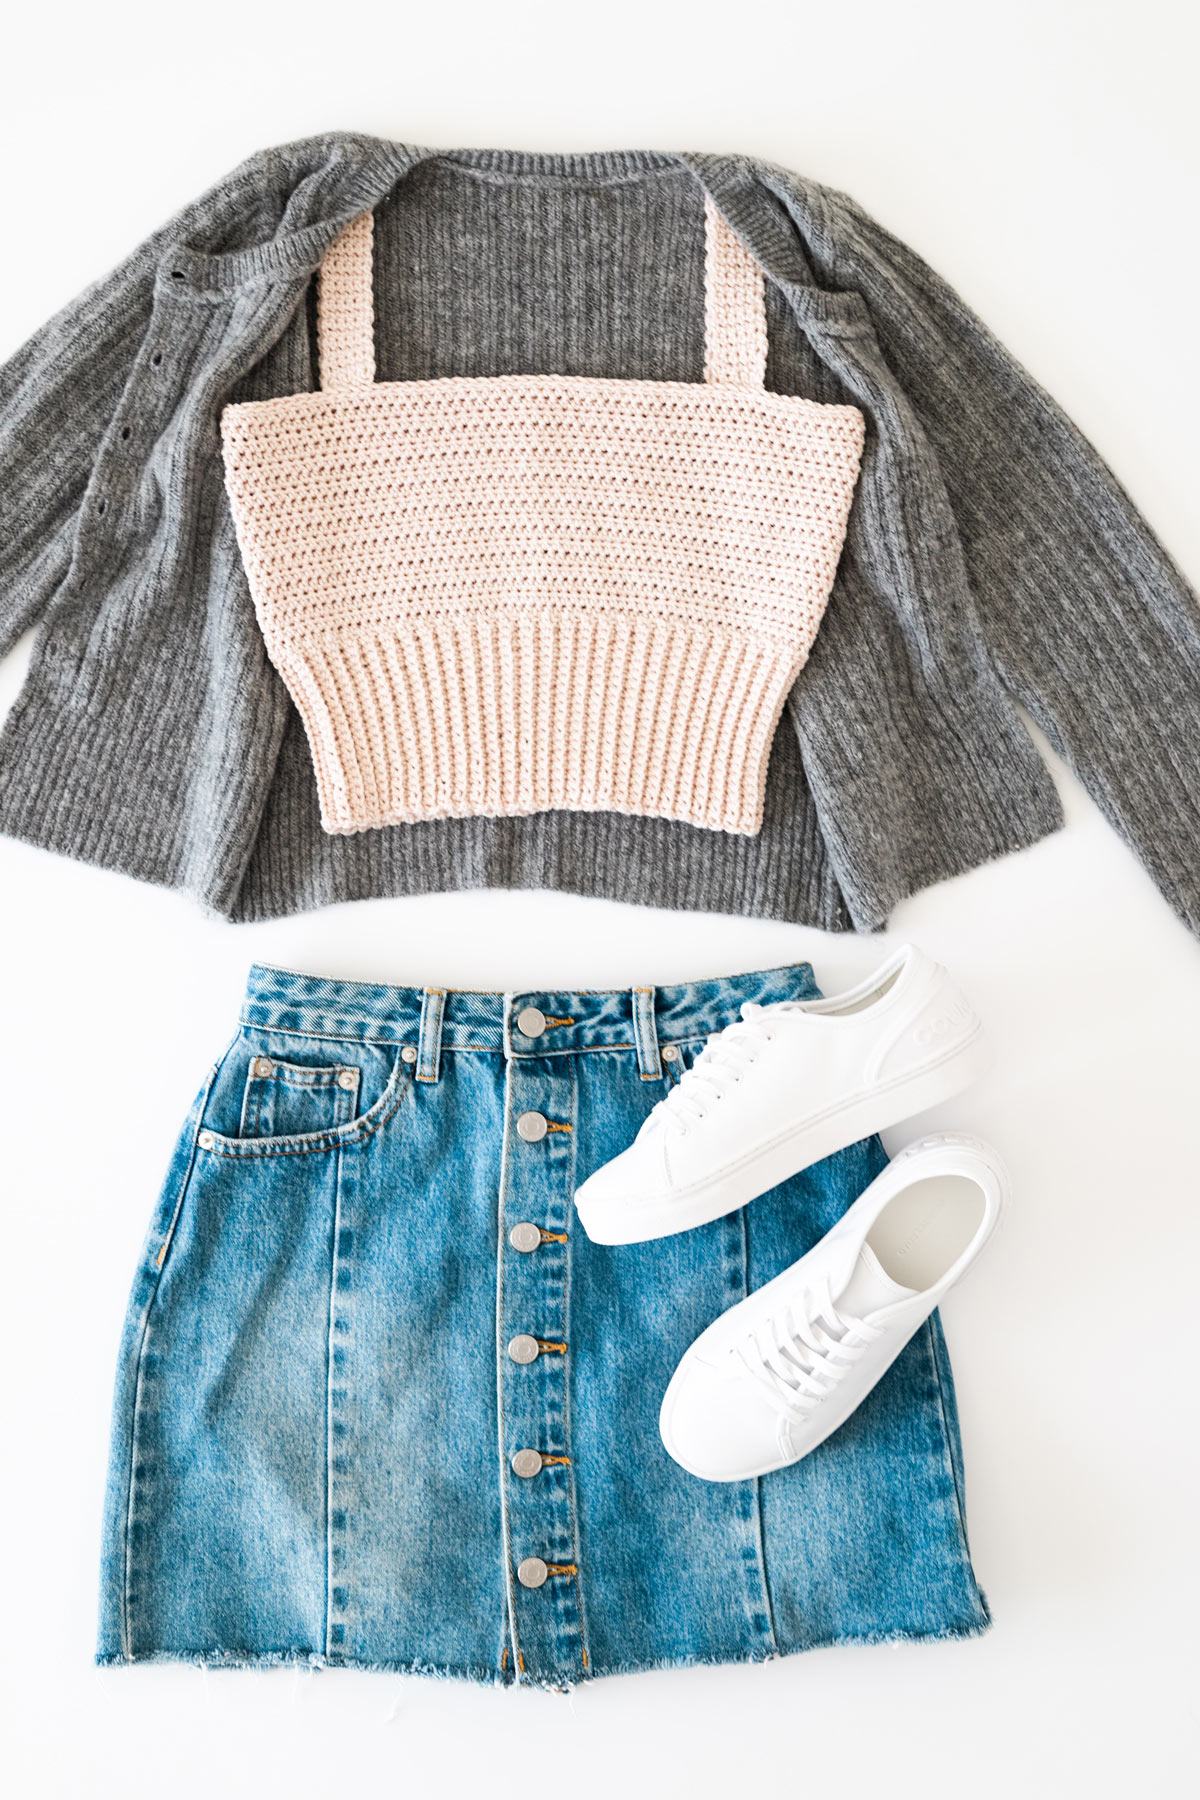
The Blair Crop Top is so simple, modern, stylish – it’ll have people saying, ‘I can’t believe you made that!’ Pair it with denim shorts, maxi skirt or jeans, this easy crochet tank top is perfect to transitional piece from spring to summer. You can even wear it over a turtleneck or under a leather jacket during the colder months!
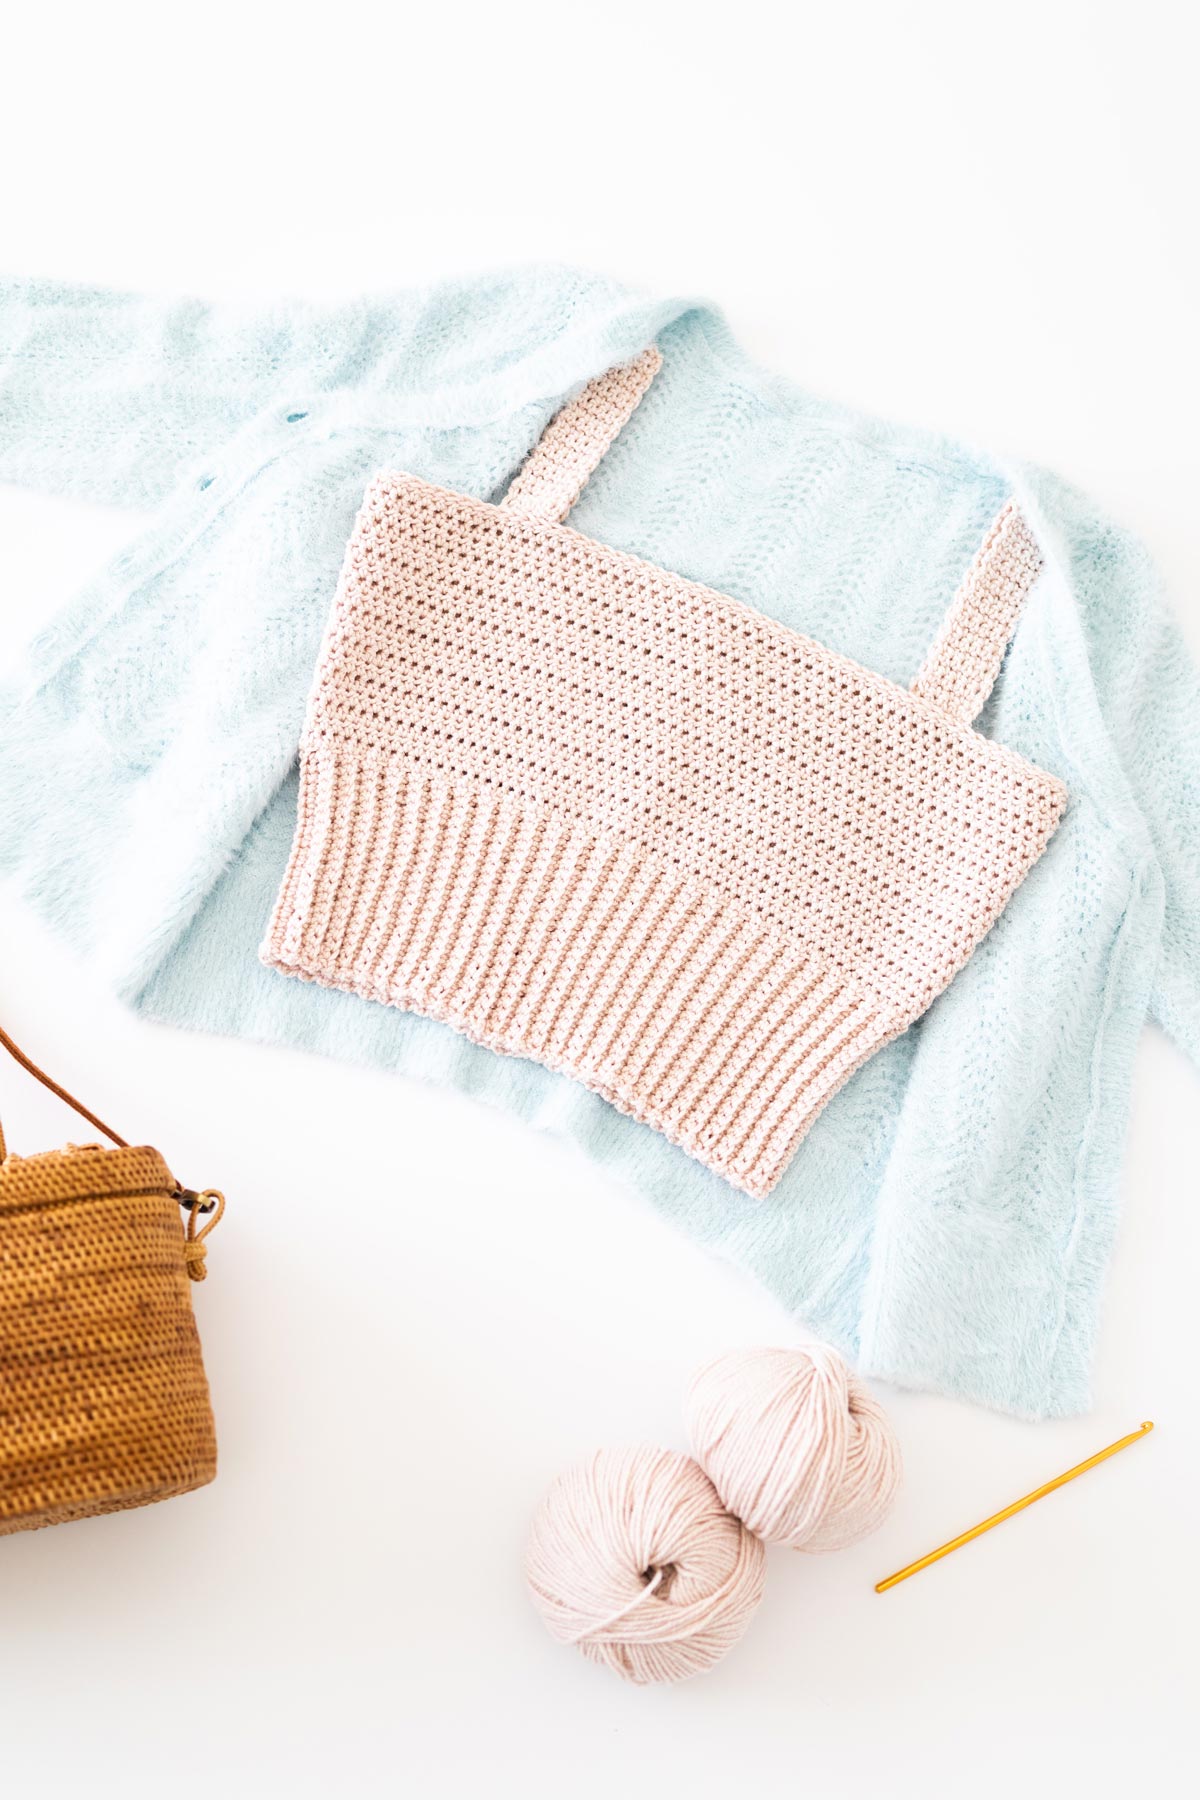
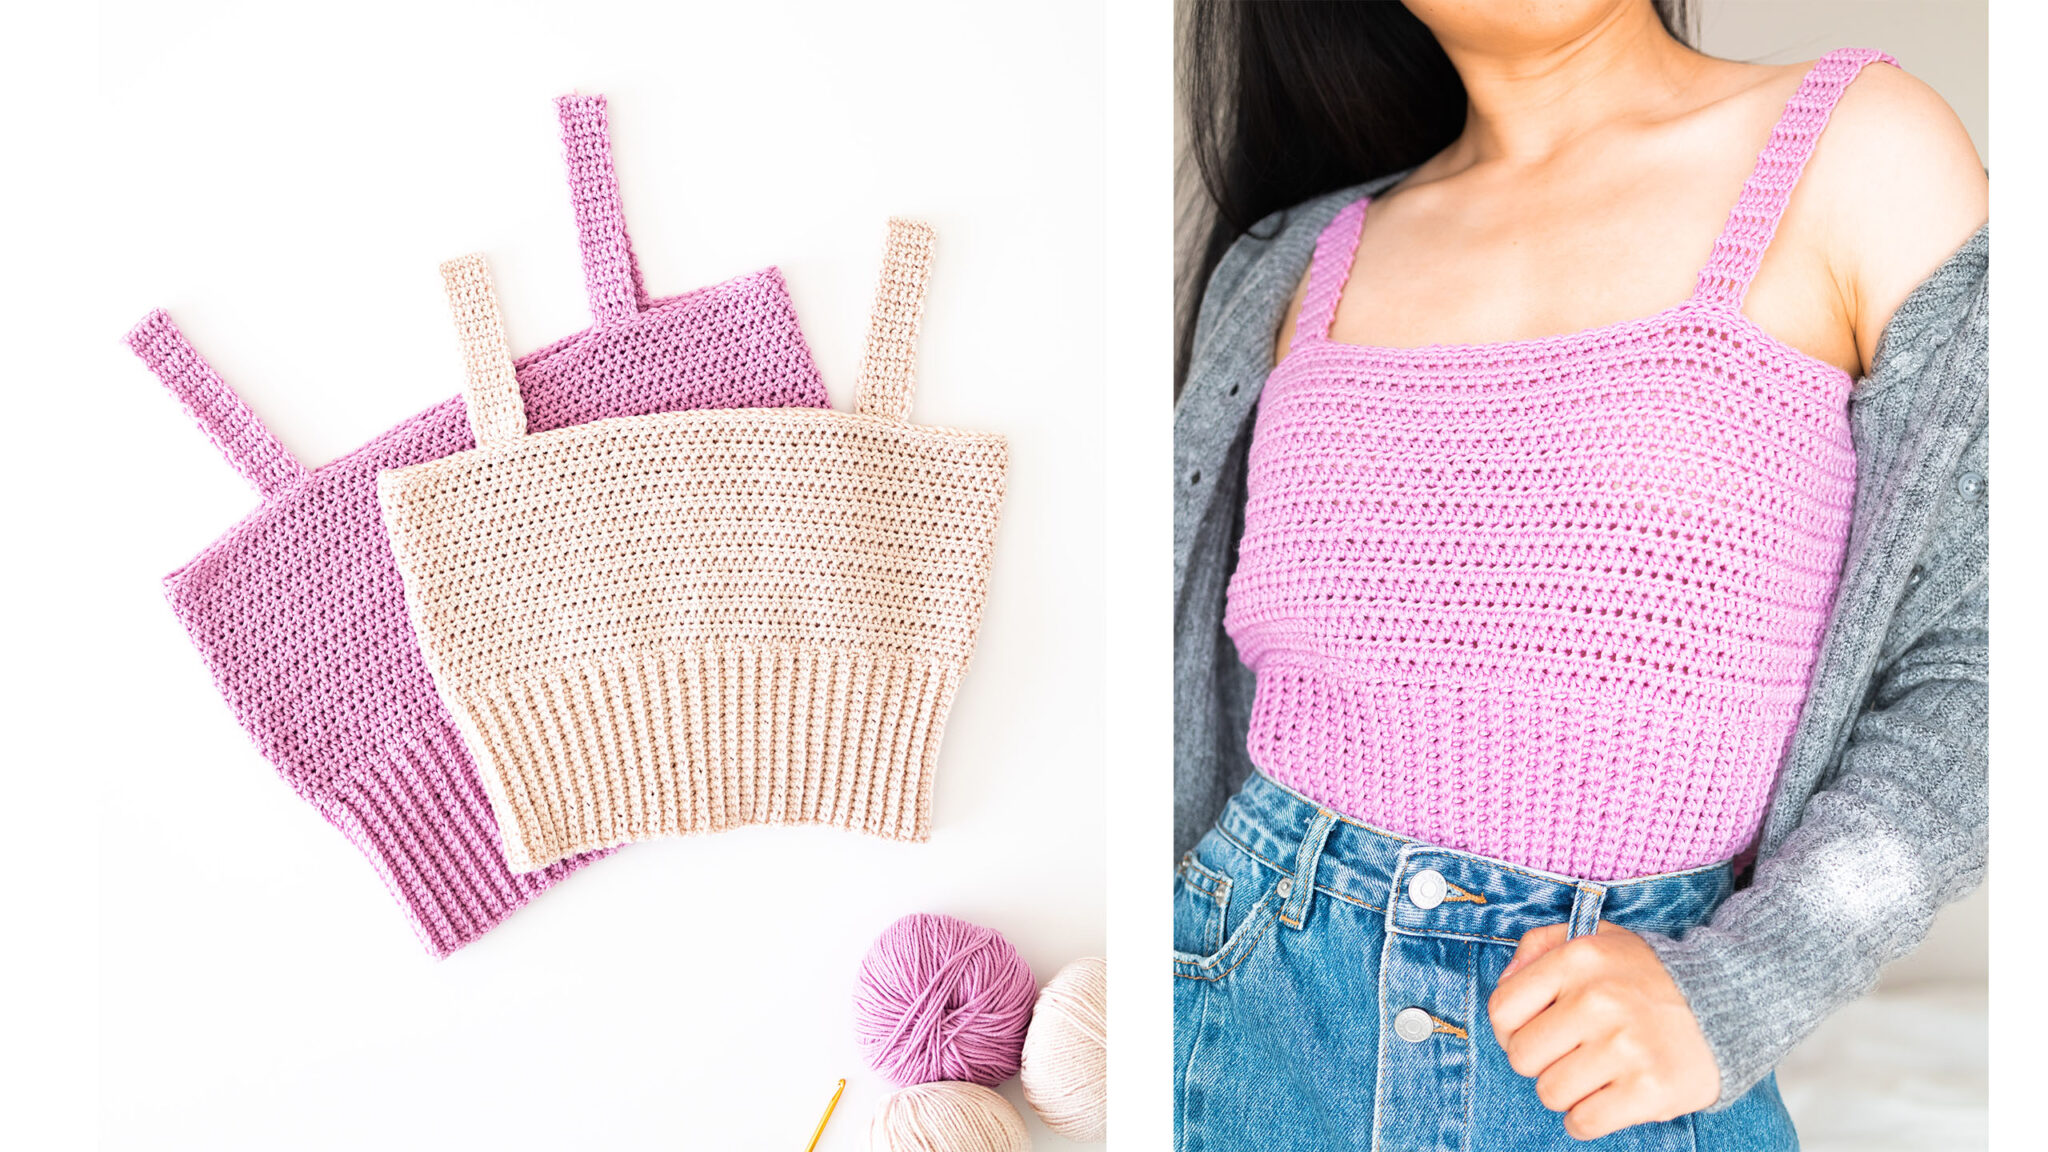
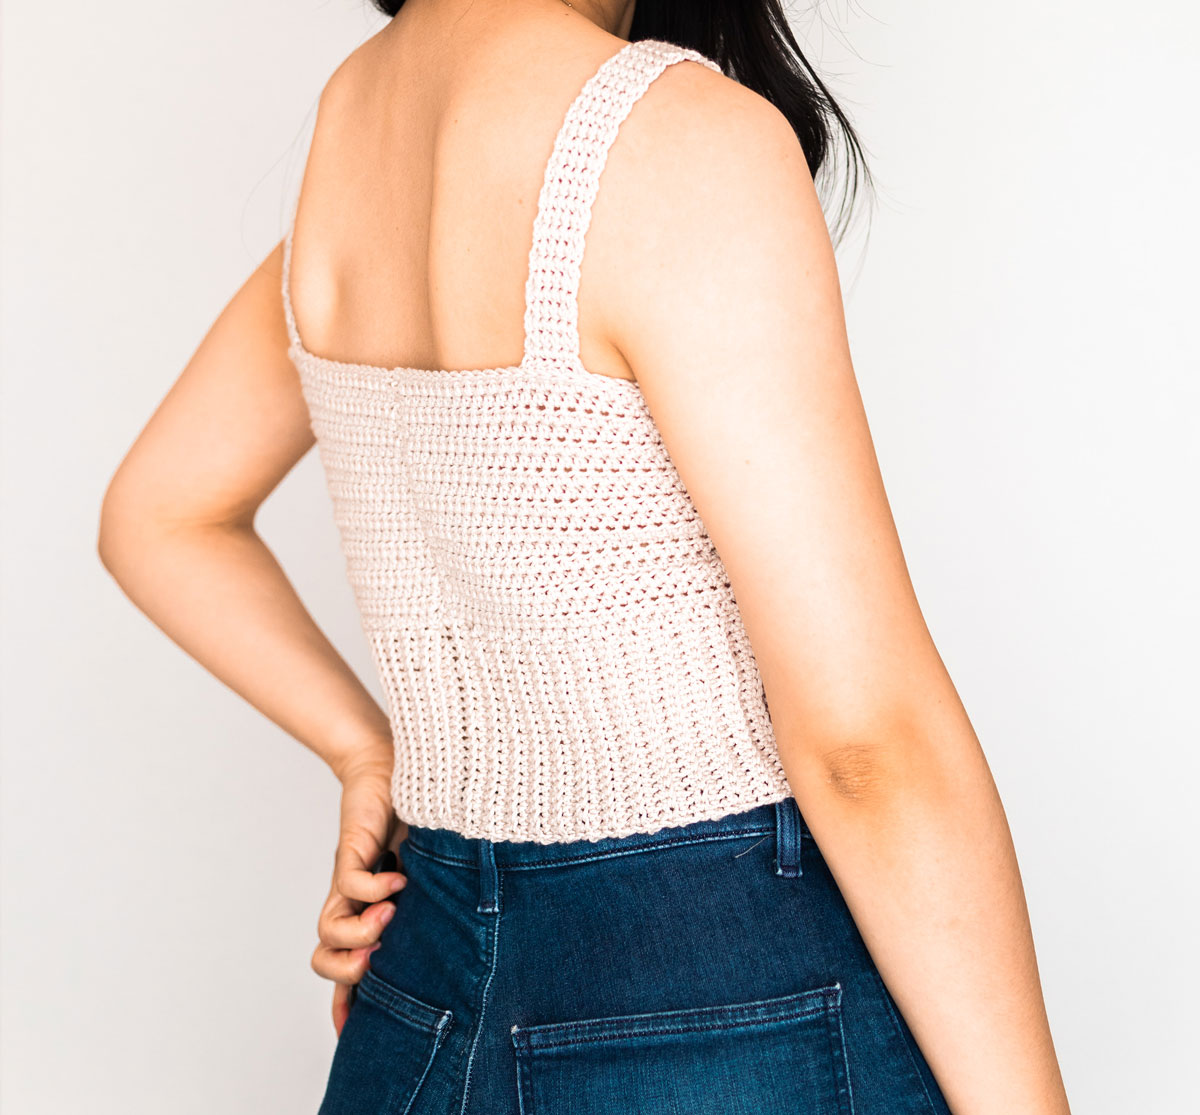
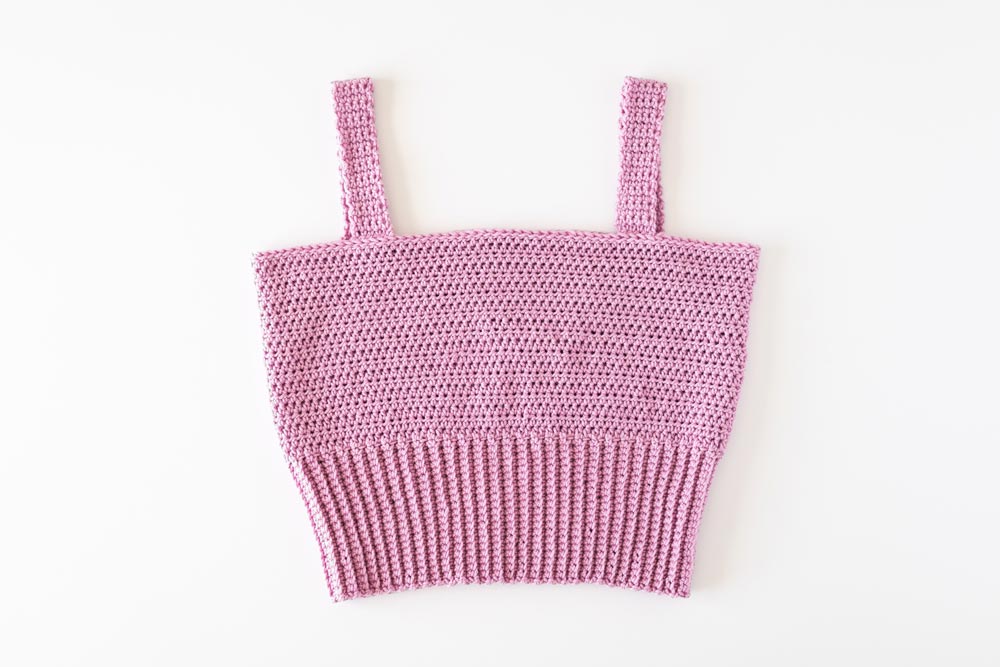
This ribbed crochet crop top is a bit of a crop top/tank top hybrid. The Blair Crop Top features thick waist ribbing crocheted in back loop single crochets while the body portion is made up of half double crochets.
The body is also worked entirely in one piece! We’ll crochet the waist ribbing and then crochet the body directly onto the ribbing. The straps are made up separately and then they’ll be sewn onto the crop top.
You’ll find alteration instructions in the pattern below, so crop top length is completely customisable and so is the ribbing and the straps.
How to get a perfect fit
The key to getting a fitted crop top is to crochet a top slightly smaller than your actual bust measurement and to pick a stretchy yarn! This pattern has 19 sizes – yes 19! With sizes ranging from a 71 – 162cm / 28” – 64” bust.
Since this is a fitted top I added half sizes in between the normal sizes of XS, S, M, etc. because I want this top to fit everyone nicely! You can see in the photos how only a difference of 2.5cm / 1” in width can make a huge difference when wearing this crochet crop top.
*As a point of reference I’m 5’3” with a 82cm/32” bust and 64cm/24” waist ?
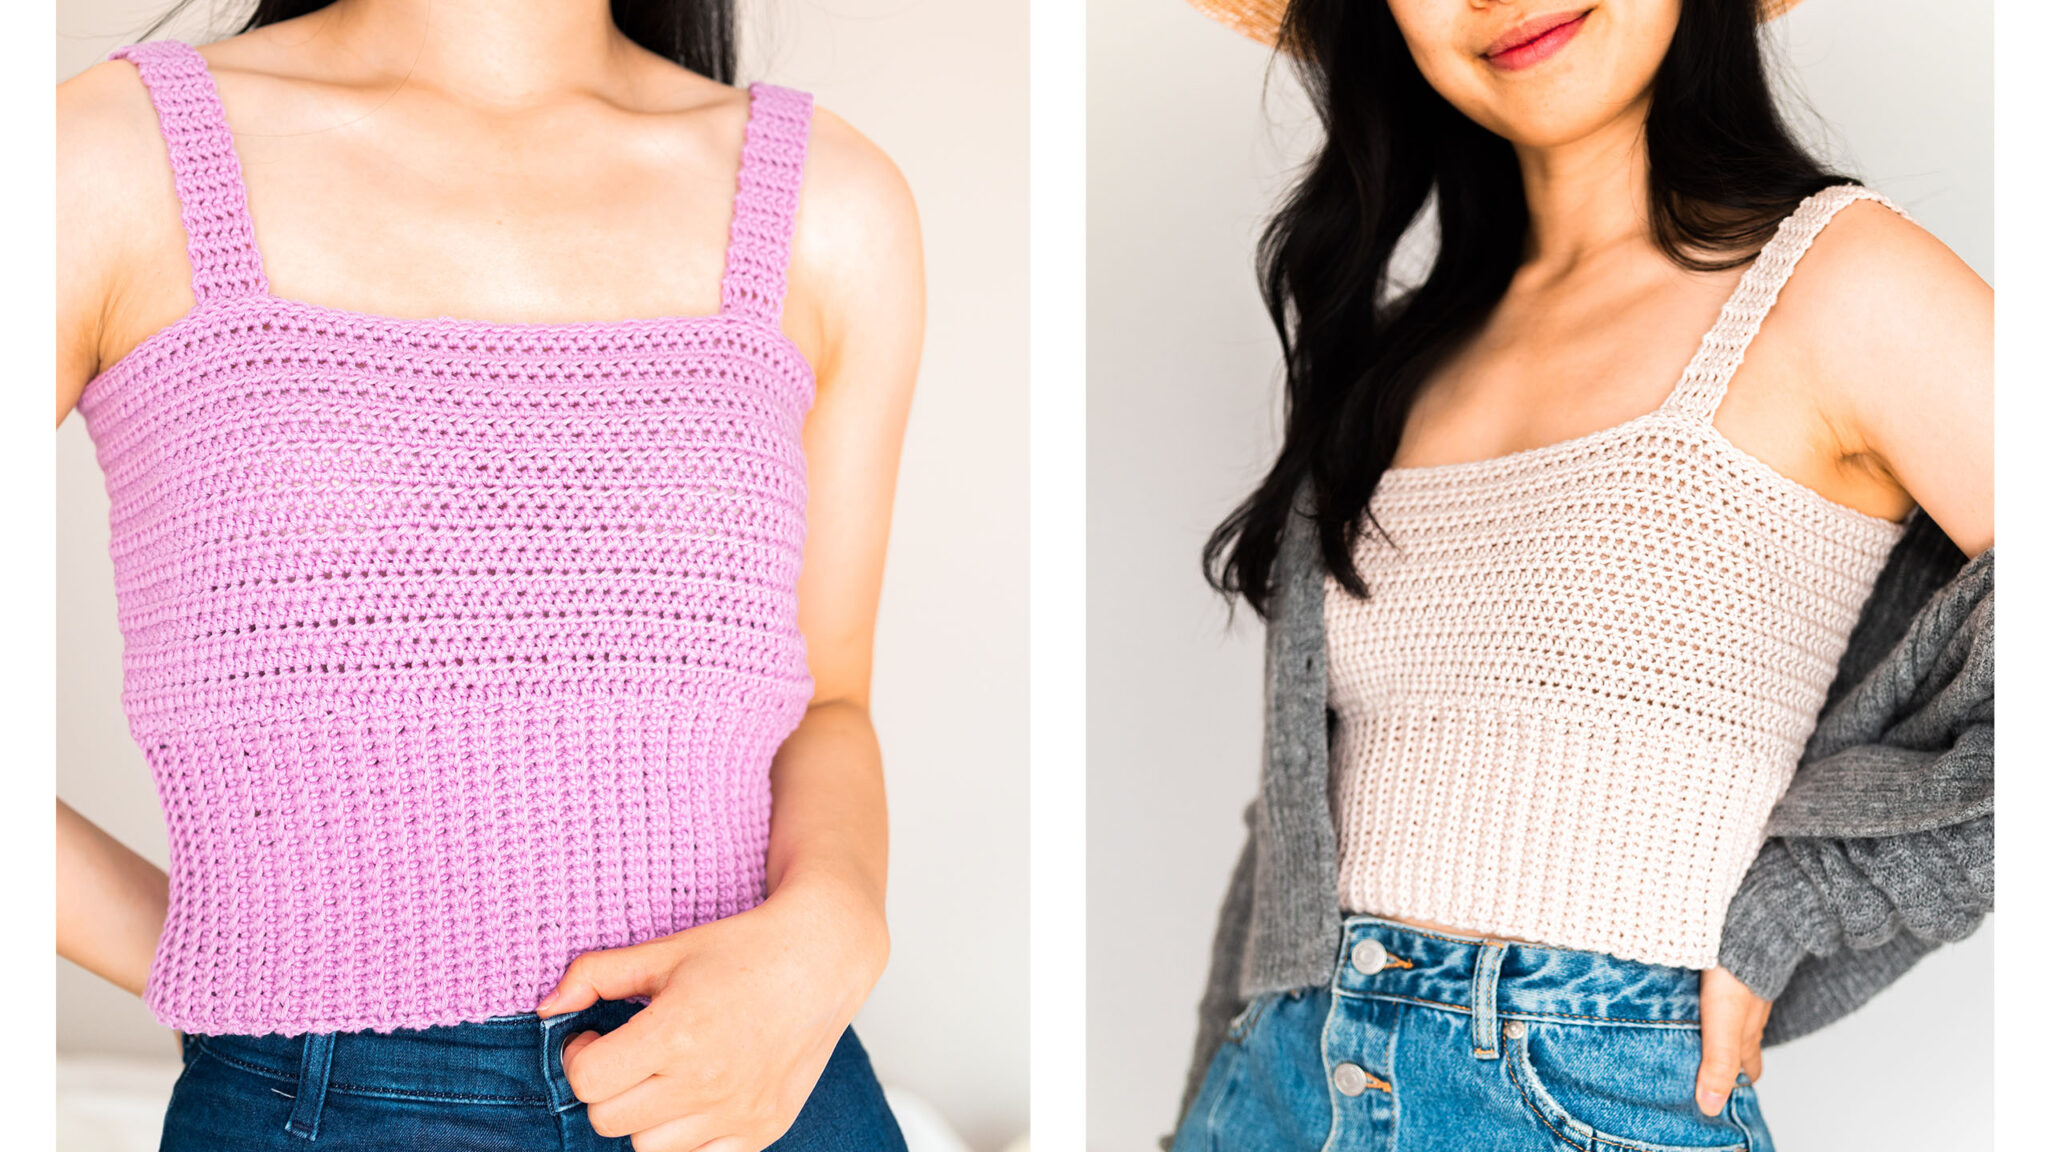
The Lilac Top is a size S, while the Powder Beige Top is a size XS+. The Lilac Top (S) still fits me but it’s a lot looser around the waist and just barely fits around my bust. This is great if you want your crochet top to fit more like a tank top and the extra length also makes it easy to tuck into jeans/skirts.
On the other hand, the Beige Top (XS+), fits snugly around the bust and waist so it has a more streamlined look and feels more like a crop top. Personally, I love the way the Beige Top fits so if you want a fitted crop top choose the top size that is at least 2” smaller than your actual ‘to fit bust’ measurement. Since these crochet stitches are quite stretchy, a slightly smaller top will stretch out to fit you.
If your waist measurement is quite small (relative to your bust) you can size down even further. Pick a size that’s up to about 4” smaller than your actual bust measurement but make sure you are using a yarn that has a lot of stretch and spring!
And as always make sure you have the same gauge as what’s listed in the pattern! Always crochet a swatch before you start your project and that way you’ll know if your top will be the same size as the suggested measurements.
If your gauge is off, just search for some ‘crochet gauge’ tutorials on YouTube (there are heaps!) and you’ll learn how to adjust your tension or hook size. If you need your stitches to be taller or shorter search for ‘crochet golden loop’ tutorials and they’ll teach you how to adjust stitch height.
Crochet Design Inspiration
If you’ve been reading the blog for a while you’ll know that I love designing crop tops! In fact, my first ever free crochet pattern was the ! Time and time again, so many of you have asked, “How do I get the perfect fit?” or “How can I make a crop top fit me at my waist and at the bust?”
Over the past 2 years, I’ve learnt so much about crocheting and designing and I’m so pleased to share this size-inclusive pattern with you!
I’ve been thinking about a fitted tank top design with waist ribbing details and a solid body for years but the tricky thing about figure hugging designs is that they can very easily go wrong. Often, you’ll need lots of rows of shaping which means a more difficult pattern and lots of counting … and if you know me, counting is definitely one of my least favourite parts about crocheting haha.
For the past few months, I’ve experimented with so many different stitches and I’ve finally found the perfect combination!
Single crochets are smaller and tighter than half double crochets so they work well around the waist while the wider half double crochets help the crop top get wider around the bust without lots of rows of shaping. Also having all the half sizes/ in between size will really help you get a perfect fitting crop top!
Looking for more free crop top crochet patterns?
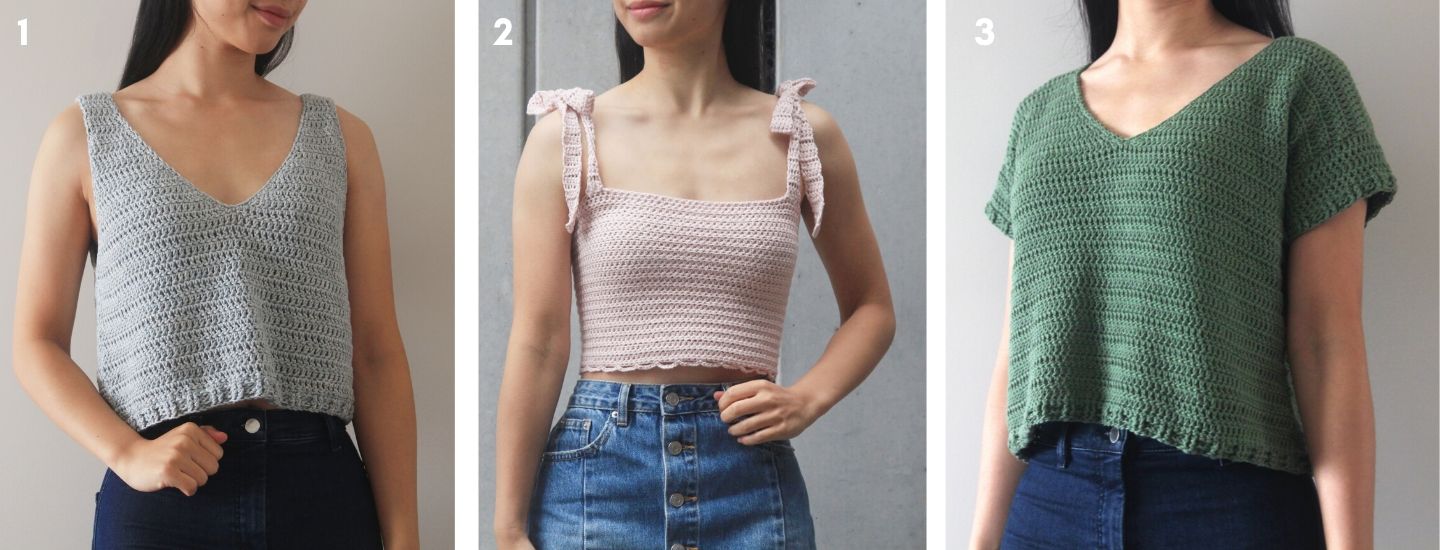
1. / 2. / 3.
Yarn
The Blair Crop Top uses in the shades Lilac and Powder and it’s made up of 50% merino wool and 50% cotton. I know a lot of you will be thinking, ‘Merino in summer?!’ But merino is actually a very breathable fibre so unless you’re living somewhere 30C+ you’ll be fine!
Especially since this yarn is a cotton-merino blend, I don’t find it any warmer than wearing an acrylic top during summer. And to be honest, a crop top tends to have very little fabric anyway haha ?
If you’re looking for a substitute make sure you to look for yarns that are a DK/Light (3) weight with a good amount of stretch and spring. Acrylic, merino and cotton acrylic blends are the best options.
100% cotton yarns will stretch out, but they don’t ‘spring back’ into place. This is great if you want a loose and relaxed look but if you want a fitted crop top, it’ll fit nicely the first few times you wear it and then stretch out!
Some of my favourite crop top yarns are –
(100% acrylic, aran/worsted/medium (4) yarn but it’s quite thin for a worsted weight yarn so it should be able to work with this pattern)
(100% acrylic, DK, huge colour range and affordable!)
(100% merino, DK, a really versatile merino yarn)
If you’re looking for a more relaxed top –
(70% Cotton + 30% Linen, DK, a great cotton yarn that softens over time – I used it for the !)
(100% Bamboo, DK, a ‘silky’ feel)
Pin me for later!

Video Tutorial
Add the !
Purchase the !
Pattern Notes:
*The Lilac Top is a size S and the Powder (Beige) Top is size XS+. Both tops are shown on a 5’3” model with a 82cm/32” bust and 64cm/24” waist.
*Sizing guide follows size XXS+(XS, XS+, S, S+)(M, M+, L, L+)(XL, XL+, 2XL, 2XL+)(3XL, 3XL+, 4XL, 4XL)(5XL, 5XL+). E.g. “Ch 21(21, 21, 22, 22)(22, 22, 24, 24)(26, 26, 28, 28)(30, 30, 32, 32)(34, 34)” means “Ch 21 for XXS+, XS and XS+; Ch 22 for S, S+, M and M+; Ch 24 for L, L+; Ch 26 for XL and XL+; Ch 28 for 2XL and 2XL+; Ch 30 for 3XL and 3XL+; Ch 32 for 4XL and 4XL+; Ch 34 for 5XL and 5XL+”.
If there is only one number, it applies to all sizes.
*”HDC 10″ means HDC into the next 10 stitches.
*”2 HDC” means place 2 HDC in the same stitch.
*The turning chain ch 1 does NOT count as a stitch.
*Total stitches are indicated between < >.
*This pattern uses US crochet terms.
*This crochet crop top is designed to be form fitting at the bust and at the waist. For best results pick a yarn that has a lot of stretch and will spring back into place. Acrylic, merino and cotton-acrylic blends will work best.
(100% cotton yarns will stretch out but will also lose their shape once you’ve worn your top a few times. They are a good option if you want your crop top to be more of a tank top and with a looser fit).
*Depending on your yarn, the top bust measurement can stretch up to 3” wider than the measurement listed and the top waist measurement can stretch up to 5” wider than the measurement listed.
*This pattern is designed with 2-4” of negative ease at the bust. Meaning if your bust measurement(to fit bust) is 107cm/42” pick size L with a 102cm/40”(top bust).
*You can see that a top with negative ease gives a more form fitting top (Powder Crop Top) while a top with the same bust measurement (Lilac Crop Top) still fits but has a more relaxed fit.
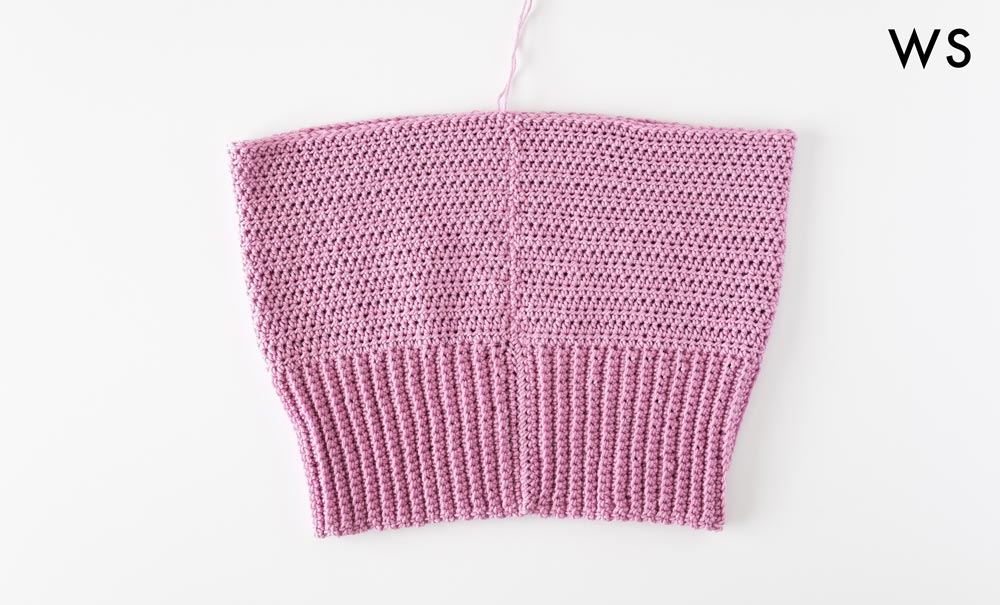
*The crop top starts with crocheting the body ribbing and then the body will be crocheted directly onto the side of the ribbing. The straps are crocheted separately and sewn onto the crop top.
*All pieces are sewn together with the right side (RS) on the inside and the wrong side (WS) facing outwards.
*The length of the top, top ribbing and straps are adjustable. Alteration instructions provided below.
LEVEL: Beginner+
Materials
Yarn – – DK/Light (3), 110m/50g, 120yds/1.75oz, 50% Cotton + 50% Merino, Lilac (4) and Powder (28)
approx. 120(130, 135, 155, 175)(185, 195, 220, 230)(260, 275, 305, 315)(350, 365, 400, 420, 455, 470)g
Scissors
Stitches & Abbreviations
Ch = Chain
Sl st = Slip Stitch
SC = Single Crochet
HDC = Half Double Crochet
BLO = Back Loop
St(s) = Stitch(es)
Rep = Repeat
Measurements (cm):
To fit Bust: 71(86, 81, 86, 91)(96, 102, 107, 112)(117, 122, 127, 132)(137, 142, 147, 152)(157, 162)
Top Bust: 66(71, 76, 81, 86)(91, 96, 102, 107)(112, 117, 122, 127)(132, 137, 142, 147)(152, 157)
Top Waist: 53(58, 62, 66, 70)(74, 79, 83, 88)(92, 97, 100, 104)(109, 113, 117, 121)(126, 130)
Top Length(not including strap): 25(25, 25, 27, 27)(29, 29, 31, 31)(34, 34, 37, 37)(40, 40, 43, 43)(45, 45)
Measurements (inches):
To fit Bust: 28(30, 32, 34, 36)(38, 40, 42, 44)(46, 48, 50, 52)(54, 56, 58, 60)(62, 64)
Top Bust: 26(28, 30, 32, 34)(36, 38, 40, 42)(44, 46, 48, 50)(52, 54, 56, 58)(60, 62)
Top Waist: 21(23, 24.5, 26, 27.5)(29, 31, 32.5, 34.5)(36, 38, 39.5, 41)(43, 44.5, 46, 47.5)(49.5, 51)
Top Length(not including strap): 10(10, 10, 10.5, 10.5)(11.5, 11.5, 12, 12)(13.5, 13.5, 14.5, 14.5)(16, 16, 17, 17)(18,18)
GAUGE: 10cm/4” square = 17.5 stitches wide x 18 rows tall in back loop single crochet /15 stitches wide x 13 rows tall in half double crochet
Blair Crop Top Crochet Pattern
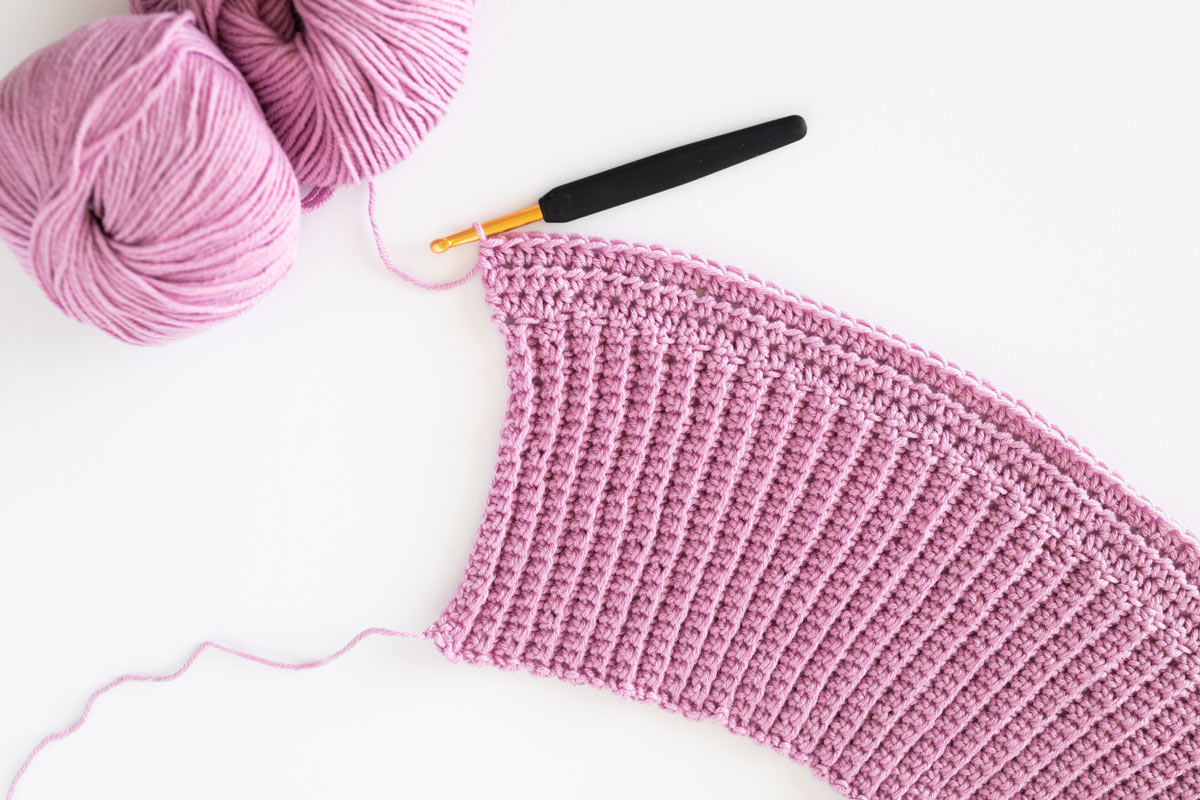
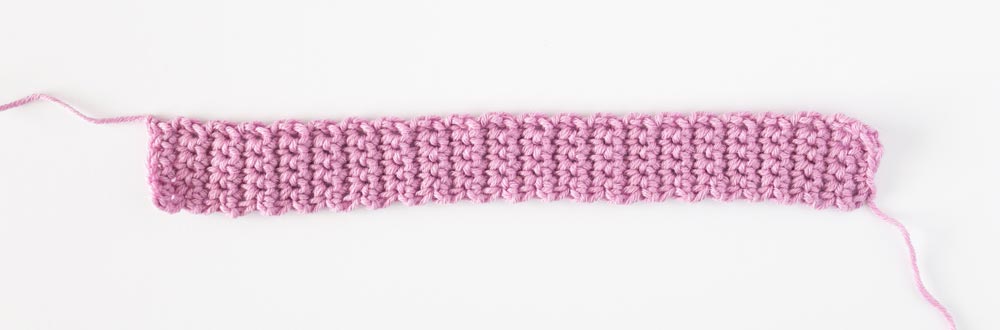
Body Ribbing
FOUNDATION CHAIN: Ch 21(21, 21, 22, 22)(22, 22, 24, 24)(26, 26, 28, 28)(30, 30, 32, 32)(34, 34).
*The foundation chain runs the length of the ribbing, not the width. You can add/remove chains to make the ribbing longer/shorter.
ROW 1: SC into 2nd ch from hook, SC in each ch until end, turn.
<20(20, 20, 21, 21)(21, 21, 23, 23)(25, 25, 27, 27)(29, 29, 31, 31)(33, 33)>
ROW 2: Ch 1, BLO SC across, SC in last st, turn.
<20(20, 20, 21, 21)(21, 21, 23, 23)(25, 25, 27, 27)(29, 29, 31, 31)(33, 33)>
Repeat ROW 2 until ROW 96(104, 112, 118, 126)(134, 142, 150, 158)(166, 174, 180, 188)(196, 204, 210, 218)(226, 234).
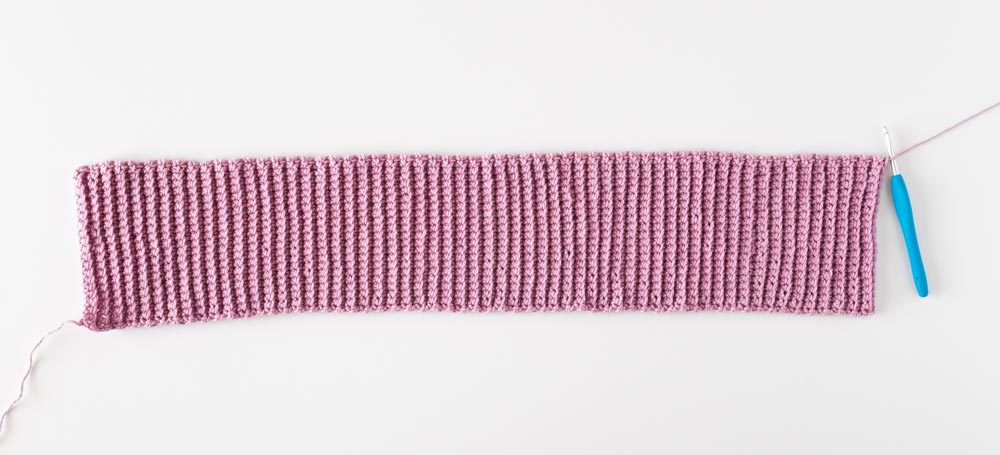
Do not fasten off! We will now work along the long edge of the ribbing band. Each row equals 1 stitch. Proceed to ‘BODY’ instructions.
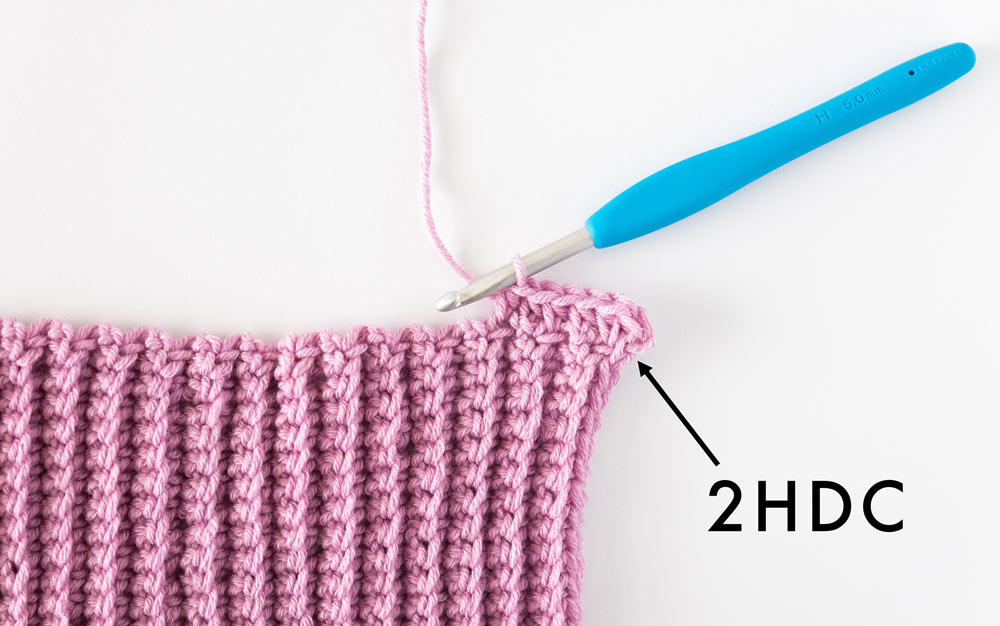
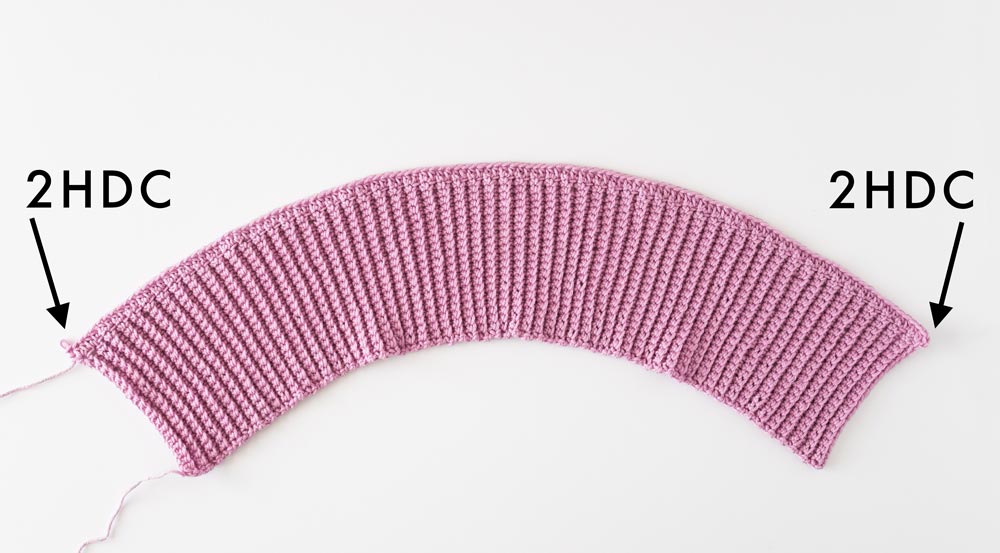
Body
ROW 1: Ch 1, 2HDC in first row, HDC in each row across, 2HDC in last row, turn.
<98(106, 114, 120, 128)(136, 144, 152, 160)(168, 176, 182, 190)(198, 206, 212, 220)(228, 236)>
ROW 2: Ch 1, HDC across, turn.
<98(106, 114, 120, 128)(136, 144, 152, 160)(168, 176, 182, 190)(198, 206, 212, 220)(228, 236)>
Repeat ROW 2 until ROW 18(18, 18, 20, 20)(22, 22, 24, 24)(26, 26, 28, 28)(30, 30, 32, 32)(34, 34).
*You can add/remove rows to make your top longer/shorter.
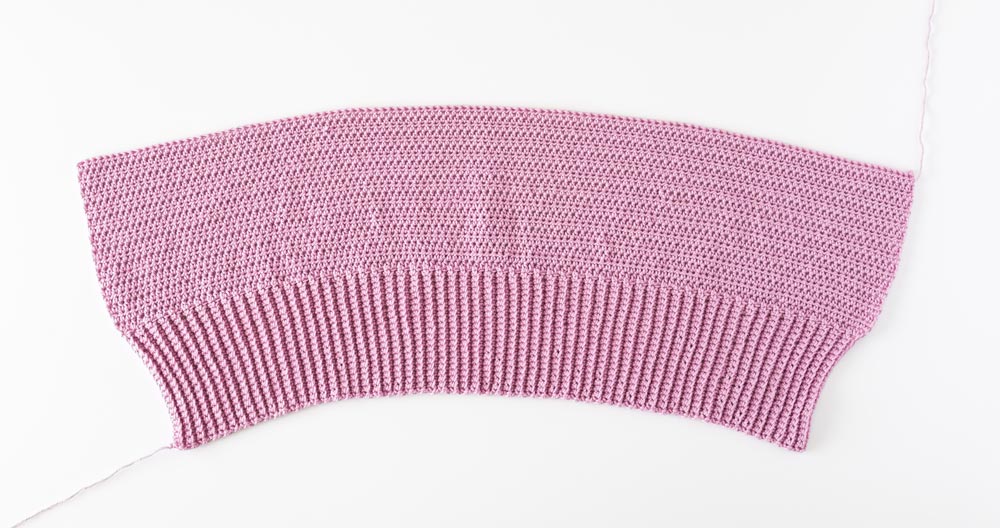
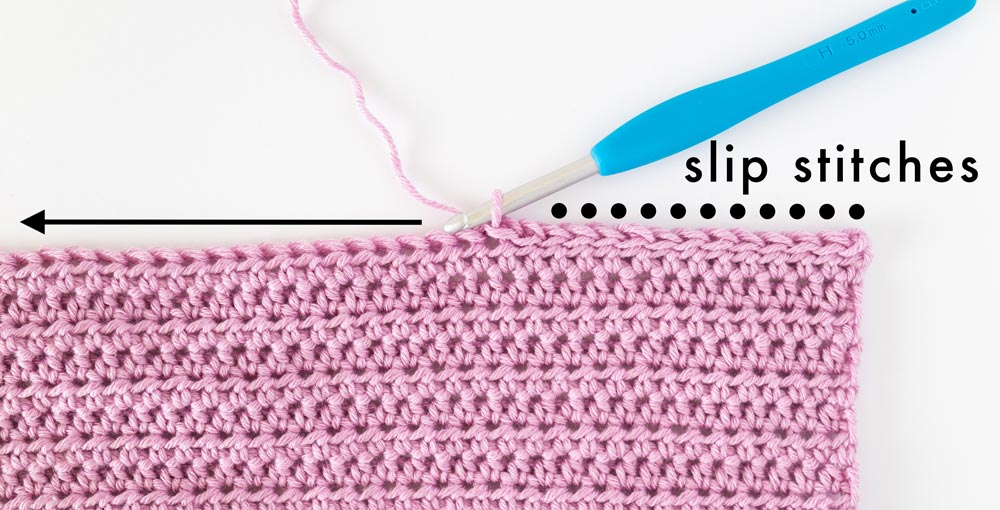
FINAL ROW (RS): Ch 1, sl st in each st across. Fasten off.
<98(106, 114, 120, 128)(136, 144, 152, 160)(168, 176, 182, 190)(198, 206, 212, 220)(228, 236)>
*Keep your slip stitches loose so that your top can stretch as you put it on.
Fold your body panel in half so that the WS is facing you.
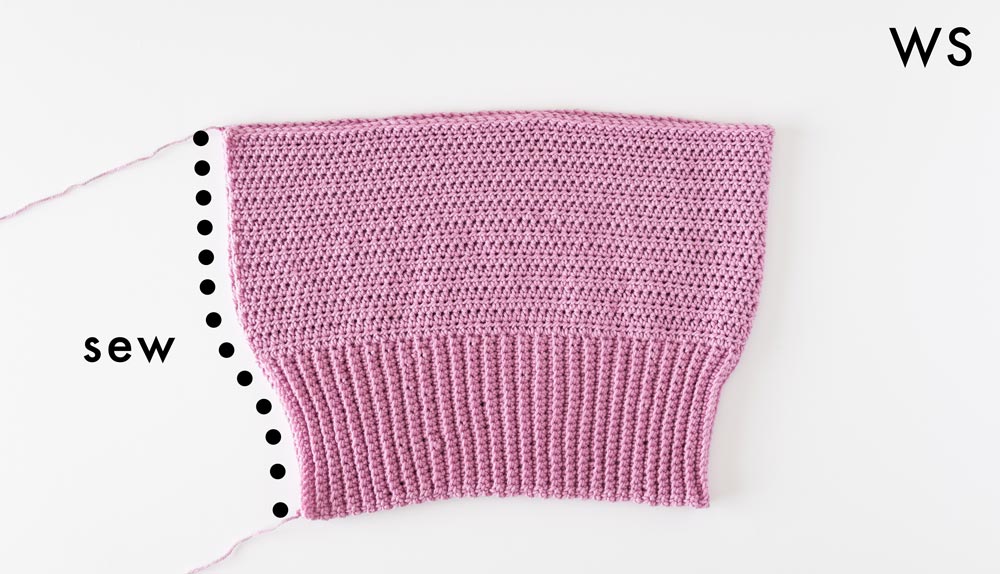
Whip stitch the sides of the top together.
Straps
(make 2)
FOUNDATION CHAIN: Ch 6.
ROW 1: Working into the back bumps of the chain, SC into 2nd ch from hook, SC in each ch until end, turn.
<5>
ROW 2: Ch 1, SC across, turn.
<5>
Repeat ROW 2 until your strap measures 24(24, 24, 25, 25)(26, 26, 26, 26)(27, 27, 28, 28)(29, 29, 30, 30)(31, 31)cm / 9.5(9.5, 10, 10)(10.25, 10.25, 10.25, 10.25)(10.5, 10.5, 11, 11)(11.5, 11.5, 12, 12)(12.5, 12.5)”
Pin your straps in place and try on your garment.
Adjust straps by adding/removing rows to make your straps longer/shorter.
Your straps should fit snuggly as they will stretch out after you’ve worn your top a few times.
Once you’re satisfied with your strap length, fasten off.
Assembly
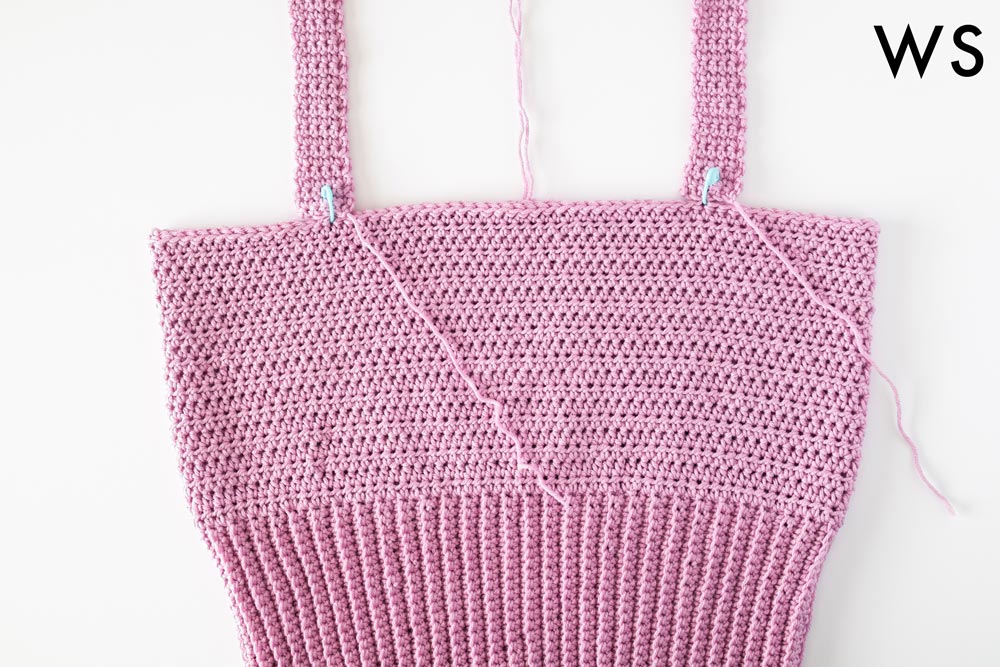
Pin your straps into place.
*I recommend wearing the skin coloured bra you’ll wear under the top while pinning your straps into place. This way you can hide your bra straps underneath the crop top straps.
*As a point of reference, I placed my straps 8cm/3” from the edge of the top.
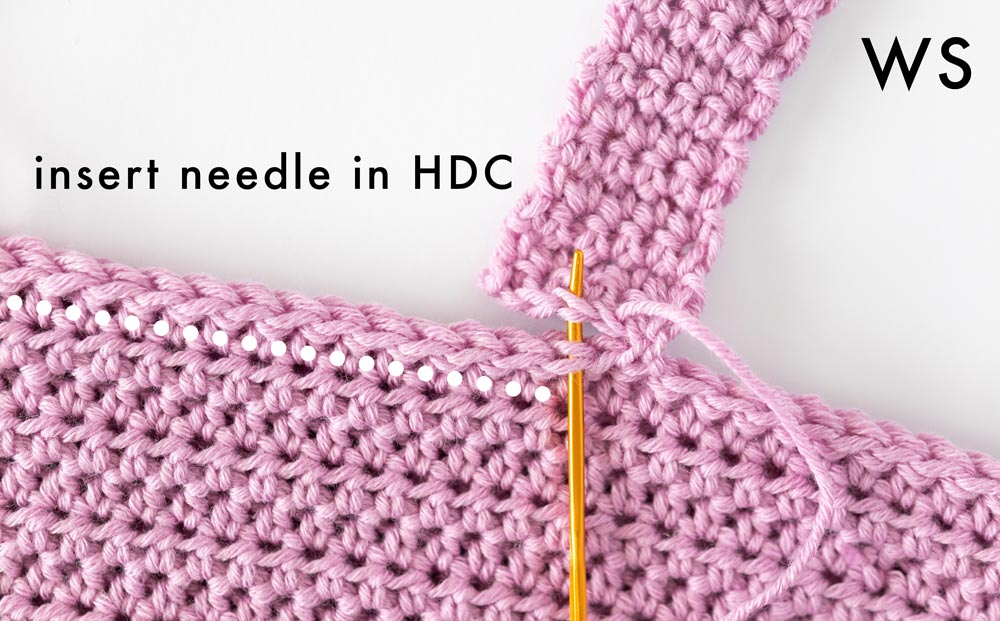
Sew your straps onto your top.
*For a neat finish, only insert your needle through the tops of the last rows of HDCs on the body of the top. Don’t insert your needle into the slip stitch edging. This gives a clean and crisp edge along the right side of the top.


Finishing
Weave in all of your ends.
Voilà! You’ve finished your Blair Crop Top! ?
The post appeared first on .


