Hello, my fellow Remodelaholics! I’m popping in from Shark Tails today to share a project that required minimal spend-age as well as minimal effort and resulted in a huge design pay-off! Isn’t it the best when things work out that way?
Last time I was here, I showed you how to build this using plywood. Today, I’m going to be a little less build-y and a little more crafty: I’m super excited to share this hand stamped accent wall project with you!
This past August, Matt and I found out that we would be welcoming a sixth member to our household in the form of a human child. WHOA. I have never even held a newborn baby before, so as you can imagine I was experiencing paralyzing fear some nerves when it actually started to sink in that we were having a baby.
My initial fear and trepidation was gradually replaced with excitement, and I dove into planning the design for the nursery. Of all the rooms I’ve fixed up or changed in our house, I have to say this is the one I have had the most fun with. Since we’d decided early on we didn’t want to find out the sex, I knew I’d have a bit of a challenge keeping it neutral but still fun and original. I did a lot of perusing my favorite blogs, Instagram, and of course, Pinterest. When I stumbled upon this wallpaper, I knew immediately that I wanted it for the nursery:

Photo via
Seriously you guys — I was obsessed. Unfortunately, as most beautiful things do, it comes with a hefty price tag and after hurriedly doing some math I realized it would cost upwards of $400 for me to do the one wall. I cursed my champagne taste/beer budget self and tried to move on.
But I couldn’t.
So I slapped my DIY cap on and devised a plan that would give me my accent wall without damaging my credit score for years to come in the process.
Watch the video and please subscribe!
See the written tutorial for the brushstroke accent wall .
How to Make a Lunar Phases Hand Stamped Accent Wall
This post contains affiliate links. Learn more and read our full disclosure policy .
I originally settled on stenciling the wall, and ordered stencil from Etsy for about $5. When it arrived, I realized that it would take a looooong time to stencil the whole wall with it, and of course there would be paint bleed to deal with as well. Also, the moons did not end up being as spaced out as I wanted on the stencil, and I refused to settle. After some further brainstorming, I came up with the idea of creating a custom “stamp” made out of sponges. It seemed like the least time consuming option while still being super cheap. I used the stencil to create my stamp.
What you’ll need for this stamped accent wall:
- Clean, bare wall for stamping (freshly painted is optimal)
- Regular household cleaning sponge (number of sponges depends on your stamp design)
- Stencil of your choosing (optional)
- Piece of scrap wood for backing
- Wood glue, sharp scissors, ballpoint pen, measuring tape and ruler
- Paint for stamping
- Flat tray for paint, large enough to accommodate entire stamp
- Scrap cardboard for excess paint
- Level (optional; more on this)

Matt and I had already moved all the junk out and repainted the baby’s room so we had a fresh, white canvas to work with. I started by tracing the different moons onto my sponges (I only ended up using two sponges) with the ballpoint pen and cut out the moons using a pair of very sharp scissors.


After all my moons were cut, I roughly laid them out to determine how long I would need my scrap wood to be and cut it to size. I then found the center on both the x and y axes of the wood using my measuring tape, and drew a grid on the wood using a ruler to make the placement of my sponges easier.


I lined up my sponges on the grid, starting from the middle with the full moon sponge and then working my way outward. I honestly didn’t measure here: I eyeballed it until I had a placement I liked. If you wanted something perfectly exact, though, I would suggest you do some measuring.

Once I was happy with the placement of the moons, I glued them to the wood using wood glue. (***Make sure the side of the sponge that you traced on is facing out — glue down the other side as it won’t necessarily be the perfect “cut out” due to the thickness of the sponge.) Let it dry for at least 25 minutes.

As soon as your sponges are good and stuck, it’s time to stamp! Full disclosure: unless it’s related to safety, I am a “cut all the corners” DIY type. That is to say, I did not use a level or draw any guidelines to help me stay on the straight and narrow while I was stamping, but if you are someone who would be driven nuts by the “imperfectness” of my horizontal lines, then I implore you to use a level. I simply couldn’t be bothered and wanted this to be a one and done type of deal. I was also worried if I tried super hard to make it perfect, any little mistakes would be that much more noticeable. I think eyeballing it made my end result look pretty authentic, but that’s just my humble opinion. Something I did think of halfway through that would have been super helpful was to have stuck my mini level on the top of the stamp, but it was too late by that point. If you are like me, skip the measuring and just jump right in like you don’t have a care in the world!
Ok! I had some black latex Rust-Oleum paint that was leftover from my , so that’s what I used. It was looking a little too black for my liking, so I added in some of the white paint we’d used on the walls until I had achieved the color I wanted.

The first stamp was nerve-wracking and I totally almost chickened out. There is something terrifying about touching freshly painted white walls, amirite? I dipped my stamp into the tray of paint, not pushing down hard at all, and then swirled it around on my cardboard to take off any excess. I wanted it to look a little faded, and also avoid any globs. I started at the top left of the wall, put the top of the wood flush with the ceiling, and lightly pressed….

…not too shabby! I was very nervous and so my shaky hand smeared the stamp a little bit: but it was nothing a damp cloth couldn’t fix right up. The first few rows I took very slowly so I could get the hang of the stamp, how much pressure I should use, spacing, etc.

You DO NOT need to re-dip the stamp in paint every time. Sometimes I was able to do an entire length of the wall without re-dipping, and once I got going, it went quite fast. I think it took me about 2 hours total stamping time, and only that long because I may or may not have made an epic mistake on one of the rows and had to paint over it and wait for it to dry before I could keep going…
Some tips and tricks:
- Keep a damp cloth on hand for any accidents or drips
- Hold the stamp with both hands and eye it up before committing/pressing it against the wall
- Don’t press too hard! Remember it’s a sponge and there is a lot of excess paint accumulating in there
- Every so often, wipe around the sides of your shapes to remove any globs of paint
- Step back and look at the wall often while you’re working to make sure nothing is looking too wonky
- Depending on your pattern, consider staggering it (for example, I lined up my “full moon” under the middle of the two crescent moons when starting a new row)
- Have fun with it and don’t get too finicky or hung up on imperfections — once the entire wall is done and you’ve got things moved into the room it’s gonna look baller, I promise!
When you get to the end of a row, there will be a lot of instances where you can’t fit your stamp. That’s ok. Leave it to the end.

When the entire wall was done (save for the ends) I carefully peeled the shapes off my wood block and finished the rest by hand.


It took about ten minutes tops to finish the ends. Just make sure you’re paying attention and stamping the right pattern.
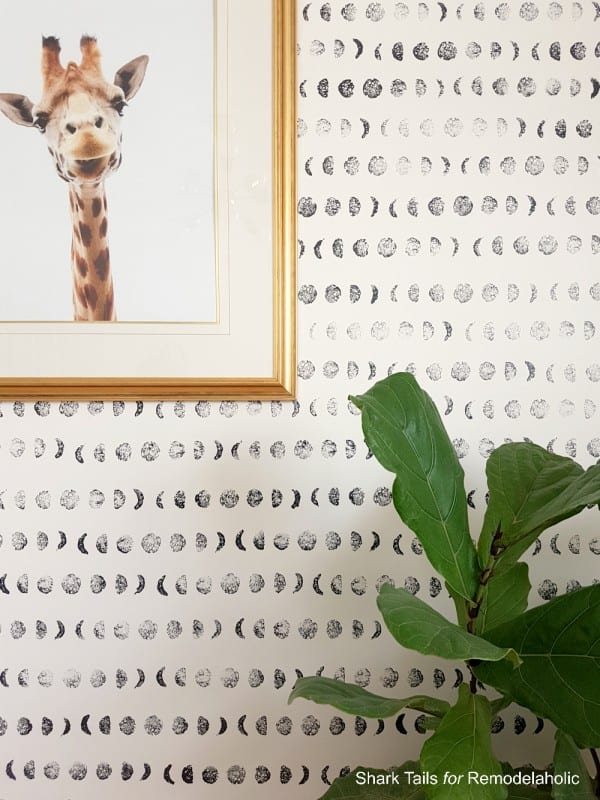
I cleaned up my mess (I definitely stepped off the step ladder into an open can of paint at one point so) and stood back to admire my work. It’s obviously not as perfect as the actual wallpaper would have been, but I looooooove it!

Guys. $15 vs $400 — what do you think? Personally I couldn’t be more stoked. It turned out better than I ever could have imagined and was SO CHEAP! Also it was quick AND easy — it took a bit of finesse and patience, but I do believe that this project is something anyone with a little DIY experience could do. It took one afternoon and the payoff is huge: the perfect statement wall for our neutral little nursery! If you’d like to see how the room turned out once we moved in the furniture and added some finishing touches, you can see the whole nursery reveal .


I love that this project is so versatile: you could do so many different patterns and designs to suit any style and it’s not a huge investment (I spent a whopping $15!) depending on the supplies you have on hand.


We’d love to see your versions of this fun DIY, so be sure to share them with us if you decide to embark on your own stamping journey!
More DIY painted accent walls:
The post appeared first on .


