Hi all — I’m back visiting from again, and as always, stoked to be here. I can’t believe it’s been a year since I became a contributor at Remodelaholic: I have enjoyed absolutely every minute of it! Some of the recent projects I’ve shared include this , and this simple made from plywood and nylon clothesline.
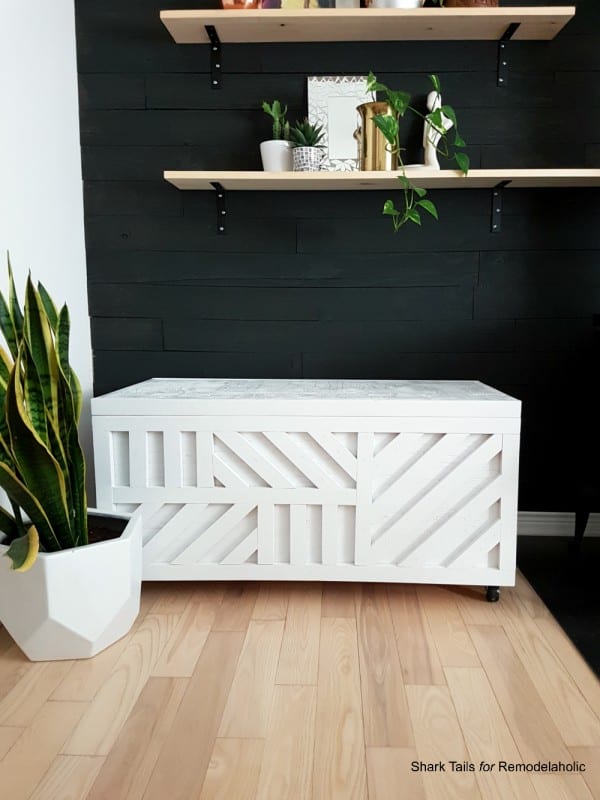
It feels great to be back sharing another project with you all that I am really excited about! It’s the perfect project for those of you who are just getting started with this whole “building” thing, and want to get some practice with the mother of all DIY furniture tools: the Kreg Jig. Without further ado, I give you, my DIY plywood storage box:
A little backstory here: we live in eastern Canada and the winters here are pretty brutal. Two years ago we had a wood stove put in and it is the best decision we EVER made. I’m telling you guys: there is nothing like quite like wood heat when there’s six feet of snow outside and you’re debating moving to Hawaii permanently. I honestly think in the thick of January-February-March, I would have a hard time choosing between my wood stove and my husband. (It would be a tough choice, that’s all I’m saying.)
Wood stoves don’t come without their cons, though. Namely, all that wood can get pretty messy, especially when you’re up and down the basement stairs a few times a night lugging armfuls of the stuff. We had been using a sad little metal holder that had a nylon hammock type thing, but it wouldn’t hold more than a few hours worth of wood, and more importantly, it was hideous. It was also quite messy, as there were only two sides to it and I was constantly having to sweep up bark and wood crumbs. When Matt and I were thinking up projects for my next Remodelaholic post, he had the brilliant idea that I come up with a proper storage solution for the wood.
I briefly dabbled with the idea of open shelves up one side of the wall, which I have seen done and looks really awesome. My practical side won out though (this rarely happens) when I realized that would still be pretty messy, and would only look good if the shelves were kept constantly filled.
I settled on a basic storage box made out of 3/4″ plywood and 1″ x 2″ pine trim. I had so much scrap wood from other projects lying around in our garage, and this seemed like a great opportunity to use some of it up.
How to Build a Plywood Storage Box for Firewood
Materials and Tools:
- 3/4″ plywood (one sheet)
- 8′ pine 1″ x 2″ trim (five — more if doing decorative inlay)
- Circular or table saw
- Mitre saw
- KregJig pockethole system and 1 1/4″ screws
- Finish nailer and 1 1/2″ finish nails
- Clamps
- Wood glue
- Stainable/paintable wood filler
- Random orbit sander and 120 grit paper
- Paint or stain
- 3/4″ piano hinge (35″ long) and hardware
- 4 heavy-duty lockable casters (optional) and hardware
Plywood cut list
- 2 – 16″ x 38″ (two side pieces)
- 2 – 16″ x 16″ (two end pieces)
- 1- 16″ x 36.5″ (bottom piece)
- 1- 17.5″ x 38″ (top piece)
Trim Cut List
- 14″ (4 pieces)
- 16″ (8 pieces)
- 36 1/2″ (4 pieces)
Building Instructions
As mentioned above, I used wood that I already had in the garage. The plywood I used was super rough spruce, but if you wanted this piece to have a more finished, high quality look, it might be worth it to splurge on some nicer quality birch or something similar.
You can always have the hardware store cut your plywood to size for you, but if not, use a table saw or circular saw to cut your pieces to the proper dimensions. Full disclosure: I do not like using the table saw. I don’t really have the set-up to handle large sheets of wood, and I find I am just not that accurate with it. If you’re like me, you can easily make these cuts using a straight edge and a circular saw. (Mine is a little mini-one that can cut up to 1 1/4″ material and I am obsessed with it!)

After cutting all of your plywood pieces to the proper dimensions, drill 3/4″ pocket holes into the parallel sides of the two 16″ x 16″ end pieces using your KregJig.

Once you’ve drilled your pocket holes, attach the 16″ x 16″ square pieces to the 16″ x 38″ long rectangular side pieces with wood glue and 1 1/4″ pocket hole screws.

After attaching all the side pieces together, you should have a nice, bottomless box.

You’re now ready to attach the 16″ x 36 1/2″ bottom piece. Drill 3/4″ pocket holes all around the perimeter of the board.

Using wood glue and 1 1/4″ pocket hole screws, attach the board flush inside the bottom of the box.

I had my pocket holes facing the underside of the box to make attaching this piece easier, since you won’t see them anyway.
It’s time to trim out the box using 1″ x 2″ pine to hide those plywood edges. Cut the trim to length using your miter saw and attach flush to the ends of the box using wood glue and 1 1/2″ finish nails.

Once you’ve attached the trim to both ends of the box, you’re going to trim out the front and back of the box the same way, lining the trim up flush with the trim pieces on the side. (This means your trim will overlap your plywood by about 3/4″.) Use wood glue and 1 1/2″ finish nails.


Now that you’ve trimmed out the box, it’s time to trim the the lid. Simply attach 1″ x 2″ trim flush with the edge of your 17 1/2″ x 38″ piece of plywood using wood glue and 1 1/2″ finish nails.


And here is your lidded, trimmed out storage box in all its glory:


At this point, you can either leave the box as is and move on to the finishing touches, or you can jazz it up a bit with some inlay. I had a lot of extra trim lying around, and I felt the box needed a certain something. I decided to do a patterned inlay.
For the inlay, I played around as I went. I started with the 90 degree vertical and horizontal pieces, and then to fill the empty space I used my miter saw to cut a variety of trapezoids and parallelograms at 45 degrees to achieve the look I wanted, dry fitting them into place before attaching them with wood glue and finish nails. I did this on the front and both ends, but left the back as is because no one will ever see it and I was running low on trim!
Sometimes flying by the seat of your pants totally pays off.

Fill in all the nail holes and gaps with wood filler, allow it to dry, and sand to a smooth finish using 120 grit sanding pads and an electric sander.

After you’ve sanded the entire piece (bottom and lid), wipe off any debris with a tack cloth and stain or paint as desired. I had just gotten a spray-nozzle that attaches to your spray paint cans (supposedly eliminating “finger fatigue”) that I was dying to try, so I decided to go the spray paint route. I used Rustoleum paint and primer in one in the semi-gloss white.

I have to say, that little nozzle worked amazingly well. Best $10 I ever spent. If you do a lot of spray painting, I suggest you invest in one of these little guys!
It took almost three cans of paint to get the coverage I wanted on the box and lid, and of course I allowed it to dry for just enough time (I need to work on my patience) so I could handle it without the paint completely rubbing off. I recommend you let it dry for at least 24 hours, though. 

The next step is totally optional: once the paint is “dry”, add four heavy duty lockable casters to the bottom of the box. I did this so we can easily wheel it in and out of place if we want.

Phew! Almost done you guys. The final step is to attach the lid to the bottom using a 36″ x 3/4″ piano hinge and appropriate hardware (they usually come together). I had to manually use my good old fashioned screwdriver for this, since someone (Matt) has misplaced my small square drill bit.
Line the hinge up flush with the edge of the top and secure with a screw on each end. I didn’t put all the screws in until I attached the top to the hinge as well, to make sure everything was lined up nicely.


Ok, now you’re done! How does it feel? I’ll tell you it felt pretty good to me! I had my dad help me move it inside to its new home by the stove so I could surprise Matt when he got home from watching football with his dudebros.

I am pretty pleased with how nicely this turned out even though I used junky plywood scraps that have probably been in the garage since 2013. If this were going to be used for something like toys, blankets, etc, I would have put a lot more care into the finish work, however for its intended purpose and the wear and tear it’s going to have to put up with, I didn’t want to get too hung up on the tiny details.

I love how much wood this bad boy holds! I was considering adding lockable hinges on the inside to keep the lid from slamming down, but it doesn’t seem necessary. I would probably invest in a pair if this were a toy box where little fingers would be, though.

Matt has already requested a handle be added to the top to make opening and closing the lid easier. I was thinking a leather strap might look nice. Thoughts?
I love that it’s also now another place for me to style throw pillows! (I may or may not have a throw-pillow related-problem…)

And while we’re at it, why don’t we go ahead and throw a plant on there as well?

This is such a step up from the old metal eyesore we were using and I love how functional and versatile it is. Obviously it will be hard to keep things “styled” on top of it during the winter when we’re constantly opening and closing it, but for the other three weeks of the year (ha!) it’s the perfect place for some pretty decor, in my humble opinion.


Our living room still has a long ways to go, but it’s come pretty far from where we began. Last summer, I , which did wonders for the space and made it feel much lighter.


It’s been pretty chilly at night so we’ve already been getting lots of use out of the wood stove.

As always, if you decide to tackle this project yourself, don’t forget to share and tag #imaremodelaholic so we can see your beautiful work!
More storage-friendly one-sheet plywood projects:
The post appeared first on .


