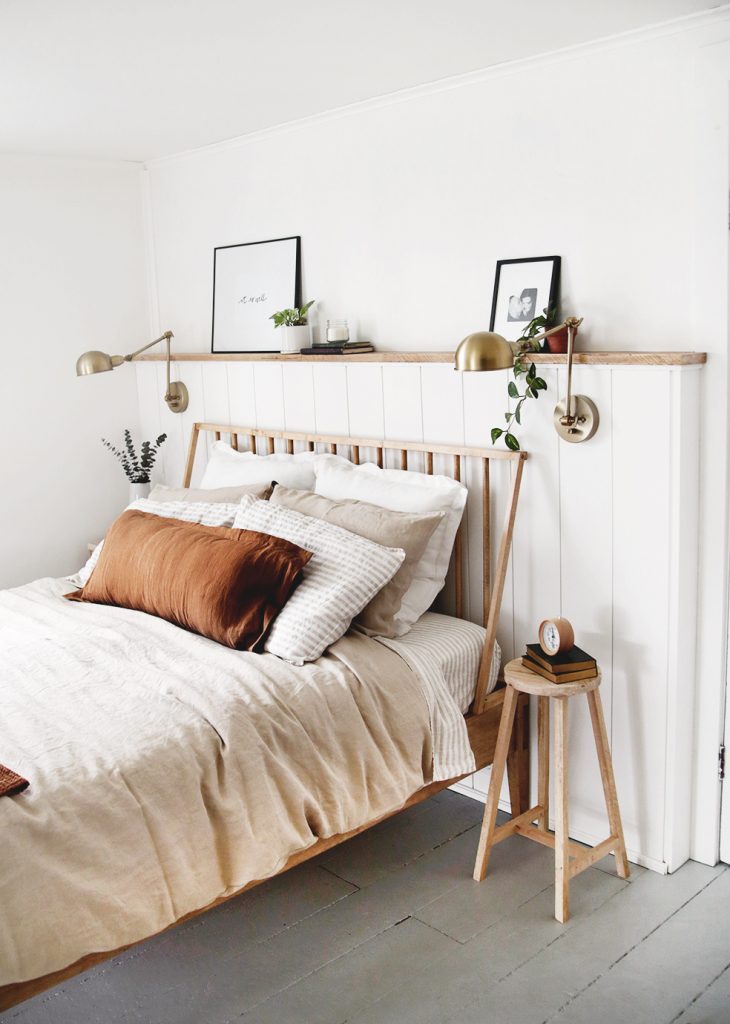
After doing an in Lincoln’s bedroom last year, I thought it’d be fun to try some kind of accent wall in our room during our . I originally had thought about just doing a full wall of vertical boards (umm, I’m loath to call it a shiplap wall, even though that’s what it is – it just feels like that word became way overblown, but it’s a common wall treatment in old farmhouses, which is what we have! We have a similar wall in one of our bathrooms that’s been there since before Fixer Upper was even a thing… not knocking the show, I love Chip & Jo!), but I also wanted a shelf on that wall too, so we ended up combining the two into one! I love that this vertical board accent wall is still simple, but brings a bit of texture and dimension into the space! Having a shelf like this is perfect for being able to rearrange artwork as wanted without having to constantly put holes in the wall and then have to fill them.


Supplies Needed for Wall:
- table saw
- mitre saw
- measuring tape
- compressor and nail gun
- drill and screws
- 2×4’s
- wood board for top shelf
- level
- sandpaper
- clear polyurethane finish (or any finish you want to use)
- trim pieces, optional (for under shelf and along baseboard)
- nail hole filler
- paint
.jpg)
.jpg)
.jpg)
How to build the accent wall:
Measure the wall where the half wall will be located, determine the total length of the half wall.
Determine how tall the wall will be. We wanted our wall to be 54” tall to the top of the shelf. To determine the length of the top and bottom 2×4’s, take the total length of the wall, minus the 3/4” board that will go on the end.
Using the mitre saw, cut two 2×4’s to this length.
Next determine the length of the end and middle upright 2×4’s. To get this measurement, subtract 3-3/4” from the height; this is the thickness of two 2×4’s and the thickness of the top shelf board (ours ended up being 50-1/4”). From your 2×4’s cut three pieces this length.
To determine the length of the cross pieces, take the length of your top 2×4 and subtract the thickness of three 2×4’s (4-1/2”). From your 2×4’s, cut four pieces to this length.
On a flat surface assemble the frame of the wall. Using screws, attach the two end 2×4’s to the top and bottom 2×4’s, keeping them flush with the ends. Measure and mark the middle of the top and bottom 2×4’s and attach the middle 2×4 at this location. Measure the upright 2×4 and divide this length by 3, mark your uprights at these locations. Using screws attach the horizontal 2×4’s at these locations (we offset the 2×4’s on one side for ease of screwing them in).
Set the frame up against the wall in the desired location. Use a level to make sure the frame is level; if needed use shim(s) to level. Find the location of the studs in the wall you are attaching the frame to. Using screws attach the frame to the wall, screwing through the top and bottom 2×4’s into the wall studs.
Measure the width of a shiplap board to determine the amount that is exposed when they are placed together. Divide the length of the top 2×4 by this number to determine if you will need to cut the first piece narrower in width so that you will end up with a piece at the other end that is an ok width; and to determine how many boards you will need to cover the wall.
Using the mitre saw, cut the number of shiplap boards needed to length (ours were 53-1/4”). Using the compressor and nail gun, begin attaching the boards starting at the wall end.
Check with a level to determine if the first board is plumb, in our old house it was not. If it is not plumb, hold it next to the wall in a plumb position and draw a line on the board that is even to the line of the wall. Use table saw to cut to this line (or a jig saw if the line is not straight). Attach the first board nailing through the tongue of the board and through the face of the board on the opposite side at each horizontal 2×4.
Continue attaching boards until you reach the end board. Place this board in position and draw a line on the back of the board along the end 2×4. Cut to this line using the table saw. Attach this board and measure from the back of the frame to the front of this board and cut a piece that is this width and 53-1/4” long from a shiplap board. Attach this board using the nail gun.
Determine how much you want your shelf board to stick out from the wall; make sure to include the thickness of the trim piece that will run under the shelf if you’re using one. Add this number to the length of the wall, this is the length of the shelf board. Measure from the back wall to the front of the half wall and add the number, this will give you the width of the shelf board. Use the table saw and mitre saw to cut the shelf board to this size.
Sand and apply finish to the shelf board.
Using the nail gun, attach the shelf board to the wall. Cut and attach under shelf trim piece and baseboard trim if desired. Fill nail holes and paint wall.


You can see the whole bedroom makeover ! And yes, they’ll still be more DIYs from this space coming up, whether you’re sick of seeing it or not  , so keep an eye out for those!
-Manda
sources:
– DIY | – c/o Magic Linen | – c/o Magic Linen | – c/o Magic Linen | – c/o Magic Linen | – Target | Nightstand – DIY coming soon | Wood Stool Nightstand – DIY coming soon | – Lamps Plus | – Convivial Production | – Michaels | – our Etsy Shop | – Amazon | : Benjamin Moore Simply White
The post appeared first on .


