Hey there Remodelaholics! Scott here with back again to make some more sawdust with you. This time we’re building a solid wood nightstand – no plywood in this baby! This nightstand features angled legs, a storage shelf and a deep drawer for lots of storage. Window/door casing moulding is used to make the face frame and gives this project a thick, chunky look.


This new wood nightstand hints at that retro look, but different from the Mid-Century Modern nightstand that was made entirely with plywood, this piece is made almost entirely of solid wood. Not only does it look chunky, but it’s HEAVY too!

The drawer is deep and the drawer bottom is the only piece of this project that isn’t made with solid wood.

You won’t run out of storage with this nightstand. In addition to the deep drawer, the shelf above the drawer is perfect for storing books, magazines, reading glasses, remotes, phones and more.

DIY Chunky Solid Wood Nightstand
to see Scott’s step-by-step photo tutorial

This post contains affiliate links for your online shopping convenience. Learn more and read our full disclosure policy .
Supplies
- (1) 1x2x6
- (2) 1x3x8
- (1) 1x4x6
- (1) 1x8x8
- (3) 5/4x3x8
- (4) 5/4x4x8
- (1) Pine Casing Moulding 11/16″ x 2-1/2″ x 8′
- 2’x4′ hardboard
- 1-1/4″ wood screws
- 3″ wood screws
- 1-1/2″ pocket screws
- 1-1/4″ brad nails
- 1/2″ pin nails
- 1″ pin nails
- Wood glue
- 14″ Full Extension Ball Bearing Side Mount Drawer Slides (such as )
- Knob
Tools
- Tape measure
- Miter saw
- Table Saw
- Kreg Jig
- Brad nailer
- Pin nailer
- Countersink drill bit
Note: For the 5/4 boards, set your Kreg Jig for 1-1/8″ material.
Step 1. Make the Side Panels.
Cut 6 pieces of 5/4×4 to 14-1/2″ and 4 pieces of 5/4×3 to 14-1/2″. Drill one pocket hole in each end of the side pieces. Take three of the 5/4×4 pieces and set one in the middle and one on each end. Take two of the 5/4×3 pieces and set them between the 5/4×4 pieces. Mark the locations for pocket holes to join the pieces together. (Hint: I drew a large triangle on the same side as the pocket holes, so it would be easy to reorient the pieces in the same locations). Drill pocket holes at the locations you marked. Apply glue to the edges of the side pieces, clamp and attach using 1-1/2″ pocket screws. Repeat for the other side panel.

Step 2. Make the Side Rails.
Rip a 5/4×4 to 1-1/4″ and cut 4 pieces to 15-1/2″.

Apply glue to the rails, clamp to the side panel and attach using 1-1/2″.

Step 3. Make the Top, Bottom and Middle Panels.
Cut 9 pieces of 5/4×4 to 23-5/8″ and 6 pieces of 5/4×3 to 23-5/8″. Drill two pocket holes in each end of the 5/4×4 pieces. Take three of the 5/4×4 pieces and set one in the middle and one on each end. Take two of the 5/4×3 pieces and set them between the 5/4×4 pieces. Mark the locations for pocket holes to join the pieces together. (Hint: I drew a large triangle on the same side as the pocket holes, so it would be easy to reorient the pieces in the same locations). Drill pocket holes at the locations you marked. Apply glue to the edges of the side pieces, clamp and attach using 1-1/2″ pocket screws. Repeat for the other two panels.

Step 4. Assemble the Carcass.
Place the bottom on your workbench. Apply glue to the sides and clamp. Flip over and be sure the bottom is flush with the bottom of the sides. Attach using 1-1/2″ pocket screws. Apply glue to the edges of the top, place in position and be sure the top is flush with the top of the sides. Clamp and attach using 1-1/2″ pocket screws. Do not install the middle panel.

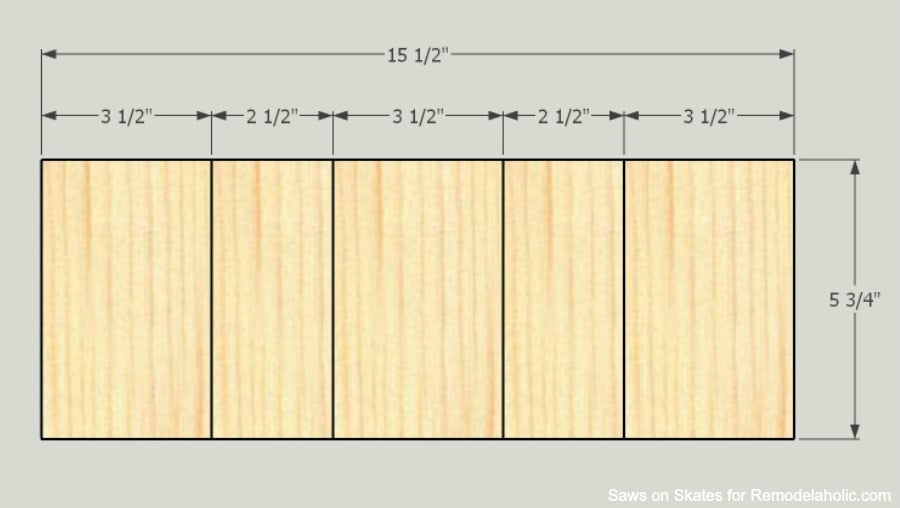
Step 5. Make the Inside Shelf Panels.
Cut 6 pieces of 1×4 to 5-3/4″ and 4 pieces of 1×3 to 5-3/4″. Take three of the 1×4 pieces, set one in the middle and one on each end. Apply glue to the edge of two 1×3 pieces, set them between the 1×4 pieces and clamp until dry. Repeat for the other shelf panel.
Step 6. Install the Inside Shelf Panels.
Sometimes widths of wood can vary, so it’s a good idea to dry fit the shelf panels making sure they fit properly. Trim to fit if it’s too long. If the shelf panel is too short, place it so that it’s flush with the front of the carcass. Apply glue to the shelf panel, clamp in position and let dry. Repeat for the other shelf panel.

Step 7. Install the Filler Pieces.
Cut 1 piece of 1×2 to 23-5/8″ and 1 piece of 1×2 to 22-1/8″. Apply glue to the 23-5/8″ piece, place at the bottom front of the carcass and attach using 1-1/4″ brad nails. Apply glue to the 22-1/8″ piece, place at the top front of the carcass and attach using 1-1/4″ brad nails.

Step 8. Install the Face Frame.
Using a table saw, rip the casing moulding to 1-7/8″. Cut a 45 degree angle on one end of the moulding. Place on the front of the carcass and mark the other end. Cut a 45 degree on your mark. Test fit and adjust if necessary. Apply glue and attach with 1″ pin nails. I also used some painter’s tape to secure the moulding while the glue dried. Cut a 45 degree angle on one end of the moulding. Place against the moulding you just installed and mark the other end. Cut a 45 degree angle on your mark. Test fit and adjust if necessary. Apply glue and attach with 1″ pin nails. Continue working around the sides until all of the moulding is installed.

Step 9. Sand, Stain, and Polyurethane.
I’m sure you noticed we haven’t installed the middle shelf yet. If we had, it would be very difficult to properly sand, stain and apply polyurethane to the shelf area. Before we go any further, let’s do a little finishing work. There were a few areas on the nightstand with some small gaps, so I whipped up a batch of my two ingredient and filled the gaps. Then I sanded the nightstand smooth, applied a dark walnut stain and three coats of polyurethane.
Step 10. Cut the Legs.
Let’s get a head start on the legs, while the stain and poly are drying on the carcass. The legs are made from 5/4×3″ wood with parallel 10 degree angles. To make the angle, set your miter saw to 10 degrees and make a cut. Leave the piece on the saw and measure 7-1/8″ from the edge of the cut you just cut. Next, slide the piece so the mark you made corresponds with the saw blade and make the cut. Repeat for the other legs.

Step 11. Cut the Long Leg Stretchers
Cut a piece of 5/4×3 with a 10 degree angle. Measure 19-3/16″ across the bottom and make a 10 degree cut. Drill 2 pocket holes in each end of the stretchers.

Step 12. Cut the Short Stretchers
Cut 2 pieces of 5/4×3 to 11-7/8″ and drill pocket holes in each end.

Step 13. Make the Leg Assemblies.
Apply glue to the ends of the short stretcher and place on your workbench. Place a leg on each side so that the legs are pointing towards you. Clamp in position and attach using 1-1/2″ pocket screws. Repeat for the other side.

Place the long stretchers and leg sub assemblies on your workbench. Apply glue to the long stretchers, clamp to leg sub assemblies and attach using 1-1/2″ pocket screws. Prime and paint the legs.

Step 14. Install Middle Shelf.
Place the carcass upside down on your workbench. The middle shelf might be tough to get in, so you can apply a little candle wax to each end of the shelf. Slide the shelf in position, clamp to your workbench and attach using 1-1/2″ pocket screws.

Step 15. Make the Drawer Slide Supports.
Cut 3 pieces of 1×4 to 6″ and 2 pieces of 1×3 to 6″. Take the 1×4 pieces, set one in the middle and one on each end. Apply glue to the edge of two 1×3 pieces, set them between the 1×4 pieces and clamp until dry. Once the glue is dry, rip to 2-1/2″ on the table saw.

Step 16. Install the Drawer Slide Supports.
Sometimes widths of wood can vary, so it’s a good idea to dry fit the drawer slide supports making sure they fit properly. Trim to fit if it’s too long. If the drawer slide support is too short, place it so that it’s flush with the front of the carcass. Place a scrap piece of 1x wood on the bottom of the carcass. Apply glue to the drawer slide support, place on top of the scrap and attach using 1-1/4″ brad nails. Repeat for the other drawer slide support.

Step 17. Make Drawer Box.
Before making the drawer box, check the instructions of your drawer slides. My drawer slides require 1/2″ space on either side of the drawer box, so my drawer box needs to be 1″ narrower than the carcass opening. Adjust your drawer box dimensions if necessary.
Cut the front and back. Cut 2 pieces of 1×8 to 19-5/8″ and rip to 6-1/2″. Drill pocket holes in each end. Cut the sides. Cut 2 pieces of 1×8 to 14″ and rip to 6-1/2″. Apply glue to the ends of the front and back, place the sides and clamp. Attach using 1-1/4″ pocket screws.

Check the dimensions of the drawer box and cut the bottom from 1/8″ hardboard. My drawer box bottom measured 21-1/8″ x 14″. Apply glue to the drawer, place the bottom and attach using 1/2″ brad nails.

Step 18. Install Drawer Slides.
Install the drawer slides according to the manufacturer’s instructions.
Step 19. Make Drawer Front.
Measure the drawer area opening. We want 1/8″ clearance on each side of the drawer front, so deduct 1/4″ from your top to bottom dimension and deduct 1/4″ from your side to side dimension. My drawer front measured 21-7/8″ x 6-7/8″. Adjust your drawer front if necessary. Cut a 1×8 to 21-7/8″ and rip to 6-7/8″.

To locate the knob location, use a straight edge to draw a line from corner to corner. Drill a hole slightly larger than the screw that came with your knob.

Place a few pieces of scrap 1/8″ hardboard on the bottom of the drawer opening and each side. Place the drawer front in position and drill a hole through the drawer front into the drawer box. Attach the knob and using the hardboard, be sure the drawer front is centered in the drawer opening. Remove the drawer, drill countersink holes and attach the drawer box to the drawer front using 1-1/4″ wood screws. Sand, stain and apply poly to the drawer front.

Step 20. Attach the Legs.
Center the legs on the carcass and clamp in position. Drill countersink holes in the leg stretchers and attach using 3″ wood screws.

Thank you for stopping by to check out my DIY Chunky Solid Wood Nightstand. Which do you prefer, the or the Chunky Solid Wood Nightstand? Cast your vote in the comments!
Pin this to save it for later
More DIY nightstands with building instructions:
The post appeared first on .


